
オンラインカレンダーで訪問者が参加予定を素早く見つけやすくするには、効果的な整理が鍵となります。これを実現する強力な方法の一つは、カレンダー内でフィルターを適切に設定し、活用することです。 Timely ソフトウェアを使用して、WindowsXNUMX XNUMXビット上で動作する XNUMXTB RAID XNUMX を備えたデスクトップ コンピューターで録画されます。
このガイドでは、フィルターとタクソノミーを使ってカレンダーを整理するプロセスを詳しく説明します。カテゴリーやタグの追加から、会場や主催者の管理まで、必要な機能をすべて網羅しています。さあ、カレンダーを最適化してみましょう!
1. イベント フィルターと分類法を使用する理由
ユーザーフレンドリーで操作しやすいカレンダーを作成するには、効果的な整理が鍵となります。これを実現する最も効果的な方法の一つは、フィルターとタクソノミーを設定して活用することです。
イベントをカテゴリ、主催者、会場などのタグで分類することで、ユーザーはイベントをすばやく検索、閲覧し、エクスペリエンスをカスタマイズできるようになります。
これにより、ナビゲーションが改善されるだけでなく、カレンダー全体をスクロールすることなく関連イベントを簡単に見つけられるため、エンゲージメントも向上します。さらに、フィルターはカレンダー内でクリック可能なリンクとして機能するため、ユーザーは自分の好みに基づいて類似のイベントを効果的に検索できます。
イベント主催者にとって、フィルターはカレンダーに構造と一貫性をもたらし、すべてのイベントを明確かつプロフェッショナルな方法で表示することを可能にします。カテゴリーやタグの追加から会場や主催者の管理まで、フィルターはカレンダーを最適化し、可能な限り直感的に操作するためのツールを提供します。
2. フィルターを追加するには?
カレンダーのフィルターにアクセスするには、次の簡単な手順に従います。
- あなたにログインする Timely アカウント 左側のメニューをナビゲートします。
- オプション内で、「フィルター」オプションを見つけてクリックします。
新しいセクションが開き、カテゴリー、タグ、会場、主催者など、すべてのフィルターオプションが表示されます。それぞれの分類について詳しく見ていきましょう。
2.1カテゴリー
ユーザーがイベントをすばやく見つけられるように適切なカテゴリを実装することで、カレンダーの閲覧エクスペリエンスを合理化します。
カテゴリーを追加するには、緑色の「+アイテムを追加」ボタンをクリックします。右側のパネルに新しいセクションが表示され、新しいカテゴリーを作成できます。
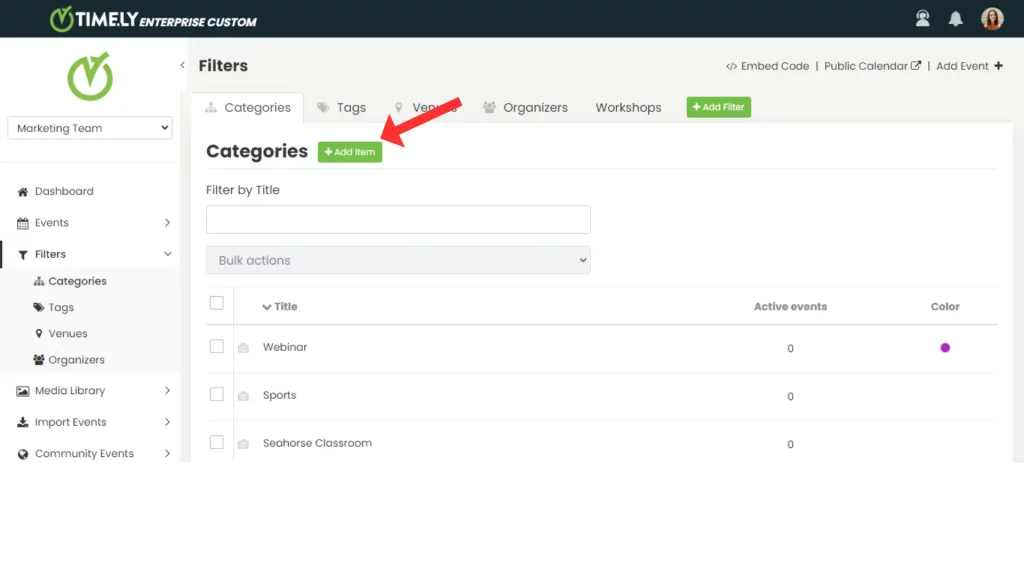
まずカテゴリー名を入力してください。関連する画像を追加したり、独自の色を選択したりすることで、カテゴリーをカスタマイズすることもできます。

カテゴリに画像を追加すると、この分類法の効果を最大限に高めることができます。選択した画像は、そのカテゴリのイベントでおすすめのイベント画像がない場合に、デフォルトの画像として使用されます。

さらに、カテゴリの色を選択すると、イベントのタイトルが視覚的に魅力的な方法で表示され、公開カレンダーが目立つようになります。

2.2.タグ
イベントの整理と検索性を高めるには、タグを追加してください。 Timely アカウント。新しいタグを追加するには、緑色の +アイテムを追加
右側のパネルに新しいセクションが表示され、タグを作成できます。イベントを表すキーワードを入力します。クリックしてください。 Save 新しいタグをフィルターに追加します。

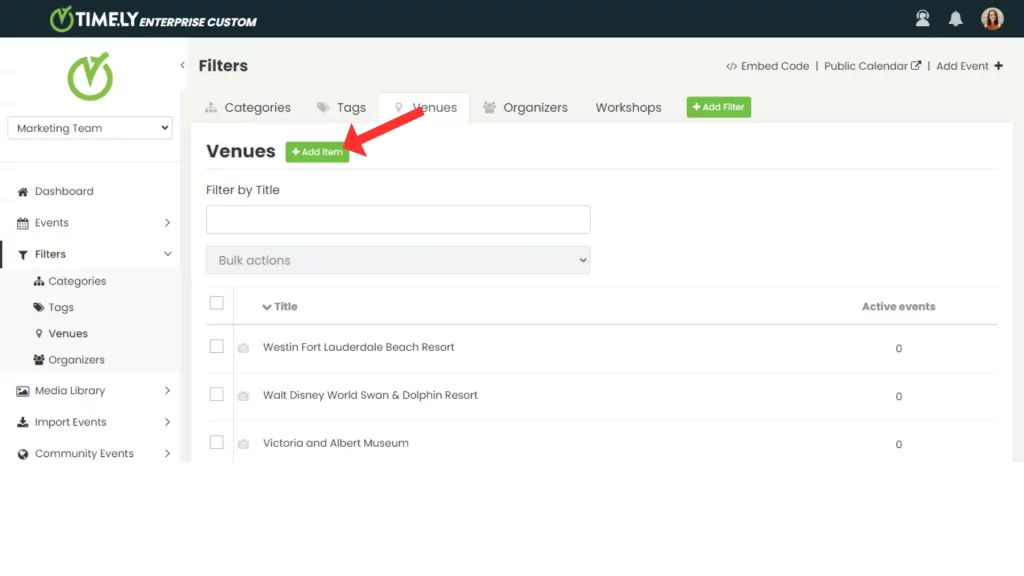
2.3 会場
とともに Timely アカウントを使用すると、イベントに会場を追加して、各イベントがどこで開催されるかを簡単に確認できるようにすることもできます。
イベント作成プロセスを簡素化し、時間を節約するために、フィルターメニュー内で直接会場を作成できます。緑色の +アイテムを追加
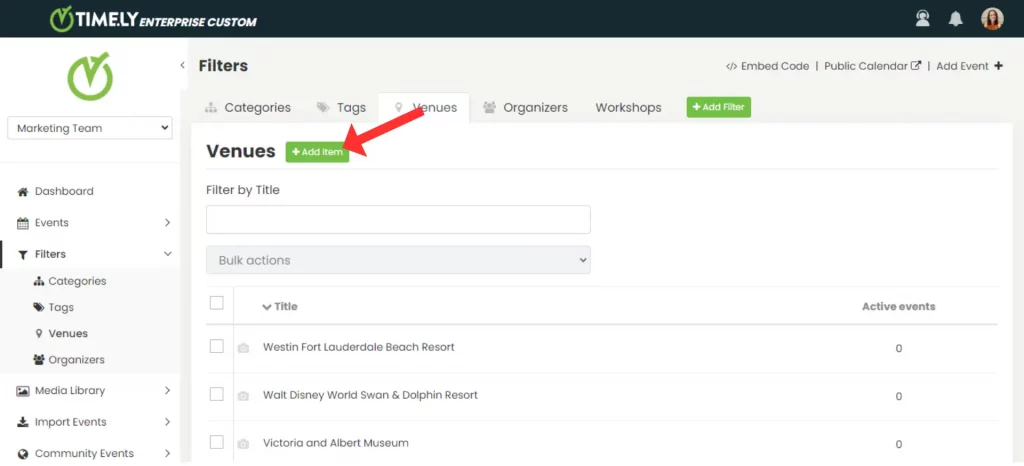
右側のパネルに新しいセクションが表示され、新しい会場を追加できます。会場の必要な詳細を入力し、クリックしてください。 Save フィルターに追加します。
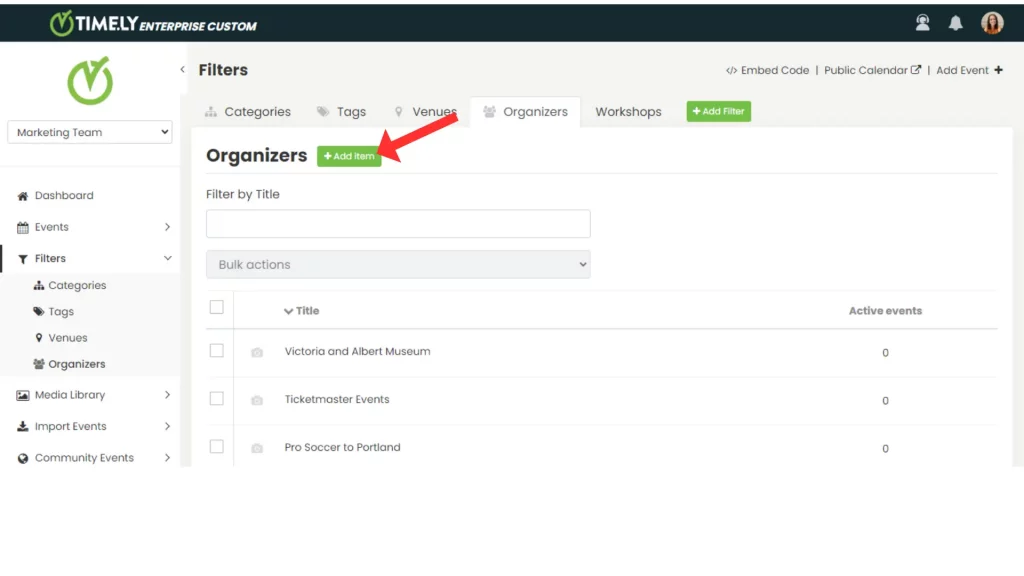
2.4 主催者
とともに Timely アカウントを使用すると、イベントの主催者を追加できます。主催者は名前と連絡先情報で識別できるため、参加者にとって貴重な情報となります。
新しいオーガナイザーを追加するには、緑色の +アイテムを追加 ボタンをクリックしてください。すると、右側のパネルに新しいセクションが表示され、主催者に必要な情報を入力できるようになります。必要な情報を入力してクリックしてください。 Save 新しいオーガナイザーをフィルターに追加します。
3. カスタムフィルターを作成する方法
カスタムフィルターを追加すると、訪問者は標準のカテゴリ、タグ、会場、主催者以外にも検索範囲を広げることができます。この機能は特定のモジュールとサブスクリプションプランでのみ利用可能です。 お問い合わせ くわしくはこちらから
サブスクリプション プランに応じて、アカウントのいくつかの領域でカスタム フィルター グループを作成して割り当てることができます。
- スペース – カスタマイズされたフィルターを使用して部屋やイベント会場を紹介することで、空き状況の管理が簡単になり、訪問者がニーズに合った場所を選択できるようになります。
- イベント – フィルターを使用してプログラムを整理し、強調表示することで、スタッフと一般のユーザーがカレンダーを簡単に閲覧できるようになります。
- 連絡先 – システム内のユーザーをセグメント化および分類して、よりスムーズな社内管理とターゲットを絞ったコミュニケーションを実現します。
- Resources – 機器、資材、その他の資産を分類し、ユーザーがリクエスト時に必要なものを正確に見つけられるようにします。
カスタム フィルターを追加するには:
- 緑をクリック +アイテムを追加 フィルター タブの最後にあります。

- 名前を入力してください(例: ワークショップ).
- フィルタグループを割り当てる場所を選択します
- [保存]をクリックします。
4. フィルターを編集または削除するにはどうすればいいですか?
既存のフィルターを変更するには、アイテムの上にマウスを移動してクリックします。 編集情報は右側のパネルに表示されるので、必要に応じて変更を加えることができます。
フィルターの削除も同様に簡単です。削除したい項目にマウスを移動してクリックします。 削除選択してアクションを確定します 削除 ポップアッププロンプトで。

追加のヘルプが必要ですか?
さらに詳しいガイダンスとサポートについては、当社のウェブサイトをご覧ください。 ヘルプセンター。ご質問がある場合やサポートが必要な場合は、お気軽にサポート チケットを開いてカスタマー サクセス チームにお問い合わせください。 Timely アカウントのダッシュボード.
さらに、実装と使用に関して追加のサポートが必要な場合は、 Timely イベント管理システム喜んでお手伝いさせていただきます。すべてを探索してください プロフェッショナルサービス 私たちはあなたに提供できます、そして 私たちと連絡を取る して、高成長のクロスチャネル戦略の構築を始めましょう!