Visual content plays a crucial role in attracting and engaging audiences to your venues and spaces. Timely venue management software enables you to enhance your venue and space listings by adding beautiful images that showcase your event spaces well.
1. Why You Should Add Images to Venues or Spaces
Including images in your venue or space profiles can be crucial for a variety of reasons.
- Stimulate Customer Interest: First, the images provide a sense of realism, which helps stimulate potential customer’s interest. Instead of simply reading about your venue or space, visitors can have a glimpse of it. A single, appealing image can evoke strong emotions and desires within a viewer that plain text descriptions might not be able to do.
- Enhance User Engagement: Visual content tends to have higher engagement rates. People tend to engage more with visuals rather than just reading plain text. Adding images to venues or spaces can drive higher user engagement and may lead to increased space bookings.
- Aesthetics Perception: Photographs provide viewers a direct insight into the aesthetics of the venue. Users get an understanding of the ambience, decor, and overall vibe of the place. This helps them decide if it aligns with their expectations or needs, whether it’s for a business conference, a wedding reception or a simple social gathering.
- Better Understanding: A good set of photos allows a customer to get a clear, all-around view of the space, eliminating any chances of misconceptions or false expectations. This, in turn, may lead to higher customer satisfaction rates.
- Enhanced Reputation and Credibility: By displaying images, your business shows transparency. This enhances your reputation as an event venue provider, instills confidence, and makes you appear more trustworthy to potential bookers.
- Increased Bookings: High-quality, engaging images are likely to inspire potential customers to make a booking. A lack of visuals might cause uncertainty, whereas an accurate and engaging photo of the venue will show its real value, enhancing booking potential.
Thus, integrating quality images into your Timely venue management software venue or space profile isn’t just recommended; it’s essential for improving engagement, enhancing customer experience, and potentially increasing your booking rates.
2. How to Add Images to Venues
Here are the steps to add images to venues:
- Log in to your Timely account.
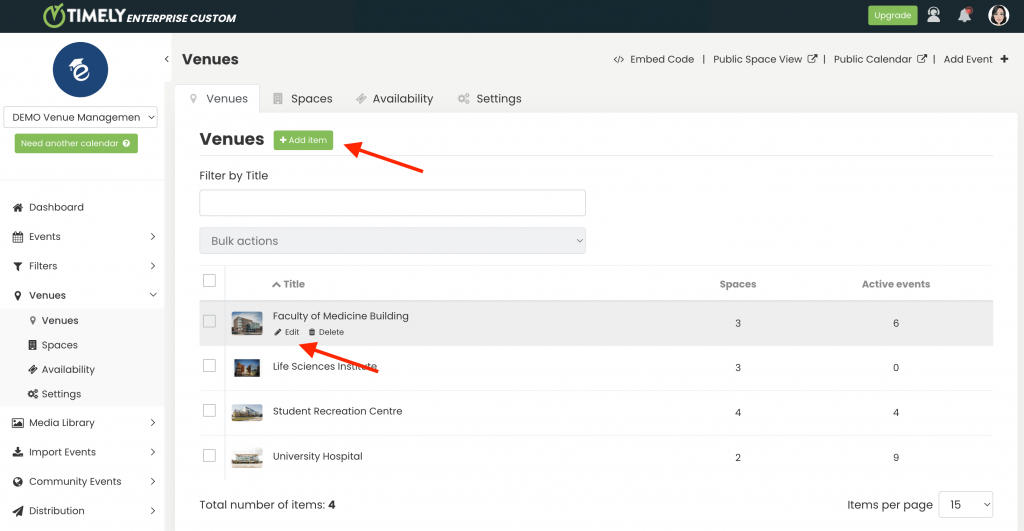
- On the main navigation menu, click on Venues. A new section will appear, where you are able to see a list with your current Venues.
- Next, click on the green “+Add Item” button to create a new venue. Alternatively, you can select a previously created venue, hover the mouse over it, and then click Edit.

- A new section will appear on the right side of the screen, allowing you to input essential venue details, including the related image.
- There, you will find two buttons: Media Library and Upload.

- To add a previously used image, click on Media Library. Your image gallery will pop-up on the screen. You can search for your image there, and then select the correct file.
- If you want to add a new image, click on the Upload button. A pop-up box will appear, allowing you to select an image from your computer. Give it an appropriate alternative text, and then click on the Save button. Your image will be automatically stored into your Timely Media Library.
- Do not forget to save your settings to complete the process.
IMPORTANT: When uploading images to your Timely account, we recommend following our Images Best Practices in terms of file format, size, quality and image alternative text.
3. How to Add Images to Spaces
To include images to your spaces, follow these quick steps:
- Log in to your Timely account.
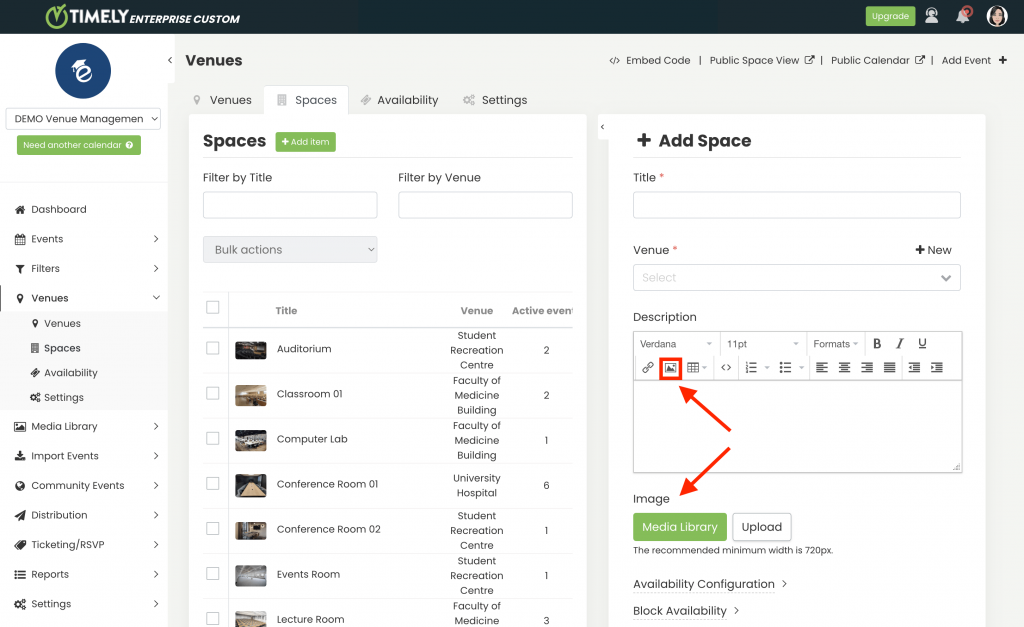
- From the main navigation menu, choose Venues, then Spaces. You’ll see a list of all the spaces you’ve created.
- To create a new space, click on the green “+Add Item” button. Alternatively, you can edit an existing space by hovering the mouse over it, and clicking Edit.
- A new section will appear on the right-hand side of the screen where you can enter all the necessary space details, including images on the space description and a cover image.

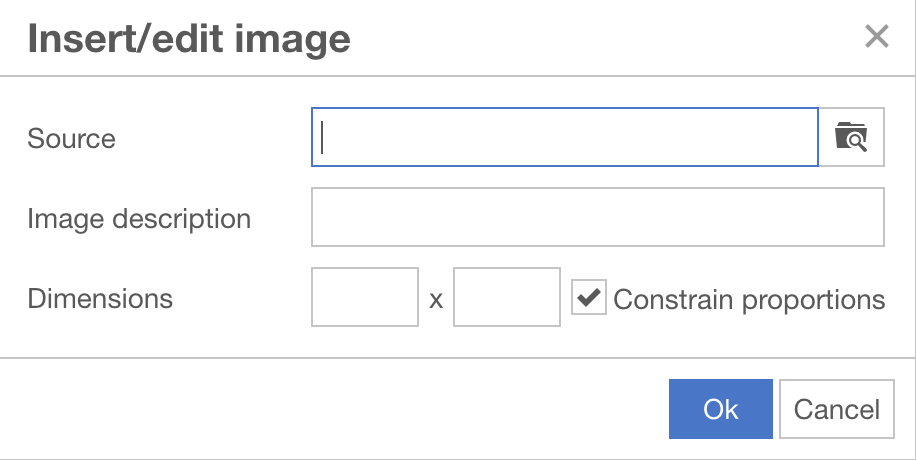
- If you wish to add images to your space description, go to the space Description section, then click on the Insert/edit image icon. A pop-up box will appear allowing you to choose an image from your computer. Next, add an image description and then click on OK.

- To add a cover image to your Space, locate the Image item. You’ll find two buttons: Media Library and Upload.
- If you want to add an image previously used, select Media Library, and your image gallery will appear on the screen. Locate the correct image file and select it.
- If you want to add a new image, click on the Upload button. You’ll be prompted to choose an image from your computer. Pick the right one, and give it an appropriate alternative text before saving it to your Timely Media Library.
- Don’t forget to save your settings to finalize the process.
Finally, visual content brings venues to life, enticing users to explore further. Timely’s commitment to enhancing your venue and spaces through images empowers you to showcase them in the best light.
Need Additional Help?
For further guidance and support, please visit our Help Center. If you have any inquiries or need assistance, don’t hesitate to contact our customer success team by opening a support ticket from your Timely account’s dashboard.
In case you require additional assistance in implementing and using Timely venue management system, we are pleased to assist. Explore all the professional and managed event services we can offer you, and get in touch with us today!