Creating spaces is a fundamental aspect of seamless venue and space management. With Timely, you can effortlessly create event spaces and connect them to their respective venues to enhance your venue and event organization. In this guide, we’ll walk you through the process of creating spaces within your Timely account.
1. Benefits of Creating Event Spaces
Creating event spaces within Timely venue management software brings several key benefits to your venue management process, including:
- Clear visual representation: Visualize your event spaces, helping event organizers better understand space details, such as room location, appearance, capacity, and layout options.
- Enhanced event management: Organize your events more effectively by linking them with their respective spaces, making it easier for everyone to find event location and directions.
- Online Space Bookings: Enable your audience to book your spaces for their events through an integrated online booking form, respecting each space’s availability and buffer time configuration.
2. How to Create Event Spaces
Follow these steps to create event spaces:
- Log in to your Timely account.
- On the main navigation menu, click on Venues. Then, click on Spaces.
- Click on the green “+Add Item” button at the top of the screen.

- A new section will appear on the right side where you can input all the essential details, as follows:
2.1 Space Title
Enter the name of your space. This will be your space’s title. Although the field accepts up to 1,000 characters, we recommend a shorter title to improve readability and user experience.
2.2. Venue
Associate your space with a venue. If your space is located within a previously created venue, link it accordingly. If your space is in a different location, you can create a new venue. For more details, see our guide on How to Create and Edit Venues.
2.3. Space Description
Provide a detailed and appealing description of your space. Highlight unique features, dimensions, capacity, and other relevant details. You can also add images, videos, and slideshows to enhance the listing.
2.4. Featured Image
Make your space stand out by adding a featured image. Upload a new image or choose one from the Media Library. If you don’t select a featured image, the software will populate it automatically with the calendar logo image from your calendar General Settings.
2.5. Availability Configuration
Configure the availability settings for your space. This step is vital for managing when the space can be booked. Specify the days and hours when the space is open for reservations.

2.6. Block Out Dates
If there are specific periods when you do not want the space to be available for booking, use the block availability feature. This allows you to mark certain dates or times as unavailable.
Whether it’s for maintenance, private events, or any other reason, blocking availability ensures that renters cannot book the space during those periods.

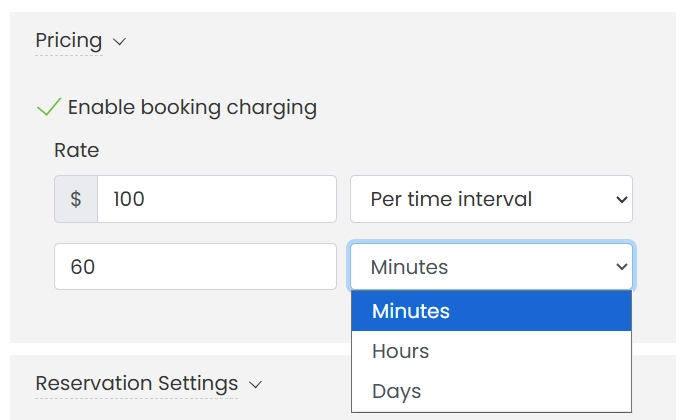
2.7 Pricing
The “Enable booking charging“ option allows you to monetize space bookings. Within this feature, you can specify a fee label and amount, and determine how the charge will be applied: per event (a single fixed price regardless of duration) or per time interval (x minutes, hours or days).
For more information about paid space reservations, check the post: How to Set Up Paid Space Reservations with Timely.
TIP: Use the Resources module to offer equipment and services alongside your space bookings. This ensures all necessary materials are included in event reservations and creates additional revenue opportunities. Learn how to create event resources for space reservations.
2.8 Buffer Time
Under “Reservation Settings”, you can enable the buffer time by checking the appropriate box, and selecting the desired period from the dropdown menu. Buffer time is automatically added before and after each event space booking in the calendar. This ensures a smooth transition between events, giving you time for setup and cleanup, and preventing back-to-back bookings from overlapping.
For example, if someone books a space from 4:00 PM to 5:00 PM, and you have set a 15 min buffer time for that space, the calendar will block reservations for that space from 3:45 PM to 5:15 PM.

2.9 Define Time Slots and Set Minimum/Maximum Booking Times
Also under “Reservation Settings”, users can define time slots for space bookings, specifying the minimum and maximum durations that customers can reserve a space. For example, a minimum slot of 15 minutes and a maximum of 1 hour can be set.

In the public view, within Schedule View, if customers attempt to book a period outside these predefined limits, the time slots will be highlighted in red, signaling that the selected time does not meet the space’s booking criteria. As shown in the image below, the system prevents bookings outside the allowed time range, providing a clear visual alert.

By following these steps, you can create, customize, and manage your event spaces efficiently. Timely’s space booking system offers robust options to improve your venue management process, while also offering clear visual feedback for users to ensure proper booking times.
2.10 Booking Window: Set Minimum Advance Notice for Bookings
Under Reservation Settings, you can also enable a booking window to control how far in advance submitters must request a space for booking.
For example, if you set a booking window of 2 hours, requesters must book the space at least 2 hours before the event start time. This helps prevent last-minute bookings and gives your team time to prepare.
How to configure the booking window for a specific space:
- Under Reservation settings, locate Enable booking window.
- Check the box to activate the booking window feature.
- Enter the minimum notice required (a number) and select the desired unit of time (minute, hour, or day).
- Select Save.

When a booking window is active, submitters will only be able to select times that meet the minimum advance notice. If they try to reserve a space outside the allowed window, the system will prevent the request and show an error message guiding them to select a valid start time.


3. Finalizing Your Event Space: Save, Save as Draft, or Cancel
After creating your event space and incorporating all the essential information, you are presented with three options for the finalization process:
- Save: Choose this option when you’re ready to publish your event space.
- Save as Draft: Opt for “Save as draft” if you wish to preserve the current state of your event space for future modifications. This is particularly useful when you want to review or edit the details before making the space publicly accessible.
- Cancel: Select “Cancel” if you decide not to proceed with the changes made or if you need to discard the current edits. This option allows you to exit the editing interface without saving the recent modifications.

Note: If you intend to save as draft, filling the Availability Configuration section is a mandatory step. Even if you plan to correct or modify this information later, the system requires it to be saved as draft.
Timely’s space management features provide a comprehensive solution for event planners and facility managers. By creating detailed space descriptions, you can enhance your offerings and streamline bookings. If you are interested in learning how to edit, clone and delete spaces, please check our guide.
Need Additional Help?
For further guidance and support, please visit our Help Center. Additionally, if you have any inquiries or need assistance, don’t hesitate to contact our customer success team by opening a support ticket from your Timely account’s dashboard.
Moreover, in case you require additional assistance in implementing and using Timely venue management software, we are happy to assist. Explore all the professional services we offer, and get in touch with us today!