At Timely, we empower venue owners to manage their venue’s working hours effortlessly using our intuitive venue management software. With Timely, setting up working hours for your Space Schedule View is seamless, streamlining bookings for you and your clients. In this guide, we’ll delve into the benefits of Timely’s space working hours feature and guide you through setting it up on your dashboard. Let’s get started!
1. Benefits of Using Working Hours for Space Schedule
One of the key aspects of managing any venue – whether it’s a conference center, a coworking space, or a community hall – is ensuring that your booking system is organized and accessible. By enabling the working hours feature, you can effortlessly streamline your scheduling process and provide a seamless experience for both you and your clients. Benefits include:
- Cleaner Display: By defining Working Hours, your Space Schedule View will appear cleaner and less cluttered, making it easier for clients to see available time slots at a glance.
- Narrowed Search: With specific time ranges displayed, clients can quickly find available slots that align with their scheduling needs, saving them time and simplifying the booking process.
- Improved User Experience: Providing a cleaner and more organized Space Schedule View enhances the overall user experience, leading to higher client satisfaction and increased bookings.
2. How to Set Up Space Working Hours on the Dashboard
Now that you know the benefits of setting up Working Hours for your Space Schedule View, let’s proceed with setting it up:
- Log in to your Timely account.
- Navigate to the main navigation menu and click on Venues.

- Then select the option Settings on the menu or on the right side.

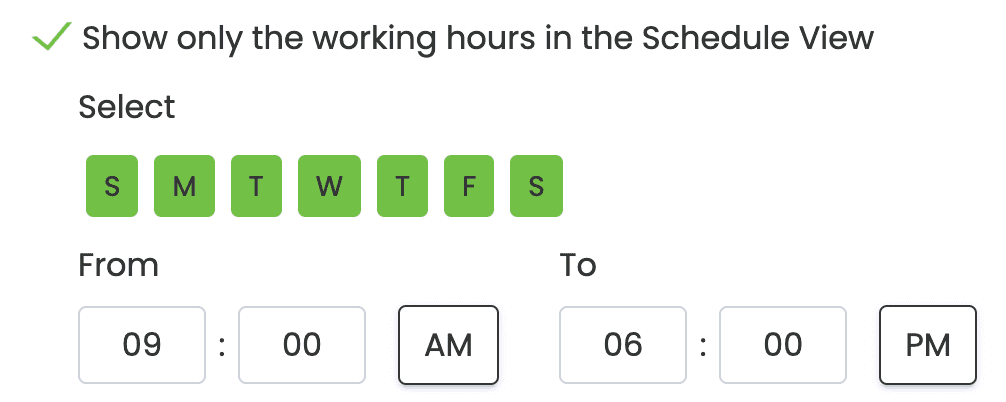
- Check the option Show only the working hours in the schedule view. This will ensure that the schedule displays only the specified working hours. Once checked, you’ll be able to select the days and start and end hours for the standard working hours for all your venues and spaces.
- Lastly, click on the Save button to save the information.
3. How your Audience will See your Venues and Spaces’ Working Hours
Here is how to view the working hours when you enable this feature.
- Log in to your Timely account.
- Click on the Public Space View shortcut on the upper right corner of your screen.

- A new tab will open on your browser and show your Timely’s standalone space view. On the top right corner, select the Schedule view.

- By enabling working hours, the Space Schedule View will display on the screen only the start and end times you have chosen, providing a clear view of available slots.

Effortlessly managing space availability is crucial for successful venue management. With Timely, you can ensure a seamless booking experience for your customers while optimizing the use of your venue spaces. Lastly, define your working hours and enhance your venue management with Timely’s intuitive features.
Need Additional Help?
For further guidance and support, please visit our Help Center. If you have any inquiries or need assistance, don’t hesitate to contact our customer success team. Simply open a support ticket from your Timely account’s dashboard.
In case you require additional assistance in implementing and using Timely event management system, we are pleased to assist. Explore all the professional services we can offer you, and get in touch with us today!