Welcome to our guide on integrating space bookings into your event submission form with Timely. Managing event submissions from your community and local partners has never been easier. In this tutorial, we’ll take you through the process of creating and customizing an event submission form that includes space bookings, making your venue and event management system even more versatile and engaging.
1. Benefits of Adding Space Booking to Event Submissions
By integrating space bookings into your event submission form, you can streamline the process of accepting room reservations for events from various organizations. This feature will help you get more event inquiries for your venue and allows you to:
- Enhance User Experience: Provide a user-friendly platform for community members and partners to conveniently submit online space booking and rentals requests.
- Customizable Intake Form: Create a customized questionnaire to gather specific details about the event your client plans to host in your venue, ensuring you have all the necessary information to accommodate their needs effectively.
- Centralized Communication: Streamline communication by having all booking requests and inquiries come through a single channel. This ensures that no requests are missed and facilitates efficient follow-up with clients regarding their bookings.
- Automated Reminders and Notifications: Stay informed with instant notifications whenever a room booking request is submitted. Additionally, provide your submitters with the assurance of timely and professional service through automated confirmation emails.
- Transparent Pricing: Requesters now see flexible booking options (e.g., 15 min, 2 h, 1 day) with the exact price calculated automatically, eliminating cost surprises.
2. Creating an Event Submission Form for Space Bookings:
To create an event submission form for space bookings, follow these steps:
- Log in to your Timely account.
- In the main menu on the left, click on Community Events, and select Settings.
- Then, check the Enable event submissions form option.

3. Event Submission Form Setup Options
3.1 Automatically Approve New Submitters
If you check this option, all submitters will be automatically approved by default. This will be the general rule, even if you had previously set up individual approval rules.

3.2 Automatically Approve New Events Submitted (Space Bookings)
When this option is checked, all booking requests sent by all submitters will be automatically approved by default. If you enabled this option, any previous individual submitter approval setting will be disregarded.

3.3 Allow Submitters to Edit Events
This setting allows all submitters to request edits to the events they have previously submitted.
When enabled, submitters will see an “Edit” button in their My Events area when logged in to the public space view or events calendar, giving them the ability to make edit requests to their space booking requests after submission.

3.4 Automatically Approve Event Edits from Submitters
When enabled, all edit requests made by submitters to their own space booking requests will be automatically approved and published, bypassing the manual moderation process.

Important: This setting can only be activated if “Allow Submitters to Edit Events” (3.3) is enabled, since edit permissions are a prerequisite for auto-approval.
3.5 Allow Submitters to Cancel Events
This setting enables all submitters to cancel their own space booking requests through the My Events area when logged in to the public space view or events calendar.

3.6 Hide Add Event Button for Event Views
By default, when you enable the Event Submission Form, the + ADD EVENT button shows automatically on the toolbar of your online events calendar.

Nevertheless, you can hide it by simply clicking on the hide add event button checkbox on the Event Submission Form settings.
Please note that you can add your + ADD EVENT button as a CTA elsewhere on your website. You can even re-label the button, if you wish. Simply go to Settings, then press on Embed Code and select the embedding options according to your needs.
For specific instructions on how to hide the button and create a new embed code, visit the complete guide on how to hide the add event button.
3.7 Enable External Tickets
If you check this option, a new field will appear on the form allowing your event submitters to add an external link to the website where they are selling tickets, as well as the event ticket price.

When the event is published, the link will appear on the “Ticket” CTA on the respective event post on your public calendar.
3.8 Featured Image Required
This setting allows you to set the featured image as a required item on your submission form. In other words, if this option is activated, your event submitters will not be able to submit events unless they upload an image for their event.

It is particularly relevant for event calendar owners who are careful on how their calendar looks in their audience’s eyes, and want to make sure all event posts have a featured image. Moreover, this feature can save time and improve productivity by making event submitters complete this step on the event creation process.
4. Form Layout
Users can select between Fullscreen or Popup layouts to match their preferences.

The Fullscreen option offers a distraction-free experience, ideal for detailed submissions. For example, when offering both space and resource bookings through the online submission form.

The Popup format keeps the form compact and accessible within the existing page view.

5. Spaces
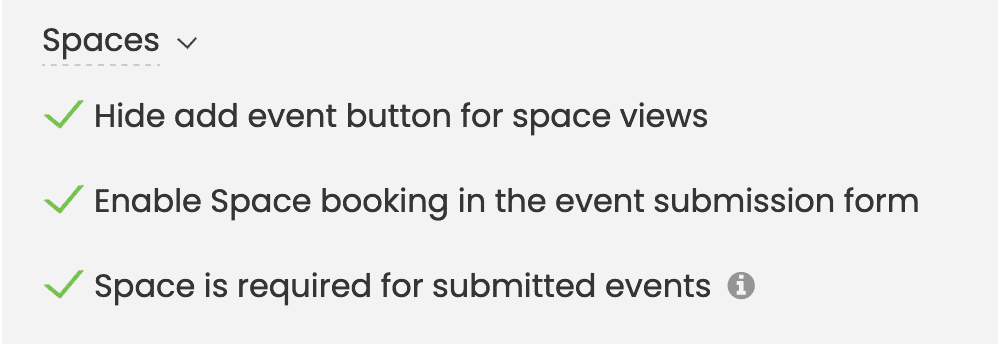
Use the Settings submenu on the Community Events Menu to enable event submission forms and set up your preferred options. In the “Spaces” section, you can fine-tune space booking settings:
- Hide add event button for space views: By default, when you enable the Space Booking Form, the + Add Event button shows automatically on the toolbar of your Space Views. Nevertheless, you can hide it by simply clicking on the hide add event button for space views checkbox on the Event Submission Form settings.
- Enable Space Booking in the Event Submission Form: Activate this option to allow submitters to book spaces.
- Make Spaces Required for Submitting Events: Enabling this filter makes the venue filter mandatory, ensuring that submitters specify a space for their events to complete the event submission process.
By incorporating space bookings into your event submission form with Timely, you can streamline the venue booking and rental process, offer a better user experience, and keep visitors engaged on your website. Now, you’re ready to empower your community and partners to request space bookings and rentals seamlessly.
6. Resources
The Resources section allows event organizers to enable Resource Booking in the event submission form. This feature, when activated, ensures that submitters can reserve necessary resources, such as audiovisual equipment, furniture, or services, during the event submission process. This simplifies event planning by integrating resource management seamlessly into the submission workflow.

7. Filter Options
7.1 Standard Filters
If you wish, you can require your event submitters to add filters to their events, so your calendar is always organized the way you want. You can allow them to search for available filters, or add new ones, if convenient.
The Filters option will list all default filters, such as Categories, Tags, Venues, and Organizers.
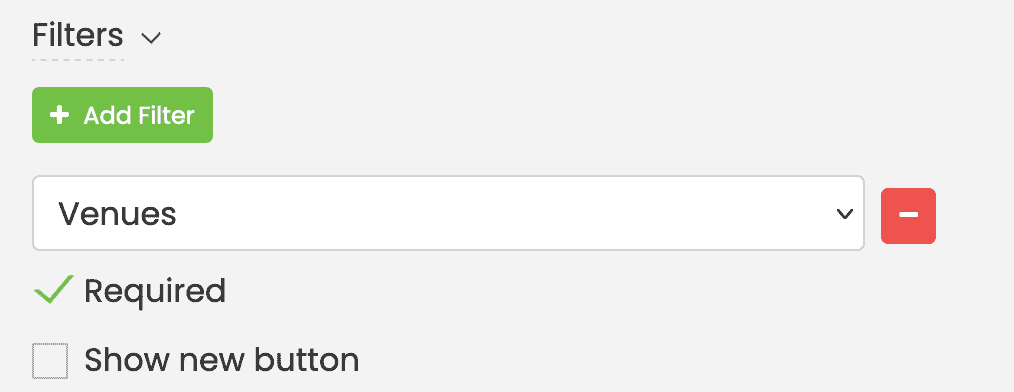
The default filters have two options:
- Required: if required is checked, then the submitter needs to choose one option; and
- Show new button: if this option is selected, then a button will appear next to the dropdown and will let the submitter add a new item to the filter.
7.2 Custom Filters
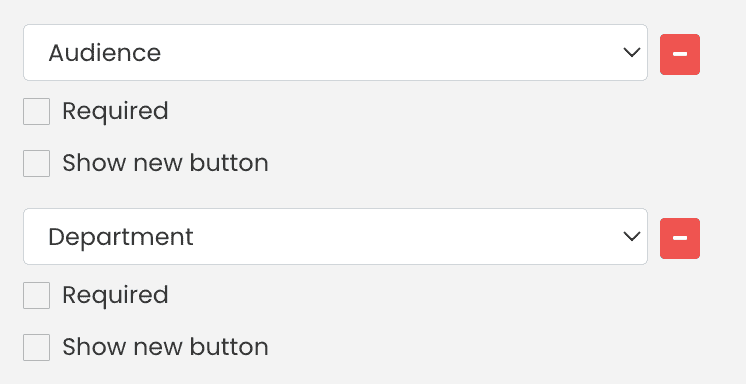
If you have Custom Filters in your plan, you will be able to add them to your event submission form. For example, if you have previously created a custom filter Audience or Department, you can add them to the event submission form. You can then determine if they will be required or optional, as well as allow submitters to create new items to the filters.
8. Field Options
8.1 Standard Fields
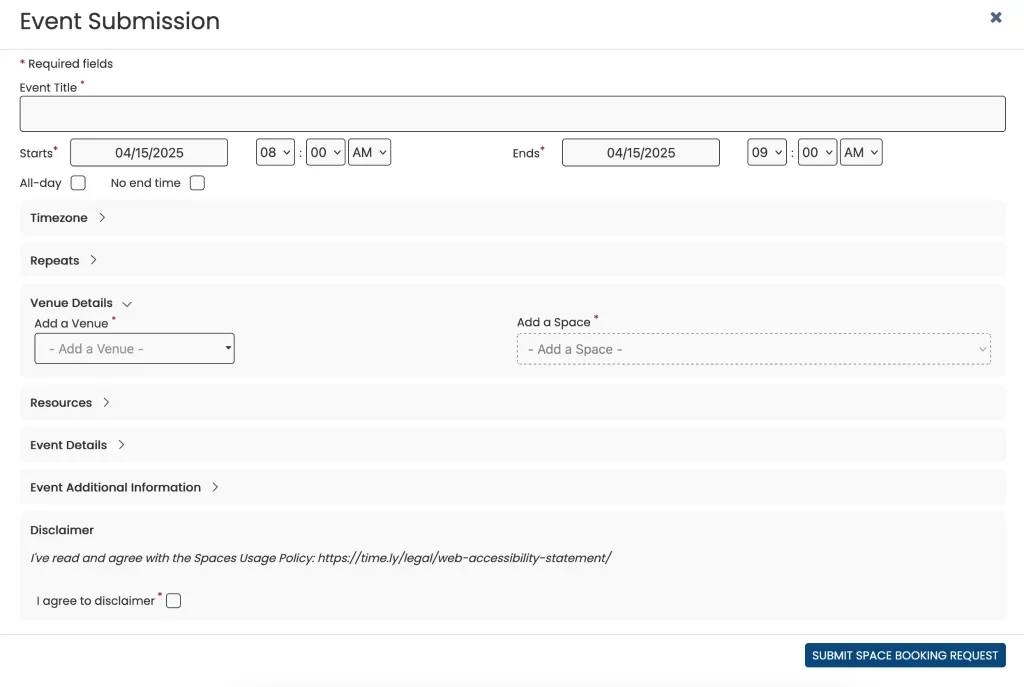
When you enable event submissions for your space booking requests, our system generates a standard event submission form for you.
The standard form contains all the relevant fields for an event to be created in our software. For instance, event title, date and time, including recurrence and timezone, event description and featured image.
The form with the standard fields will look exactly like the image below:
8.2 Custom Fields
Timely Custom Fields feature allows users to add additional fields to their event submission form. These fields can be customized as text fields, yes or no answers, checkboxes, or dropdown answers. This provides flexibility in collecting specific information from space booking requesters. Users can determine whether each field is mandatory or optional and choose to display or hide them in the event post in their event calendar.
The Timely Help Center article How to Create a Custom Questionnaire for Space Bookings explains this feature in detail. Custom Fields enable venue and facility managers to gather tailored information from space booking requesters, enhancing the understanding of events that will be hosted at their spaces and published in their event calendars.
9. Disclaimer Option
The Disclaimer option, if enabled, allows you to add a customized disclaimer for your event submission form. You can use this feature in many ways. For example, you can refer to your Terms and Conditions, Privacy Policy, or current safety precautions and protocols for events.
Moreover, you can make this a mandatory item on your form. In this case, the submitter will have to agree with the disclaimer before submitting the event. Otherwise, the system will not accept the event submission.
When enabled, the disclaimer will show up near the end of the event submission form, as shown on the image below:

Need Additional Help?
For further guidance and support, please visit our Help Center. If you have any inquiries or need assistance, don’t hesitate to contact our customer success team by opening a support ticket from your Timely account’s dashboard.
Moreover, in case you require additional assistance in implementing and using Timely venue management system, we are happy to assist. Explore all the professional services we can offer you, and get in touch with us today!