
Adding images to your equipment and services offerings helps your customers quickly understand which resources are available when booking your spaces. Visuals make it easier for them to see what’s included, choose the right options, and feel confident about their selection. In this guide, you will learn how to add images to resources and manage them in your Timely image gallery.
1. Why You Should Add Images to Resources
Adding images to resources customers can book alongside venues and spaces provides several benefits:
- Faster Decision-Making: Customers can easily recognize the right item, such as different table types, microphones, or chairs, without relying only on text.
- Improved Booking Experience: Clear visuals help customers better understand what is available when booking a space, reducing back-and-forth questions.
- Transparency: Showing exactly what a resource looks like builds trust and helps customers know what they will receive.
- Increased Bookings: High-quality visuals make listings more appealing, encouraging customers to add resources to their bookings.
Whether it’s AV equipment, furniture, or other add-ons, attaching images to your resources makes the booking experience smoother and more attractive.
2. How to Add a Featured Image to Resources
To add a featured image to a resource in your Timely account, follow these steps:
- Log in to your Timely dashboard.
- From the left-hand menu, select Resources. If you have already created your resources, there you will see a list with all your items.
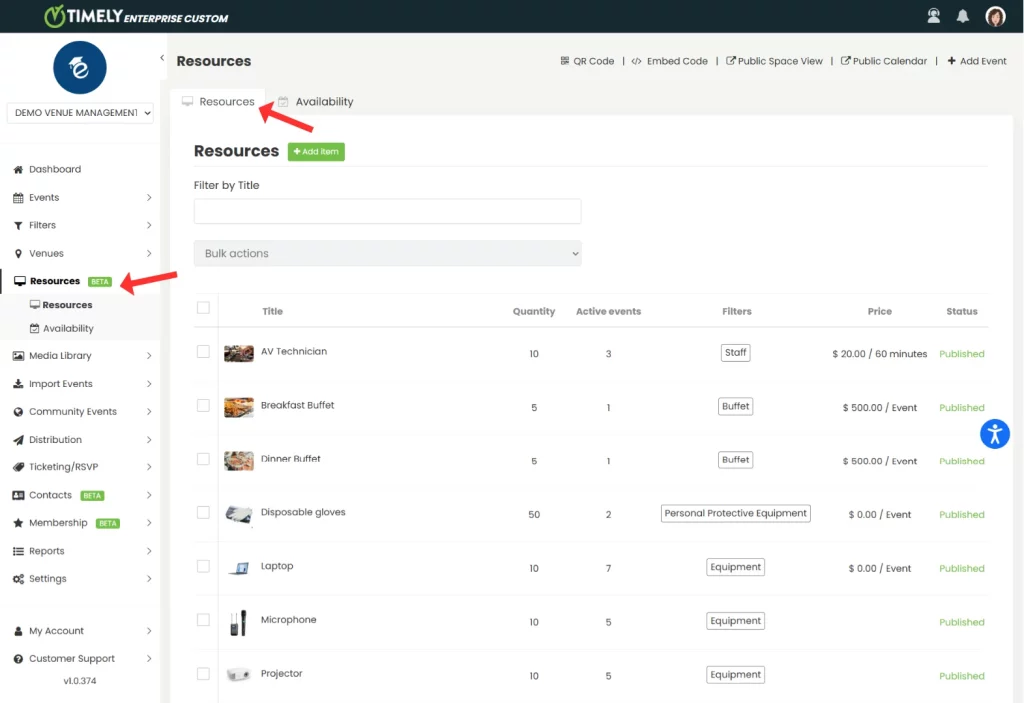
- To create a new resource, click the green + Add Item button on the top of the screen. To edit an existing resource, hover over the name and click the pencil icon.

- On the right side of the screen, the Resource Details panel will appear. Scroll to the Image section.
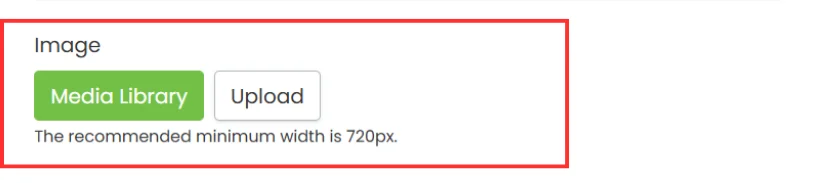
- You will see two buttons:
- Media Library: Use this to select an image previously uploaded to your account.
- Upload: Use this to upload a new image from your computer.
- After choosing an image, a preview will appear.
- Enter alternative text describing the image (e.g., “Black wired microphone” or “rectangular table”) for accessibility compliance and click Save.

- When you’re finished editing the resource, click Publish to save your changes. You can also click Save as draft if you’re not ready to publish yet.
Tip: The recommended minimum image width is 720px for best quality. For more tips, follow our Image Best Practices.
3. How to Add Images to Resources Details
If you wish to illustrate your resource description with images, when creating or editing a resource, go to the Description section and click the Insert/edit image icon. A pop-up box will appear allowing you to choose an image from your computer. Next, add an image description and then click OK.
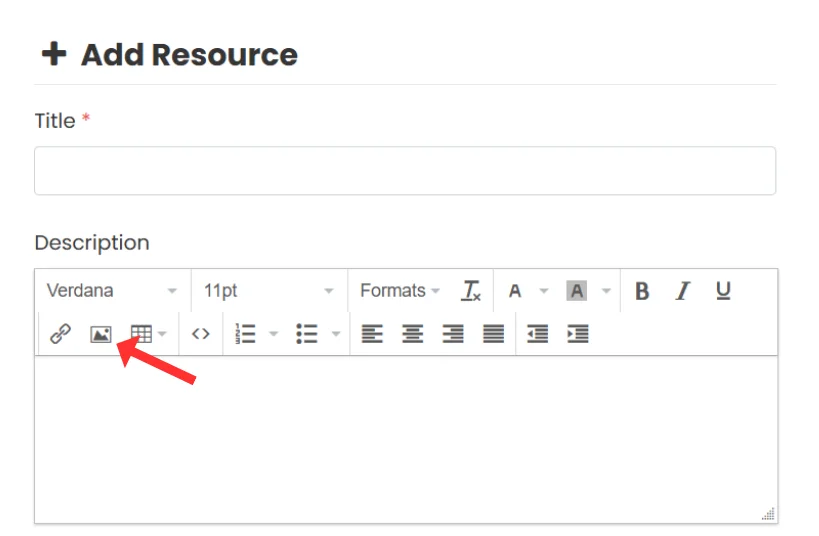
And don’t forget to click Publish to save your changes.
Need Additional Help?
For further guidance and support, please visit our Help Center. Additionally, if you have any inquiries or need assistance, don’t hesitate to contact our customer success team by opening a support ticket from your Timely account’s dashboard.
Moreover, in case you require additional assistance in implementing and using Timely venue management system, we are happy to assist. Explore all the professional services we offer, and feel free to get in touch with us today!