When it comes to venue management, having the ability to effortlessly manage and customize your event venues is key. In this post, we’ll explore how to create, edit and delete event venues in your Timely account. Let’s dive in!
1. Benefits of Creating and Managing Venues
Creating and managing venues within your Timely account isn’t just about convenience. It’s also about enhancing your venue and event management experience. Here’s why it matters:
- Organized Event Planning: Creating dedicated venues allows you to organize your events efficiently. Each venue can be tailored to match the specific location, whether it’s a physical address, an online space, or a combination of both.
- Clear Information Sharing: By defining venues, you’re ensuring that all event details are accurate and consistent across your calendar. This clarity helps both event organizers and attendees know exactly where events are taking place.
- Enhanced Visual Appeal: Including images and map coordinates for your venues adds a visual element to your event listings. Attendees can easily identify and connect with the locations, enhancing their event experience.
2. How to Create Event Venues
Timely venue management software has a separate menu just for managing venues and spaces. Therefore, when using the integrated event calendar and space booking system, you should follow the instructions below to create venues:
- Log in to your Timely account.
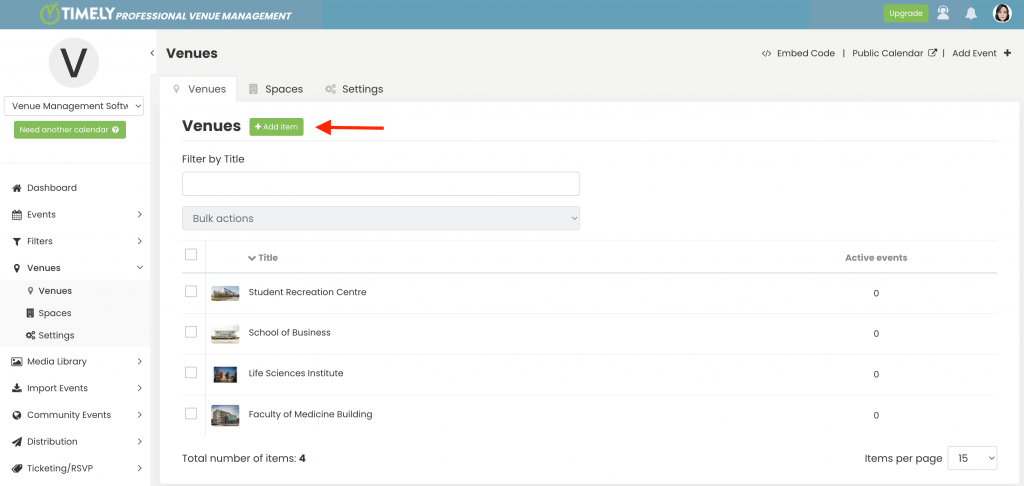
- From the main navigation menu, select Venues.
- Next, click on the green +Add Item button.

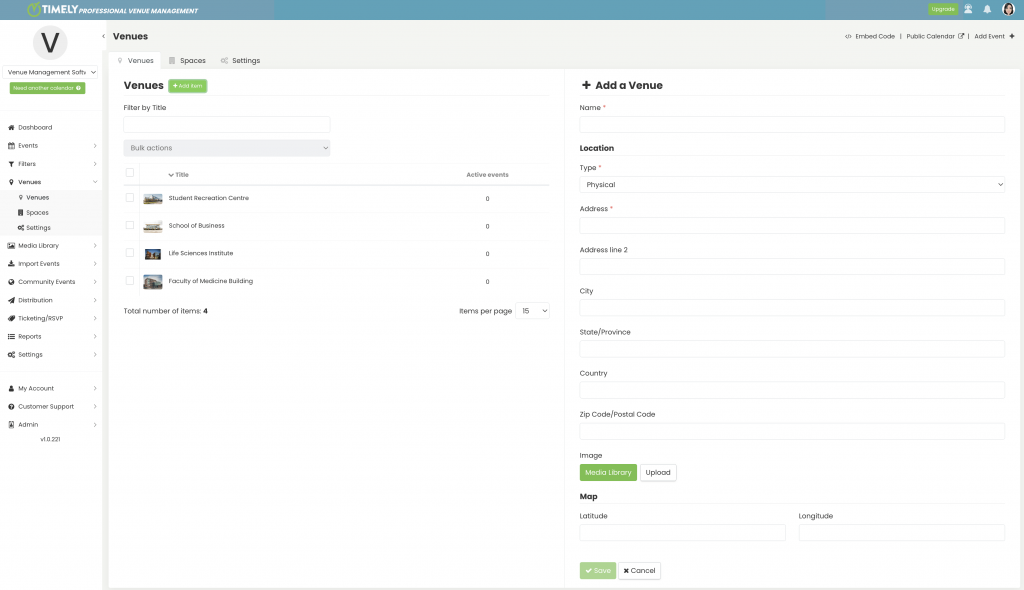
- On the right side of the screen, a new section will appear.

- There, input all the essential information:
- Venue Name: Give your venue a clear and distinctive name.
- Location: Define your venue type, whether it is physical, online, or both, and provide additional details. For example, full address and/or website.
- Image: Add an image that represents the venue.
- Map Coordinate: Input the coordinates to provide accurate location information.
- Lastly, click on the Save button to save the information. Your newly created venue will then appear on your list of venues.
3. How to Edit or Delete Event Venues
Editing and deleting venues on Timely is just as straightforward. Here’s how:
- Log in to your Timely account.
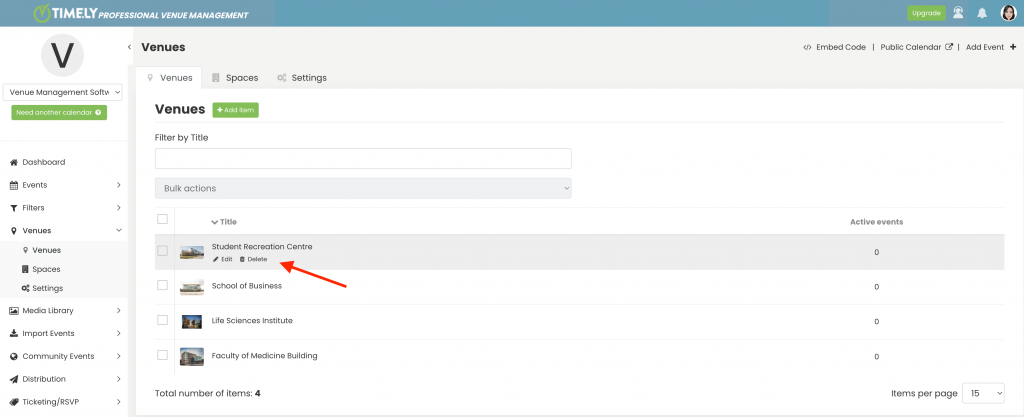
- From the main navigation menu, select Venues. There, you’ll see the list of venues you’ve added.
- If you wish, you can use the filter bar on the top of the section to help you find the venue you want to edit or delete.
- Once you have found it, hover your mouse over the venue to reveal the edit and delete options. Then, click on the appropriate option to update or delete the venue as needed.

Effortlessly managing event venues is a fundamental aspect of successful event planning. With Timely, you have the power to create, edit and delete venues with ease. From maintaining organized venue details to providing clear visuals, the benefits of this feature are undeniable.
Need Additional Help?
For further guidance and support, please visit our Help Center. If you have any inquiries or need assistance, don’t hesitate to contact our customer success team by opening a support ticket from your Timely account’s dashboard.
In case you require additional assistance in implementing and using Timely venue management software, we are pleased to assist. Explore all the professional and managed event services we can offer you, and get in touch with us today!