With Timely venue management software, you can not only automate the communication with your bookers, but also customize the email templates. By personalizing these templates, you ensure your space booking requesters receive tailored notifications regarding the status of their requests and other pertinent information. In this guide, we’ll walk you through the steps required to customize email templates for space booking requests.
1. Space Booking Email Templates
Timely offers a dedicated set of email templates for space booking notifications, allowing you to maintain clear communication with users submitting space booking requests. These templates cover various scenarios and ensure a seamless flow of information between you and your space booking requesters.
Currently, there are several types of messages that our space booking management software automatically sends to your users, when space booking requests are:
- Submitted
- Accepted
- Rejected
- Canceled
- Updated
If your subscription plan includes email customization, you can customize these email templates to align with your organization’s branding and communication style. Continue reading to learn how.
2. How to Customize Email Templates
Follow these steps to personalize your standard space booking email templates:
- First, login into your Timely account.
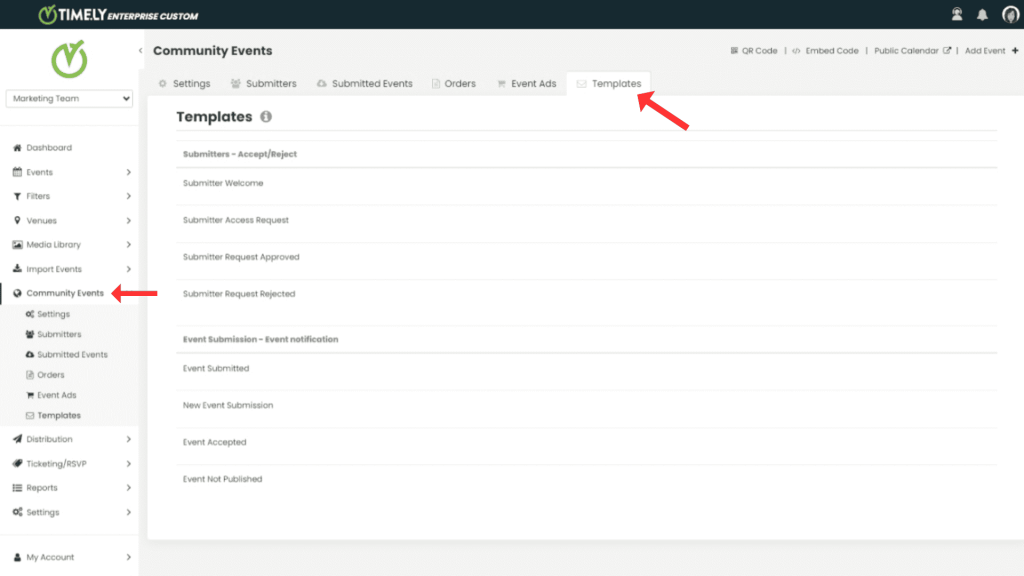
- On the main navigation menu, go to Community Events, and then select Templates. You will find a list of available space booking email templates.

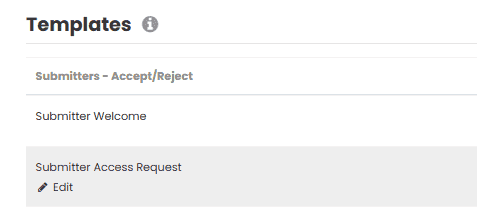
- Hover your mouse over the email template you wish to customize and click on Edit.

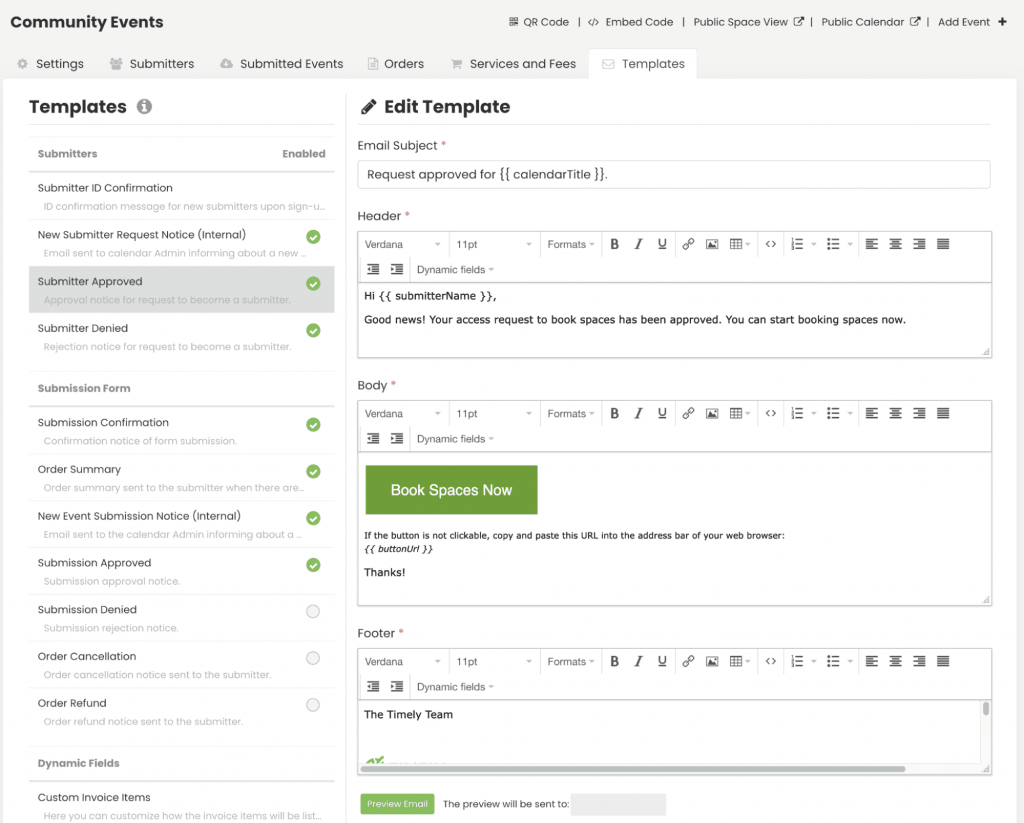
- A new section will open on the screen allowing you to edit your template. Here’s what you can modify:
- Email Subject: Craft an engaging subject line for your email.
- Header: Personalize your greeting to the recipient using dynamic fields for names and relevant information.
- Body: Customize the main message that your space booking requesters will receive.
- Footer: Add your closing and signature, including team information and logos if desired.

2.1 Using Dynamic Fields in Email Templates
Personalization is key when communicating with users. You can enhance your templates by incorporating dynamic fields that automatically populate information from Timely’s database, ensuring each email feels tailored.
To insert dynamic fields, click on the insert dynamic fields option on the top right corner of your screen and select the relevant field from the dropdown menu. The chosen dynamic field will be added automatically.

2.2 Email Subject
The email subject is the first thing recipients see, so craft it thoughtfully. Note that dynamic fields won’t work in this section.

2.3 Header
The header is your initial greeting to the recipient, and it can be personalized using dynamic fields.

2.4 Body
The body contains the main message of your email. While a standard message is provided, you have the flexibility to edit it to your preference.
2.5 Footer
The footer serves as your closing. You can add your name, team information, company logos, or other relevant details.

2.6 Preview, Save, Cancel, or Restore Default
After editing each section, preview your email to see how it will appear in recipients’ inboxes. If it looks good, simply save your customized space booking email template. If it doesn’t meet your expectations, click “restore default” to return to the standard template.
By customizing your space booking email templates, you can ensure that your communication is in line with your organization’s branding and messaging style, creating a seamless experience for your space booking requesters.
Need Additional Help?
For further guidance and support, please visit our Help Center. If you have any inquiries or need assistance, don’t hesitate to contact our customer success team by opening a support ticket from your Timely account’s dashboard.
In case you require additional assistance in implementing and using Timely venue management system, we are pleased to assist. Explore all the professional services we can offer you, and get in touch with us today!