
In venue management, accurate data and reporting are essential for optimizing space use, understanding booking trends, and making informed decisions. With Timely’s software, users can generate and export reports for spaces.
This feature offers flexibility in reporting, including advanced filters and customizable content options to help you focus on the most relevant data. In this post, we’ll guide you through the process of creating and exporting customized reports for spaces and explain how these reports can support effective venue management.
1. Benefits of Creating and Exporting Reports for Spaces
Detailed reports for venue spaces offer numerous advantages, especially for venue managers looking to streamline operations and maximize space usage:
- Faster, more accurate reporting: Access consistent, up-to-date data without manual tracking, reducing errors and saving administrative time.
- Enhanced Space Utilization: Analyzing usage patterns helps managers understand demand and optimize scheduling for each venue space.
- Informed Decision-Making: Access to accurate data on bookings, requirements, and event types supports better decision-making for future planning.
- Improved Client Communication: With a customized report, you can present a clear, professional overview of space usage to clients or stakeholders.
- Facility Management Insight: Space-specific data helps you allocate resources based on usage trends, reducing downtime and improving space turnover.
- Seamless data sharing across systems: Download reports from Timely and easily import them into finance, analytics, or reporting tools used across your organization.
By turning venue data into actionable insights, detailed space reports help organizations operate more efficiently while getting the most value out of every space.
2. What is the Timely Report Feature for Spaces?
The Timely export feature for spaces allows you to generate reports specifically tailored to venue data. You can include detailed insights about each space, apply filters to focus on specific timeframes or space types, and export reports in several formats for a professional, easy-to-read presentation.
These reports can be shared with internal teams, building managers, or renters to support resource planning and transparency. They are especially useful for educational institutions, government facilities, and co-working spaces.
3. How to Create Reports for Spaces in Timely
With Timely, creating customized reports for spaces is simple. Follow these steps to access the report options, apply filters, and export your report.
- Log in to your Timely dashboard.
- On the left menu, go to Reports.
- Select Events under the report options. This will open a view of all spaces available for reporting.

3.1 Use Basic Filters to Build Your Report
Start by applying the basic filters to define which events appear in your report.
- Start Date Range: use the date picker to select the time period you want to include.
- Post Status: Available options include All, Published, Draft, Pending, Rejected, and Trash.
- Event Visibility: Select Public for events visible to everyone, or Private for restricted or internal events.
These filters help you narrow results, focus on the right data, and generate more accurate, meaningful reports.
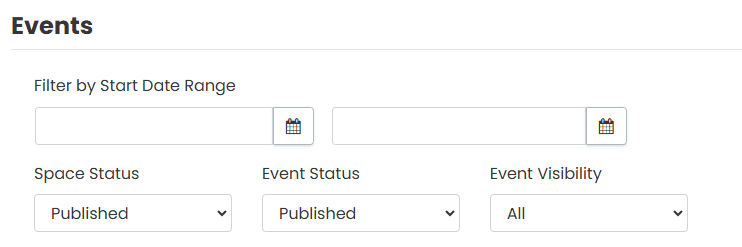
If you choose not to apply advanced filters, click Search to run the report. The system will return results based on your selected criteria. Otherwise, continue reading this post to learn more about advanced filters for reporting.
3.2 Apply Advanced Filters:
Click on Advanced Filters to access more detailed options for customizing your report.
Use these filters to refine your results:
- Venue: Select one or more venues to focus your report on specific locations.
- Spaces: Choose individual rooms or spaces to include in the report.
- Resources: Select specific resources to generate a list of events that use those items.
- Categories: Filter events by categories, such as workshops, meetings, or conferences.
- Organizers: Narrow down the report to events managed by specific organizers.
- Tags: Add tags to include events based on types, themes, or formats.
Any custom event filter you create in your account is also available for reporting. Use these advanced filters to refine results, analyze targeted event data, and generate more accurate, meaningful insights.hts.
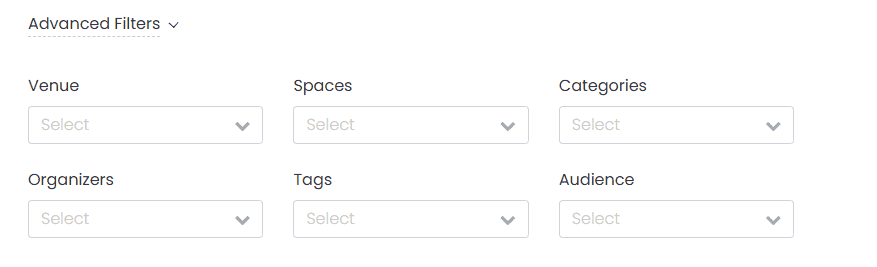
Once you’ve applied your advanced filters, click Search to generate the report and retrieve the matching data. The system will display results based on the criteria you selected.
3.3 Customize Report Content:
Under Customize Report Content, you can select exactly which fields should be included in your exported report. Each checkbox corresponds to a data point that may be relevant for your organization or stakeholders. Here’s what each item means:
- All Day: Indicates whether the event spans the entire day without specific start and end times.
- Created At: Shows the timestamp when the event or space record was created in the system.
- Ends: Displays the event or booking end time.
- Entry Fee: Indicates whether the event has an entry fee and what that fee is.
- Event Status: Reflects the current status of the event (e.g., Draft, Published, Pending).
- Facebook / LinkedIn: Shows whether the event has been shared to social media platforms.
- Featured: Indicates if the event or space is marked as “featured” in your Timely calendar.
- Post Status: Reflects the status of the post in your WordPress (or similar CMS) system, like Published or Pending.
- Repeats At: Displays information about recurring events or bookings.
- Resources: Includes information about the required resources for each event.
- Spaces: Lists the space or room associated with the booking.
- Starts: Shows the start time of the event or booking.
- Ticket Type: Shows what type of ticketing is associated with the event (e.g., General Admission, VIP).
- Timezone: Displays the timezone setting for the event or booking.
- Title: The title of the event or space booking, as displayed on the calendar.
- Updated At: Indicates the most recent update timestamp of the record.
- User: Shows the user who created or manages the entry.
- User Email: Displays the email address of the user managing the record.
- User Role: Reflects the role of the user in your organization (e.g., Admin, Editor).
- Venue: Lists the venue name associated with the space or event.
Tip: You can select multiple items depending on the level of detail needed. This is especially useful if you need to analyze patterns like booking times, space popularity, or user activity.. This is especially useful if you need to analyze patterns like booking times, space popularity, or user activity.

4. How to Export your Customized Report
Once you’ve applied all desired filters and selected the content fields, you can now export your custom report. First, click on the Export button next to the Customize Report Content button.

- Next, select the preferred Export File Format. The available options are CSV, PDF and ICS.

For each file format, the system displays additional options, which are explained in detail below.
4.1 CSV Export Options
After selecting CSV as your export file format, you can choose to export all event columns or export the current list.
4.1.1 Export All Event Columns
If you select Export All Event Columns, all event data and columns will be exported.

4.1.2 Export Current List
If you select Export Current List, additional settings will appear:
- Internal Notes: Check this box to include internal notes added by dashboard users.
- Default Filters: Select preferred filters such as Categories, Tags, and Organizers.
- Custom Fields: Select custom fields from the drop-down menu.
- Custom Filters: Select custom filters from the drop-down menu.

4.2 PDF Export Options
After selecting PDF as your export file format, you can further customize the report using:
- Default Filters: Select preferred filters such as Categories, Tags, and Organizers.
- Custom Fields: Select custom fields from the drop-down menu.
- Custom Filters: Select custom filters from the drop-down menu.

4.3 ICS Export Options
After selecting ICS as your export file format, you can enable the following options:
- Include HTML: include the HTML for the event description.
- Include Image: include event cover image.

4.4 Finalizing Your Export
Once you’ve selected your file format and options, choose one of the following:
- Export File: Generates the export immediately.
- Save and Schedule: Saves the export settings and lets you schedule the report.

This straightforward process makes it easy to produce and share comprehensive reports on venue spaces, helping you stay organized and informed about space usage.
Need Additional Help?
For further guidance and support, please visit our Help Center. Additionally, if you have any inquiries or need assistance, don’t hesitate to contact our customer success team by opening a support ticket from your Timely account’s dashboard.
Moreover, in case you require additional assistance in implementing and using Timely venue management system, we are happy to assist. Explore all the professional services we offer, and feel free to get in touch with us today!