
In Timely’s Venue Management solution, the space calendar allows users to view and book available spaces. By default, the “Add Event” button may appear on this calendar, allowing event submissions directly from the public interface. If you’d prefer to simplify or control how users submit events, you have the option to hide the “Add Event” button from the space view. This can help you guide users through a more tailored booking process or display the button in a different location on your website.
1. What is the “Add Event” Button and the Hide “Add Event” Button for Space Views Features?
The “Add Event” button allows external users to create events and book spaces from your space view. It appears on your space view’s public interface when the Community Events module is enabled and the Enable Space Booking in the Event Submission Form option is set up.

Hiding the “Add Event” button for space views will remove the option for people to book spaces from the space view. By toggling this setting, you can customize the appearance and functionality of your calendar to suit your preferences and requirements.
2. Benefits of Hiding the “Add Event” Button
Customizing the visibility of the Add Event button offers several benefits, including:
- Guided Submission Flow: Redirect users to a dedicated submission page with clear instructions, improving form accuracy and consistency.
- Controlled Access and Booking Management: Limit where users can submit event requests, helping you manage bookings more efficiently and prevent unwanted submissions.
- Focused User Attention: Simplify the interface to keep users focused on the intended actions—whether that’s viewing availability or submitting through the proper channels.
- Decluttered Interface for Better User Experience: Hide the Add Event button from the calendar views when unnecessary to create a cleaner, more intuitive event listing that’s easier to navigate.
3. How to Hide the “Add Event” Button from the Space View Toolbar
Follow these simple steps to hide the “Add Event” button from your Timely space view:
- Log in to your Timely dashboard.
- On the left menu, go to Community Events, then press Settings.
- In the Settings menu, go to Spaces.
- Locate and click on the option “Hide add event button for space views”.

- Once you’ve enabled the setting, be sure to save your changes to apply them to your calendar.
4. Hiding the “Add Event” Button from the Event Calendar View Toolbar
Follow these simple steps to hide the “Add Event” button in your Timely integrated event calendar:
- Log in to your Timely dashboard.
- On the left menu, go to Community Events, then press Settings.
- In the Settings menu, locate and check the option to Hide the Add Event button for event views.

- Once you’ve enabled the setting, be sure to save your changes to apply them to your calendar.
5. How to Display the “Add Event” Button in a Different Area of your Website
To place the “Add Event” button on a different area of your website, follow these simple steps:
- Log in to your Timely dashboard.
- On the left menu, go to Settings and choose the Embed Code tab.
- Under the “Type” dropdown, choose “Add Event Button”.
- Click Copy Snippet to copy the embed code.
- Paste the code into the desired location on your website.
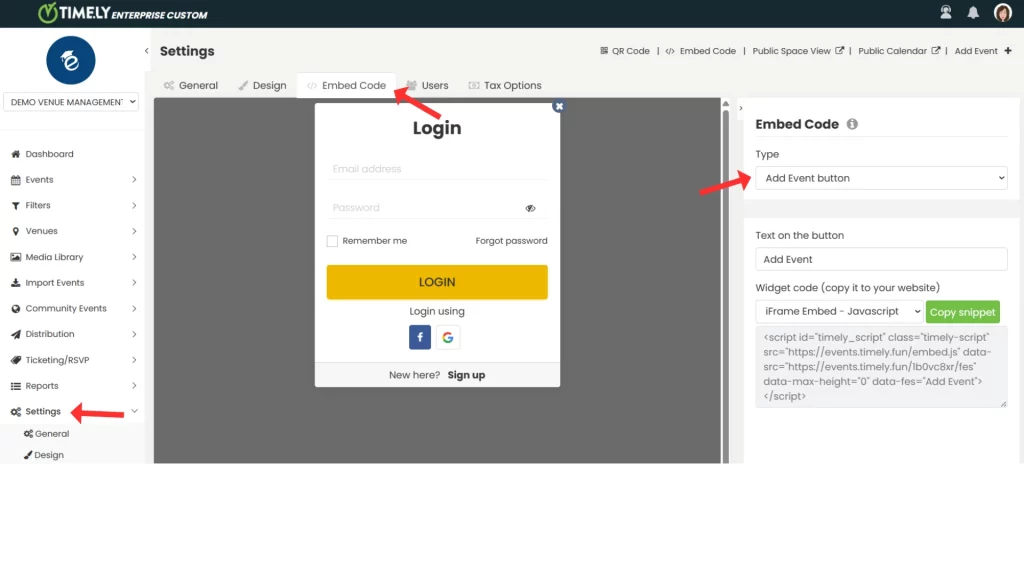
You can now direct users to book spaces from a custom page, allowing you to provide additional context or instructions.
By following these steps, you can easily customize your Timely space view to suit your organization’s needs and preferences. Streamline your event and venue management process and create a more polished calendar interface today!
Need Additional Help?
For further guidance and support, please visit our Help Center. Additionally, if you have any inquiries or need assistance, don’t hesitate to contact our customer success team by opening a support ticket from your Timely account’s dashboard.
Moreover, in case you require additional assistance in implementing and using Timely venue management system, we are happy to assist. Explore all the professional services we offer, and get in touch with us today!