Managing communication with people who request to book your spaces is essential for providing a smooth and professional service. With Timely’s venue management software, you can manually send custom email notifications to people who submit booking requests. This ensures that they are kept informed about their booking status, updates, or any additional details, helping you deliver an excellent customer experience throughout the booking process.
In this guide, we will walk you through how to set up custom email templates and manually send notifications—whether individually or in bulk—to improve communication with your space booking submitters.
1. Benefits of Custom Notifications
Sending custom notifications to space requesters provides several key advantages:
- Personalized Communication: Tailor your messages to specific details related to the space booking, making your communication more relevant and engaging. This personalized touch helps submitters feel valued and informed.
- Real-Time Updates: Whether informing submitters of changes or sharing additional instructions, custom emails ensure that submitters receive timely and accurate information about their booking requests.
- Operational Flexibility: Manually sending notifications allows you to adapt your messages as needed, based on specific requests or changes, offering a more responsive and personalized service.
By utilizing Timely’s custom notification system, you can enhance communication, improve user experience, and streamline the room booking process.
2. What Are Custom Manual Notifications?
Custom manual notifications are personalized emails that you send manually to space booking submitters. Unlike automated emails, which are triggered by specific system events, these notifications provide flexibility in timing and content, allowing you to communicate tailored messages specific to each room booking.
3. Creating Custom Email Templates for Room Booking Submitters
Before sending custom notifications, it’s recommended to set up email templates. These templates will save time and help maintain consistent, professional communication. Here’s how to create a custom email template in Timely:
- Log in to your Timely Dashboard.
- From the main menu, select Community Events, then click on the Templates tab.
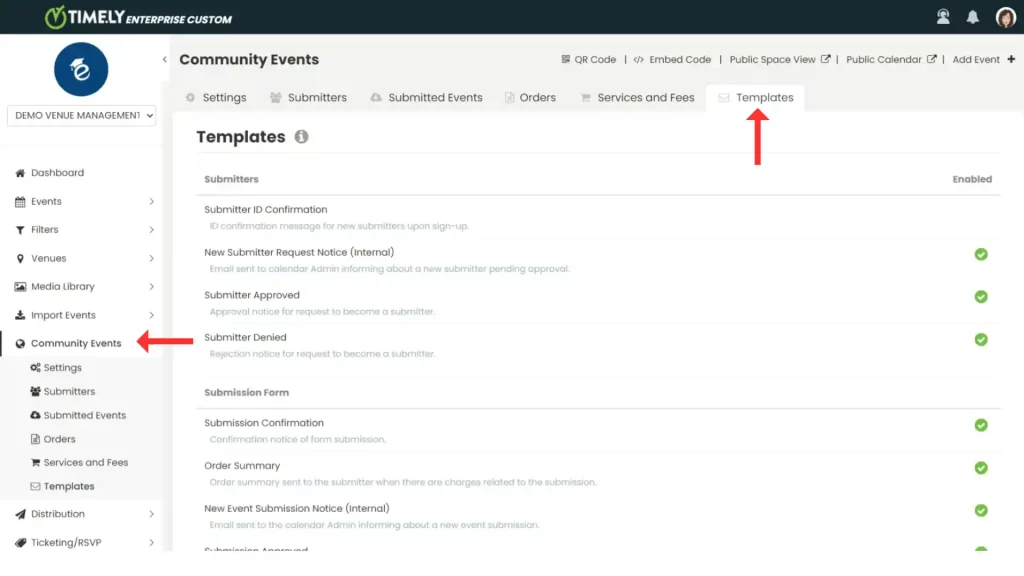
- Scroll down to the Custom Notification Templates section, where you can view the available templates.

- Click on +Add Item to create a new template. This opens the template editor, where you can customize the following:
- Template Name: Choose a recognizable name to easily identify the template later.
- Email Subject: Write a subject line that reflects the purpose of the message.
- Header: Personalize the greeting to make it relevant and welcoming.
- Body: Compose the main message, incorporating dynamic fields to personalize details such as booking date or room information.
- Footer: Include your closing information, such as your signature, logo, or contact details.
- Preview the message by sending a test email to yourself to ensure it is accurate and clear.
- Once satisfied, click Save.
Your custom email templates will now be available when you manually send notifications to room booking submitters.
4. How to Manually Send Custom Notifications
Once your templates are set up, you can start sending personalized notifications. Below is a step-by-step guide on how to manually send notifications to individual or multiple submitters.
4.1 Sending Custom Notifications to Individual Submitters
- Log in to your Timely dashboard: Timely Dashboard.
- From the main menu, click on Community Events.
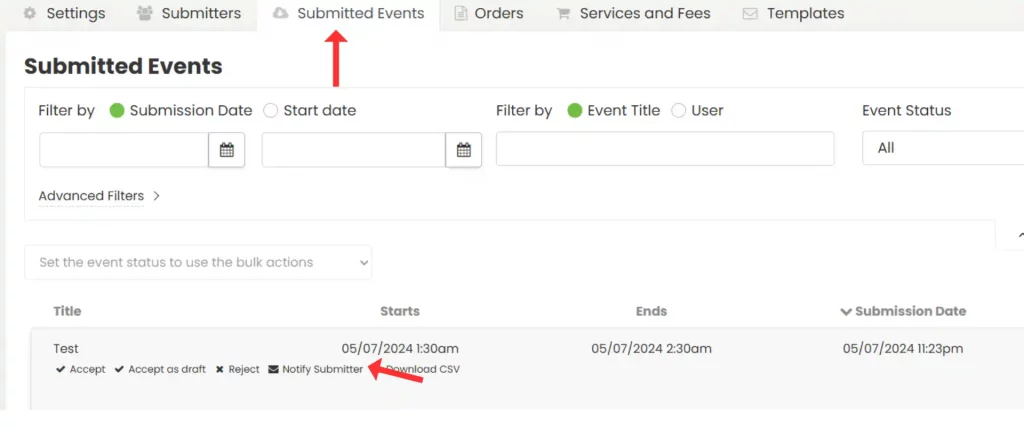
- Go to the Submitted Events tab to view all submitted room booking requests or Orders for Space Reservation.

- Use filters to narrow down results by submission date, venue, space, or organizer, if necessary.

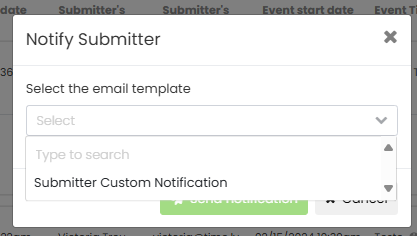
- After selecting a submitter, hover over the booking’s name and click on Notify Submitter.
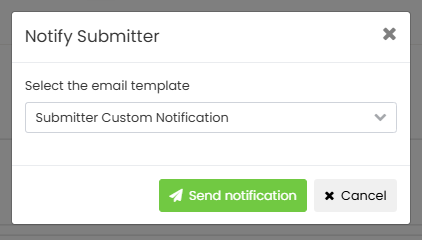
- In the pop-up window, select a custom notification template from the dropdown menu. Click Send Notification. The system will automatically send the personalized email to the submitter.
4.2 Sending Bulk Notifications to Multiple Submitters
To notify multiple submitters at once, follow these steps:
- Log in to your Timely account
- From the main menu, go to Community Events, then click on the Orders tab.
- Use the filters at the top of the screen to locate specific bookings you wish to notify.
- Select the checkboxes next to the booking requests you want to include, which activates the bulk action feature.
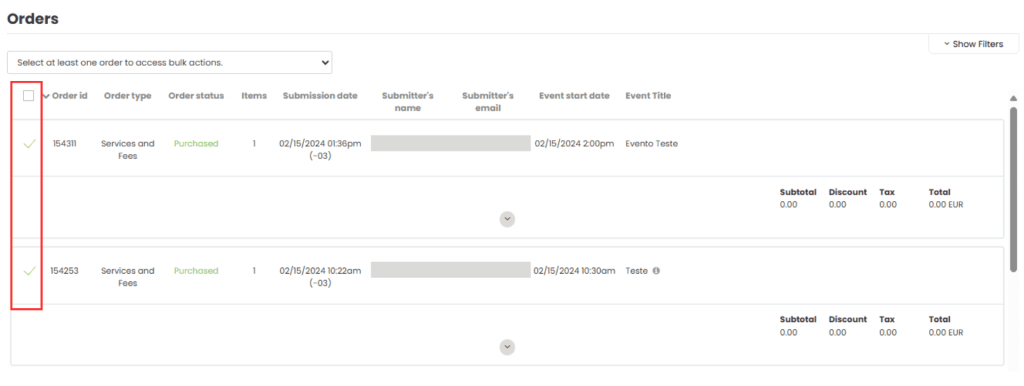
- In the action dropdown menu, choose Notify Submitters.

- A pop-up window will appear—select your custom email template. Click Send Notification. You’ll receive confirmation once the notifications have been successfully sent.
5. Avoiding Duplicate Notifications
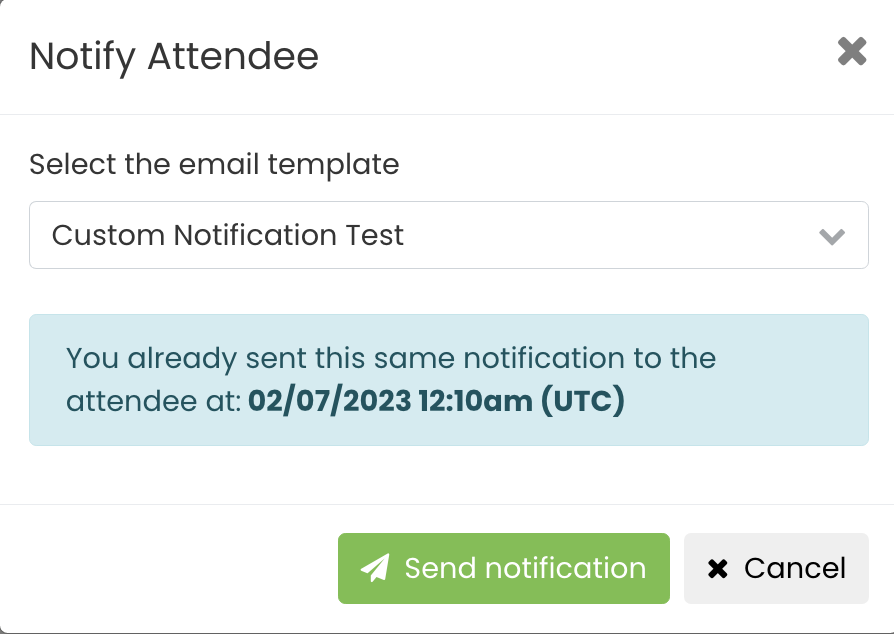
Timely’s system includes an alert feature to prevent duplicate notifications from being sent to the same recipients. If you attempt to resend a notification to a submitter who has already received one, a pop-up will appear showing the date and time the last notification was sent. You can then choose to either proceed with sending or cancel the action to avoid duplication.
Using Timely’s manual notification feature enables you to maintain clear, personalized communication with room booking submitters. Whether you are confirming a booking, providing instructions, or sending updates, custom emails ensure that your messages are professional, timely, and relevant to your users’ needs. This helps improve overall satisfaction and enhances your service quality.
Need Additional Help?
For further guidance and support, please visit our Help Center. Additionally, if you have any inquiries or need assistance, don’t hesitate to contact our customer success team by opening a support ticket from your Timely account’s dashboard.
Moreover, in case you require additional assistance in implementing and using Timely venue management system, we are happy to assist. Explore all the professional services we offer, and feel free to get in touch with us today!