
In this guide, you’ll learn how to configure the venue and space views layout of the public interface of your Time.ly venue management software. We’ll cover each step to help you quickly and easily configure your venue design settings to match your desired branding. This guide will walk you through the steps to make your space view truly yours.
1. Why Customizing your Venue Design Settings?
Designing your Time.ly space views is a crucial step in optimizing your venue’s digital presence. The way your spaces are presented can significantly impact your business in several ways:
- Attracting Website Visitors: A well-designed space view is the first thing potential clients see when they visit your website. By making it visually appealing and easy to navigate, you can capture their attention, encourage longer visits, and increase the chances of them returning. A professional, attractive presentation can make the difference between a quick glance and a serious inquiry.
- Showcasing Venue Content: Your website should be the go-to source for all information about your venue and available spaces. By customizing your space views, you can highlight key features, display stunning photos, and provide detailed descriptions that give potential clients all the information they need in one place.
- Generating Revenue: Effective design can directly influence your bottom line. By showcasing your spaces in the best possible light, you increase the likelihood of bookings. Potential clients are more likely to rent a space when they can easily see its availability, understand its features, and visualize how it fits their needs. The more appealing and informative your space views, the more likely you are to convert website visitors into paying customers.
2. Understanding the Space Views: Gallery vs. Schedule
With respect to venue design settings, Time.ly offers three different views to display your spaces: the Space Gallery, the Space Schedule, and the Space Daily Schedule. Each serves a different purpose and caters to different user needs.
2.1 Space Gallery View
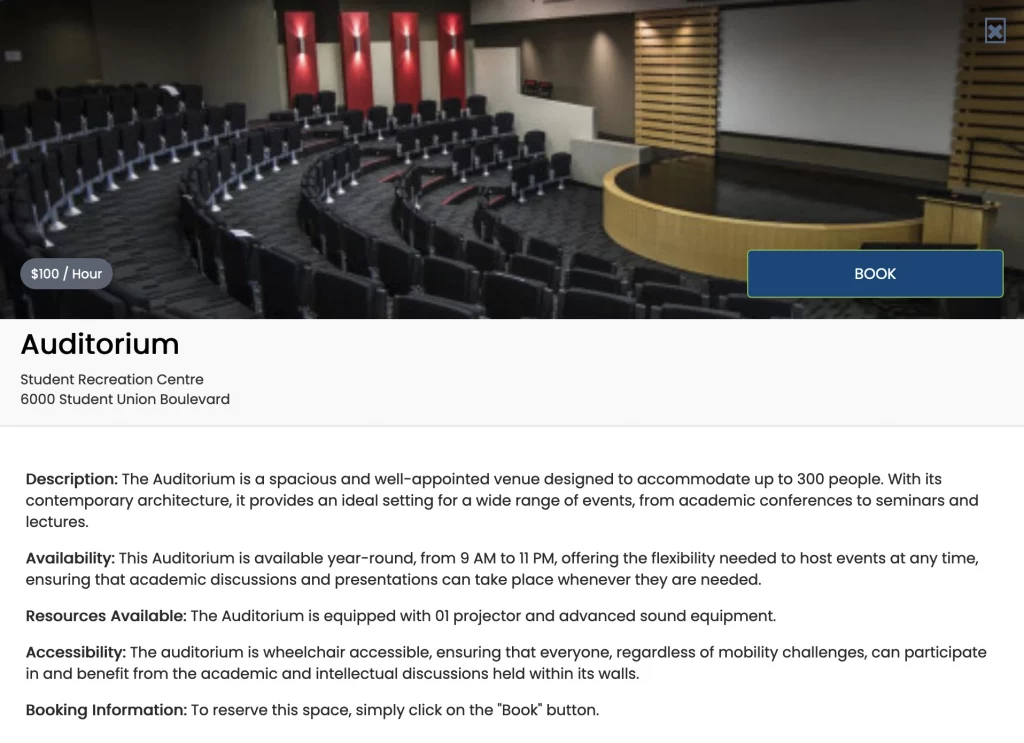
The Space Gallery view is perfect for showcasing your spaces with high-quality images. This view allows you to present your venue’s spaces visually, helping potential clients to explore each space as if they were there in person. It’s an ideal option for clients who are in the early stages of their decision-making process, as they can easily browse through the spaces, get inspired, and identify which ones might suit their needs. This view works well for venues that want to highlight the aesthetic and functional aspects of their spaces.
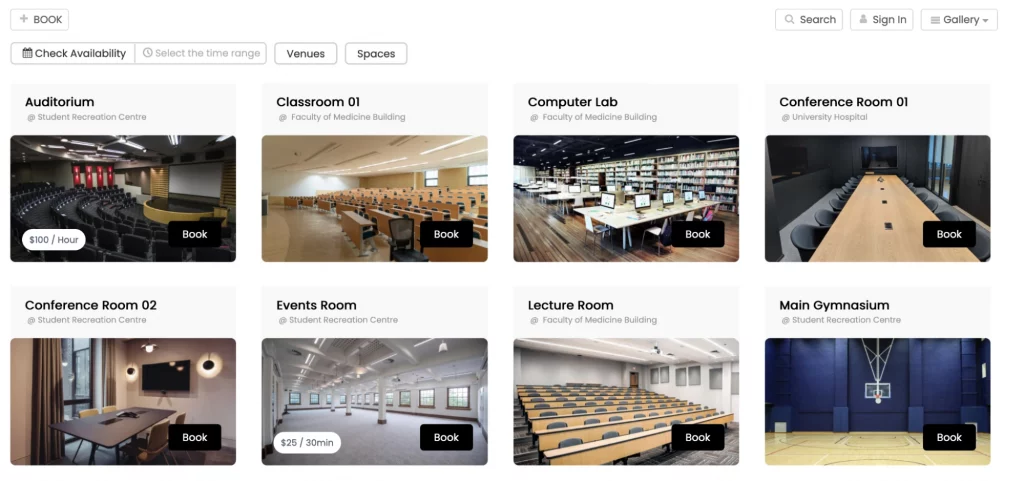
Here you can see the Space details within the space gallery view:
2.2 Space Schedule View
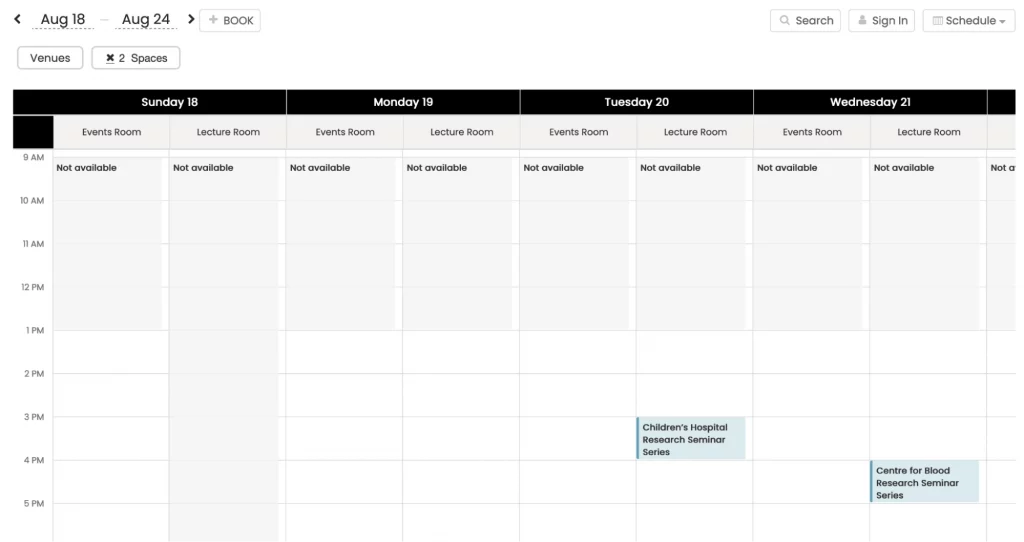
This view operates similarly to an online calendar, displaying the available time slots for each space within a week. This view is practical for users who are ready to book and want to quickly check availability. It’s particularly useful for clients who are familiar with your spaces and are more focused on finding the right time slot. This view helps streamline the booking process by making it easy to see when spaces are free, encouraging faster decision-making.
2.3 Daily Space Schedule View
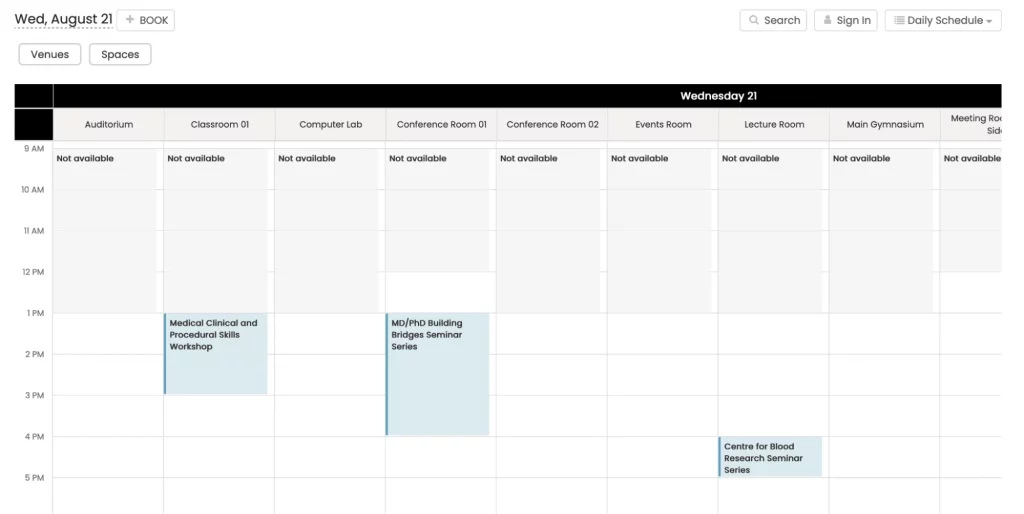
This view operates similarly to the space schedule view but is tailored to show events occurring in your spaces one day at a time. It provides a focused, real-time snapshot of daily bookings, making it easier for people to quickly assess availability and upcoming events on a day-by-day basis. This view is especially beneficial for organizations that offer online reservations for multiple spaces, allowing them to efficiently oversee daily operations, reducing the likelihood of booking conflicts or missed events.
3. Customizing the Venue Design Settings
Navigate to the venue design settings by following these steps:
- Log into your Time.ly account;
- On the main menu on the left, click on Settings.
- Then, select the Design tab.
Here, you can edit a variety of settings to tailor your space views’ appearance, such as:
- Theme
- Font Settings
- Custom Colors
- Advanced Customizations
3.1 Theme
Time.ly offers a collection of 13 default themes, each with its own style to suit various event types and preferences. Here’s a look at the themes:
- Amsterdam: Sleek and modern, perfect for business events, professional conferences, and formal gatherings.
- Antique: Elegant and vintage, ideal for cultural events, art exhibitions, and historical tours.
- Corporate: Professional and polished, suited for corporate calendars, conferences, and seminars.
- Custom: Versatile and customizable, great for personal planners, community events, and project management.
- Default: Clean and classic, useful for personal, business, and educational schedules.
- Echeveria: Visually captivating, perfect for creative events, fashion, art, and vibrant presentations.
- Twilight: Mysterious and sleek, ideal for nightlife events, concerts, and film festivals.
- Minimal: Simple and modern, suited for personal planners and productivity schedules.
- Night: Captivating and mysterious, great for nightlife, entertainment, or events seeking intrigue.
- Peacock: Vibrant and colorful, ideal for festivals, celebrations, and creative events.
- Timely: Fresh and playful, perfect for community events, educational programs, and wellness activities.
- Classic: Timeless and elegant, fitting for formal occasions and professional networking events.
- Legacy: Modern and sophisticated, ideal for fashion, art, lifestyle, and elegant gatherings.
Explore these options to find the theme that best suits your brand and style.
3.2 Font Settings
With Timely venue design settings, you can customize fonts for your space view:
- Go to your Timely dashboard.
- Select the desired font from Google Fonts or Typekit.
- Copy the font URL.
- In the “Font URL” box, paste the URL.
- Specify the font name for each section.
3.3 Custom Colors
Personalize your space views and space details by changing colors in various elements like background, border, and title. Easily revert to the original color scheme if needed. Here’s how you can do it:
- Click on the desired option to choose the element you want to customize.
- A color picker box will appear, allowing you to select your preferred color.
- You can either drag the color selector within the box or type the hex code of the desired color in the appropriate field.
- Once you’ve chosen your desired color, it will be applied to the selected element.
- If you want to revert to the original color scheme, you can click on the “Restore Default” button.
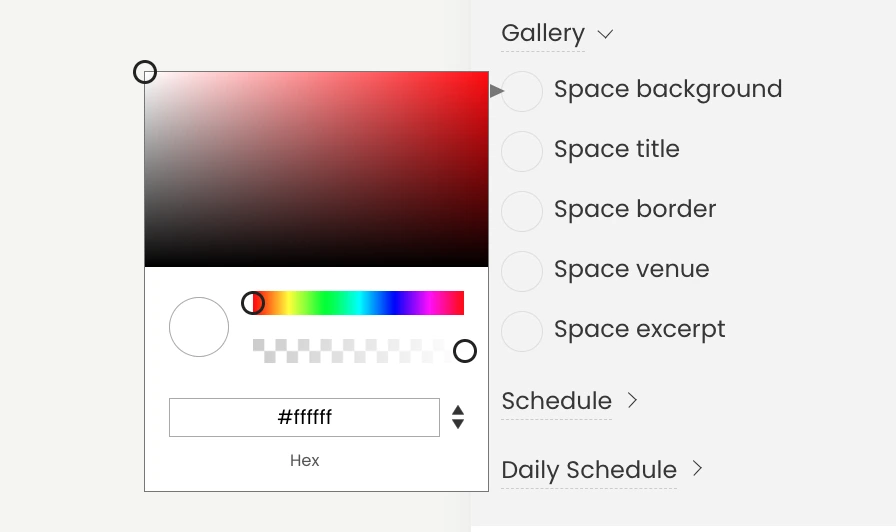
By following these steps, you can thoroughly customize the colors of your space views, creating a visually appealing and cohesive design that aligns with your branding or website aesthetics.
3.4 Venue Design Settings Advanced Customizations
CSS, or Cascading Style Sheets, is a powerful language used to define the visual appearance and layout of HTML documents. It allows you to control various elements of your calendar, such as fonts, colors, backgrounds, and more. With CSS, you can transform the default look of your space view into a unique and visually appealing representation of your brand.
To get started with CSS customization, follow these steps:
- Log into your Time.ly dashboard.
- On the main menu on the left, click on Settings.
- In the Settings menu, click on the Design tab to access the account design settings.
- On the right side of the screen, you’ll find the Advanced Customization section. Click on Advanced Customization to open some options, and then press on the Custom Style Sheet (CSS) section.
- In the Custom CSS box, add your CSS code to customize your calendar’s appearance. If you want the same CSS for both standalone and embedded calendars, simply fill in the CSS code in the first box and leave the Embed Customization checkbox unchecked. If you want to have different CSS for the embedded calendar, check the Embed Customization checkbox. Once you check the checkbox, a second box will appear where you can add a custom style sheet specifically for the embedded calendar space.
- For best practices, consider adding custom styles to classes that start with a “timely-” prefix. These classes are more likely to remain consistent across new releases, ensuring your customizations work smoothly.
With the flexibility and control that CSS provides, you can take your calendar design to the next level.
Congratulations! Your Timely venue design settings is complete. Now, your space view is uniquely tailored to your brand and preferences.
Need Additional Help?
For further guidance and support, please visit our Help Center. If you have any inquiries or need assistance, don’t hesitate to contact our customer success team by opening a support ticket from your Timely account’s dashboard.
In case you require additional assistance in implementing and using Timely venue management system, we are pleased to assist. Explore all the professional services we can offer you, and get in touch with us today!