
When external users submit a booking request through your public space view, those requests land in the Bookings dashboard for your review. There, you can accept paid booking requests and move them forward to payment, reject them to release the spaces, or edit the booking details before taking any action. This guide walks you through each of those workflows.
1. Benefits of Managing Paid Booking Requests
- Keep your space availability accurate by approving or rejecting requests before resources are committed.
- Review and adjust booking details — space, resources, services, and pricing — before sending a payment request.
- Maintain a clear audit trail: every action is recorded in the booking timeline with the date and the team member who acted.
- Communicate automatically with customers through built-in notifications at each stage of the review process.
2. How to Access the Bookings List
The Bookings menu is a dedicated section in your Timely dashboard.

- Log in to your Timely account.
- Navigate to Bookings in the left-side dashboard menu.
- The Bookings list displays all booking records with the following fields:
- Booking ID
- Title
- Customer Name
- Customer Email
- Booking Status
- Creation Date
- Total Amount
| Note: The Bookings menu is only visible if the booking management feature is enabled for your calendar. Contact your Timely account manager if you do not see it. |
2.1 Filtering and Searching Bookings

You can filter and search the list to find specific booking requests:
- Date range: filter by booking date or creation date.
- Booking Status: filter by a specific status (e.g., Pending Review, Confirmed, Rejected).
- Search: search by Booking ID, Title, Customer Name, or Customer Email. All searches support partial matches and are case-insensitive.
3. How to Review a Paid Booking Request
When an external user submits a booking request under the Charge after approval payment mode, the booking arrives with the status Pending Review. You will receive a New Booking Request Notice notification. To review the request:
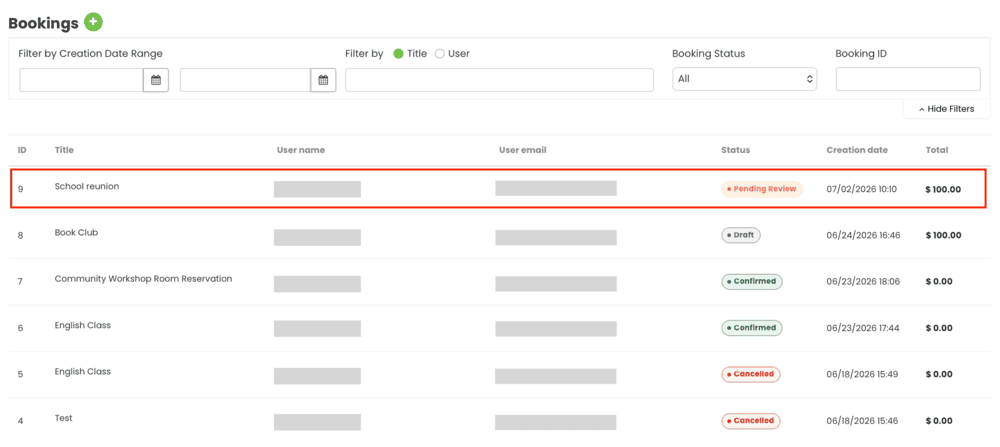
- Navigate to Bookings in your dashboard.
- Locate the booking with status Pending Review.
- Click View details on the booking row to open the booking form.
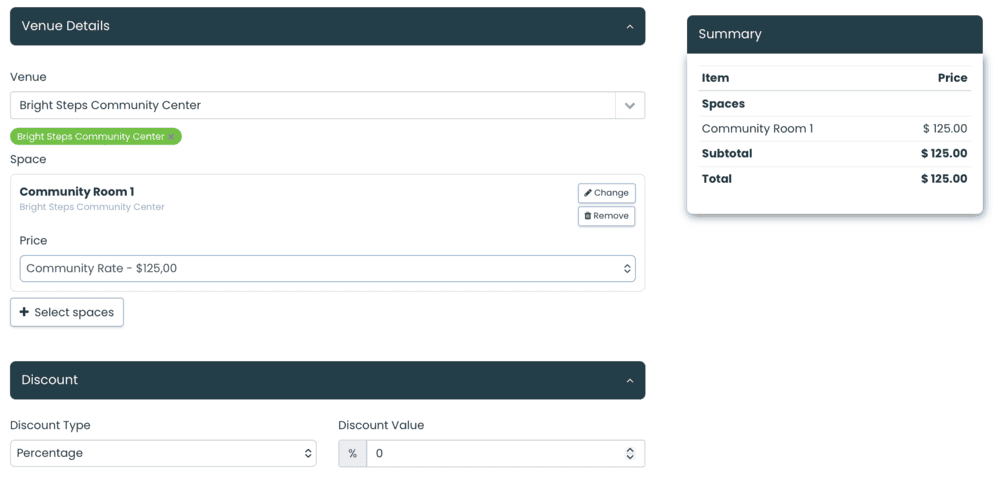
- Review the full booking details: title, date and time, selected space, resources, services and fees, total amount, and any custom fields filled by the external user.
| Note: While reviewing a booking request, you can edit any booking information before approving or collecting payment. This includes the space, resources, services and fees, date and time, and pricing. Changes made during review may affect the total amount charged to the external user. |
4. How to Accept a Paid Booking Request
Accepting (approving) a paid booking moves it to the next stage: requesting payment from the external user, or collecting payment directly.

4.1 Send to Customer (Request Payment)
Use this option to send the external user a payment link so they can pay online through your public space view.
- Open the booking from the Bookings list.
- Review the details. Optionally edit any fields before approving.
- Click Approve at the bottom of the booking form.
- Select Request payment when prompted for the payment collection method.
The system will:
- Change the booking status to Pending Payment.
- Create an order with status Pending.
- Send a Booking Payment Request email notification to the external user with a link to the My Bookings page, where they can complete the payment by credit card.
| Tip: You can also approve a booking directly from the Bookings list without opening the detail view — use the shortcut action buttons displayed on each Pending Review row. |
4.2 Collect Payment in Person (Proceed to checkout)
If the customer is present or you are collecting payment manually, use Pay Now to confirm the booking immediately.
- Open the booking from the Bookings list.
- Click Approve at the bottom of the booking form.
- Select Proceed to checkout and choose a payment method: card, card reader, cash, or check.
- Process or record the payment.
The system will:
- Change the booking status to Confirmed.
- Mark the order as Paid.
- Send a Booking Confirmation notification to the external user.
5. How to Reject a Paid Booking Request
Rejecting a booking declines the request and releases the reserved space and resources back to availability.
- Open the booking from the Bookings list.
- Click Reject at the bottom of the booking form, or use the Reject shortcut action on the Bookings list row.
- Optionally, enter a rejection reason in the text field. This reason is recorded in the booking timeline and is visible to your team.
- Confirm the rejection.

The system will:
- Change the booking status to Rejected.
- Delete the availability hold event and release the space and resource availability.
- Cancel the associated order.
- Send a Booking Rejected notification to the external user.
| Note: Rejected is a terminal status — a rejected booking cannot be reopened or edited. If you need to accommodate the customer after rejection, you or the customer will need to create a new booking request. |
6. How to Edit a Paid Booking Before Acting
You can modify a booking in Pending Review or Pending Payment status before approving, rejecting, or collecting payment. Editing lets you adjust details to reflect what was agreed with the customer before triggering any notifications.
6.1 Editable Fields
The following fields are editable while the booking is in Pending Review or Pending Payment status:
- Title
- Date and time
- Space selection
- Resources (quantity and selection)
- Services and fees
- Custom field values
6.2 How to Edit a Pending Review Booking
- Navigate to Bookings and open the booking in Pending Review status.
- Click directly on the field you want to edit within the booking form.
- Make your changes.
- Click Save to save the changes without taking an approval action yet.
- When ready, click Approve or Reject to act on the request.
6.3 How to Edit a Pending Payment Booking
- Navigate to Bookings and open the booking in Pending Payment status.
- Make your changes to the booking details.
- Click Save.
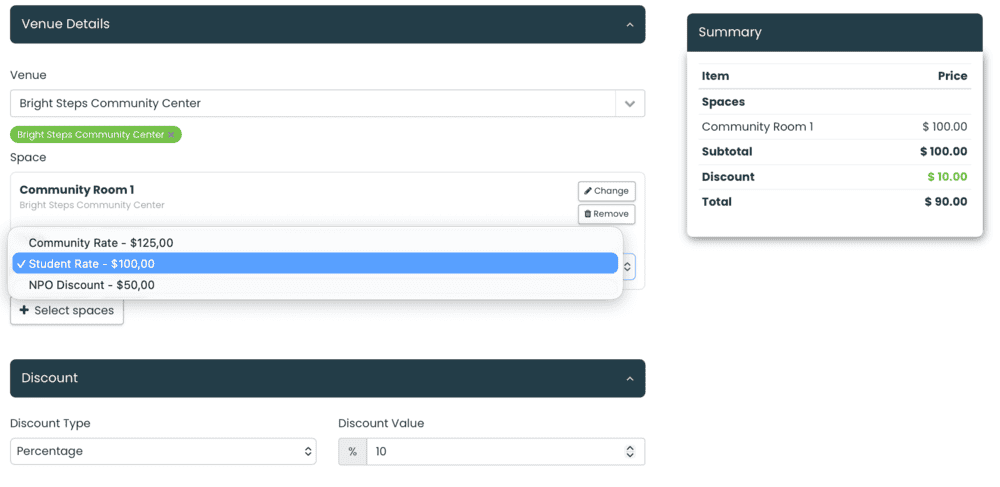
| Note: When you save edits to a Pending Payment booking, the system automatically regenerates and resends the Booking Payment Request notification to the external user with the updated price and details. Only edit a Pending Payment booking if you have agreed the changes with the customer in advance. |
7. Booking Statuses Explained
Understanding the booking status helps you know what actions are available at each stage.
| Status | What it means | Available actions (dashboard) |
|---|---|---|
| Pending Review | External user submitted a request; awaiting your review. | View / Edit / Approve / Reject / Timeline |
| Pending Payment | Booking approved; payment link sent to customer. | View / Edit & Save / Reject / Proceed to Checkout / Timeline |
| Confirmed | Payment received. Booking is active. | View / Cancel / Refund / View Order / Timeline |
| Rejected | Booking was declined by internal user. Terminal. | View / Timeline |
| Cancelled | Booking was cancelled. Availability released. | View / Timeline / Refund (if paid) |
| Expired | Payment deadline passed without payment. Terminal. | View / Timeline |
By following these steps, you can efficiently review incoming booking requests, approve them with the right payment collection method, reject requests that cannot be accommodated, and edit booking details at any point before the booking is confirmed. Every action is recorded in the booking timeline, giving you a complete history of each reservation.
Need Additional Help?
For further guidance and support, please visit our Help Center. Additionally, if you have any inquiries or need assistance, don’t hesitate to contact our customer success team by opening a support ticket from your Timely account’s dashboard.
Moreover, in case you require additional assistance in implementing and using Timely venue management system, we are happy to assist. Explore all the professional services we offer, and feel free to get in touch with us today!