If you’re using Timely venue management software to manage your venues and spaces, you can easily embed information about your spaces directly into your website. This allows you to showcase your available spaces and their details to your audience, making it convenient for potential clients to explore your offerings and book your spaces. In this comprehensive guide, we’ll walk you through the steps to set up the embed code for your space views.
1. Key Benefits of Embedding Timely Space Views on Your Website
Embedding information about your spaces from Timely onto your website offers several advantages. It provides a seamless way for your website visitors to explore your available spaces, including their specifications, features, and images. This can be particularly helpful if you offer spaces for booking events, meetings, or other purposes.
By embedding Timely space views, you can:
- Enhance User Experience: Visitors can easily find and view information about your spaces without leaving your website.
- Increase Booking Convenience: Interested individuals can check space availability and make room inquiries or rentals directly from your site.
- Showcase Space Diversity: Highlight different types of spaces you offer, such as meeting rooms, event halls, or outdoor venues.
- Save Time and Effort: Updates to your space details in Timely are automatically reflected on your website.
2. Supported Platforms for Embedding Timely Space Information
Timely’s space embed feature is versatile and can be integrated into various website content management systems (CMS) and platforms. Some of the supported platforms include:
- WordPress
- HTML
- Shopify
- Wix
- SquareSpace
- Joomla
- Drupal
- Magento / Adobe Commerce
- Adobe Experience Manager
- Weebly
- GoDaddy
- MicroSoft SharePoint / Power Pages
- Agility
No matter which CMS or platform you’re using, the general instructions for setting up the embed code for your space views are similar. Continue reading to learn how.
3. Setting Up Your Space Views Embed Code
To embed information about your Timely spaces into your website, follow these step-by-step instructions:
- Log in to your Timely account.
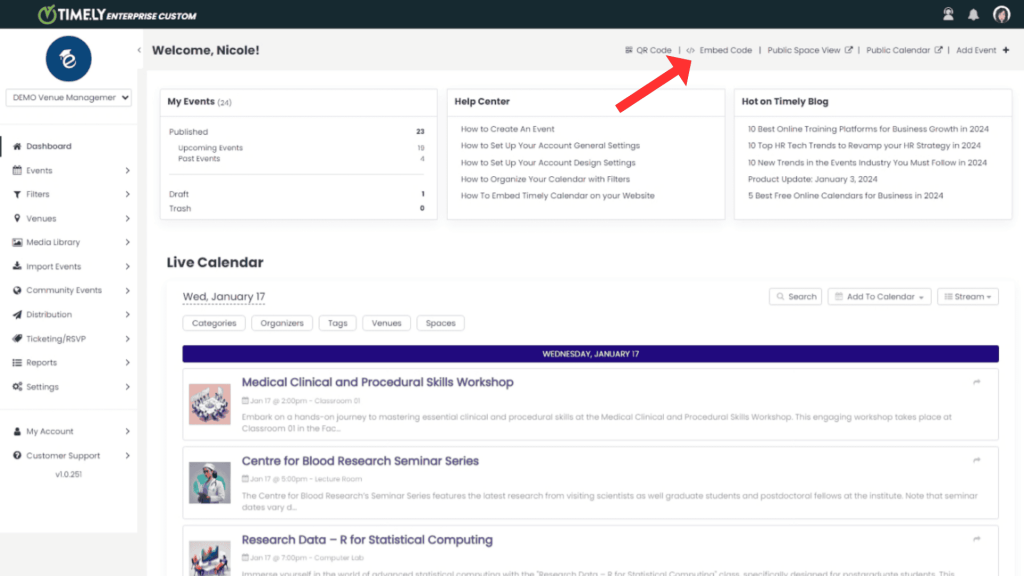
- On the top right corner, click on the Embed Code shortcut. Alternatively, go to Settings, then Embed Code.

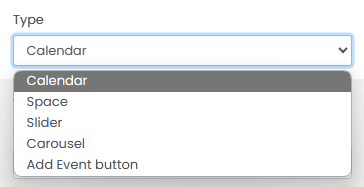
- Choose the Space option.

If you don’t want to customize the embed code, you can go straight to the widget code section below (6. Copying your Space View iFrame Embed Code). Otherwise, continue reading this post to learn more.
4. Advanced Settings
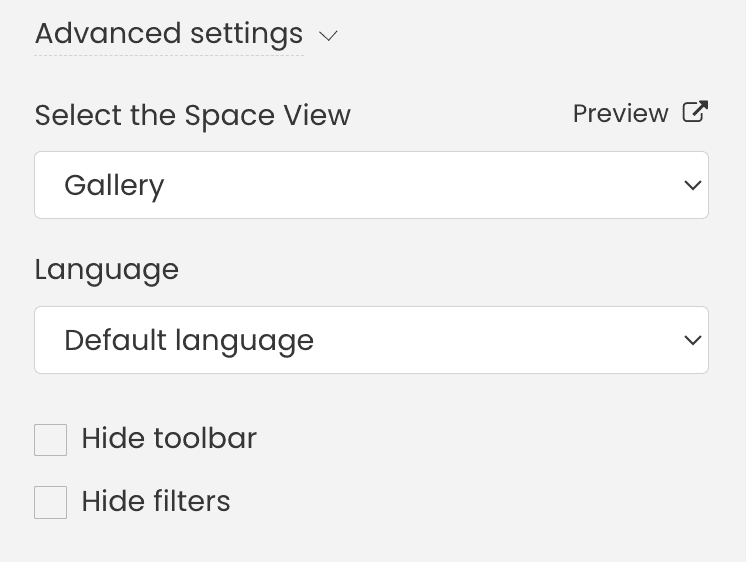
When it comes to showcasing your venues or spaces, customization is key. With Timely venue management system, you can easily customize various aspects of how your space views are presented. Use the embed code advanced settings to tailor the embed code for your space views to precisely match your needs, as follows:
- Select the space view: here you can pick the view you would like to use, it can be the same as the one for your main space calendar or you can choose a different option.
- Select the language: here you can select the language for your space calendar.
- Hide toolbar: here you can choose to hide the toolbar from the space calendar.
- Hide filters: here you can choose to hide the filters from the space calendar.

Whether selecting different views, adjusting language settings, or hiding toolbar and filter elements, these choices empower users to optimize the presentation of their calendars for enhanced user experience and accessibility.
5. Adding Filters to Your Space View Embed Code
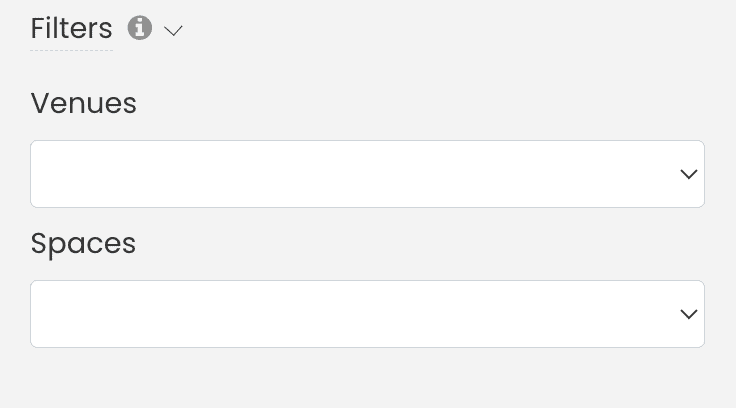
By setting up filters for your space view embed code, you can choose to display specific spaces in different booking pages of your website. In this way, viewers will only see spaces based on the venues you pick, or the exact spaces that you choose to display.

This feature proves invaluable, particularly in scenarios where you oversee multiple venues and seek to establish distinct booking pages for each. Additionally, it serves as a practical solution for creating dedicated web pages to showcase individual space schedules. Whether you’re managing an array of venues or aiming to highlight specific spaces, utilizing filters in the embed code for your space view empowers you to curate a tailored and streamlined experience for your audience.
6. Copying Your Space View iFrame Embed Code
After customizing your space view embed code, it’s time to generate your code snippet. To do so, simply follow these steps:
- Click on the “Widget code (copy it to your website)” filter.
- Choose the “iFrame Embed – Javascript” option.
- Click the “Copy snippet” button to copy your embed code.

Now, you can paste this code into the backend of your website to display your Timely space view. Depending on your CMS or platform, the process may vary slightly. Refer to specific instructions for embedding your code into CMS platforms below:
- WordPress
- HTML
- Shopify
- Wix
- SquareSpace
- Joomla
- Drupal
- Magento / Adobe Commerce
- Adobe Experience Manager
- Weebly
- GoDaddy
- MicroSoft SharePoint / Power Pages
- Agility
For assistance with other CMS or mobile applications not listed on our guides, please contact our customer support.
Embedding a Timely space view into your website enhances your visitors’ experience, effectively showcases your available spaces, and simplifies booking and rentals. Make your website a one-stop destination for space inquiries and reservations with Timely’s space view embed feature!
Need Additional Help?
For further guidance and support, please visit our Help Center. If you have any inquiries or need assistance, don’t hesitate to contact our customer success team by opening a support ticket from your Timely account’s dashboard.
In case you require additional assistance in implementing and using Timely venue management system, we are pleased to assist. Explore all the professional services we can offer you, and get in touch with us today!