
Timely‘s multi-language support and AI auto-translation features make it easier than ever to engage attendees from different linguistic backgrounds. These powerful tools allow event organizers to input event titles and descriptions in multiple languages, ensuring that event information is accessible and inclusive for everyone. In this guide, we’ll explore the benefits of these features and provide the necessary steps to use them effectively.
1. Benefits of Multi-Language and AI Auto-Translation Features
With Timely’s Multi-Language and AI Auto-Translation features, you can seamlessly provide event information in multiple languages, ensuring a more inclusive experience for attendees. Below are the key benefits of using these powerful tools:
- Increased Reach: Multi-language support and AI translation enable you to reach a broader audience, attracting attendees from different regions and linguistic backgrounds.
- Enhanced Accessibility: By providing event information in multiple languages, you ensure that non-native speakers can easily understand the details, making your event more accessible.
- Improved User Experience: Offering event information in the preferred language of your attendees enhances their overall experience and engagement with your event.
- Time-Saving Automation: AI auto-translation eliminates the need for manual translations, saving you time and effort while ensuring accurate and consistent translations.
2. What is Multi-Language and AI Auto-Translation for Events?
Multi-language support allows event organizers to input event titles and descriptions in multiple languages, making it possible for users to view event dynamic information in their preferred language on the calendar’s public view. The AI auto-translation feature further enhances this capability by automatically translating event content, eliminating the need for manual translation efforts.
These features complement the standard static content translation already included in Timely software. This means that static elements like dates, days of the week, months, times, and standard filters are automatically translated when the end-user switches the calendar language on the public interface —even if your subscription plan does not include the multi-language feature.
3. How to Use Multi-Language Feature
3.1 Select the Languages Available to your Audience
Before adding event translations, start by choosing the languages you want to display. Here’s how:
- Log in to your Timely dashboard.
- In the main navigation menu, go to Settings > General > Calendar Language.
- Under Enabled Languages, select the languages you want to display.
- Click Save.
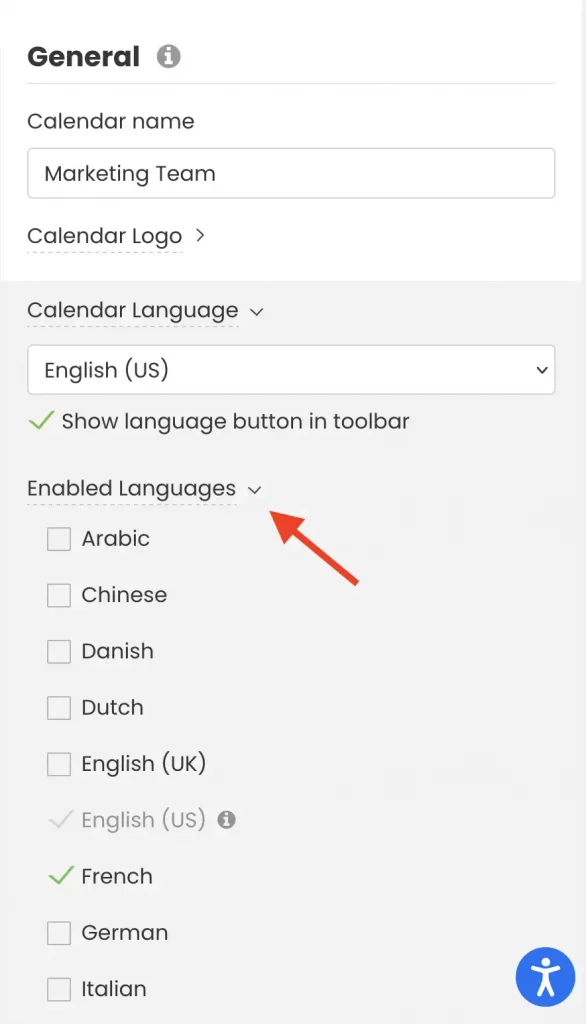
This setting will affect both the languages displayed in the public view and the languages available for translating the event title and description.
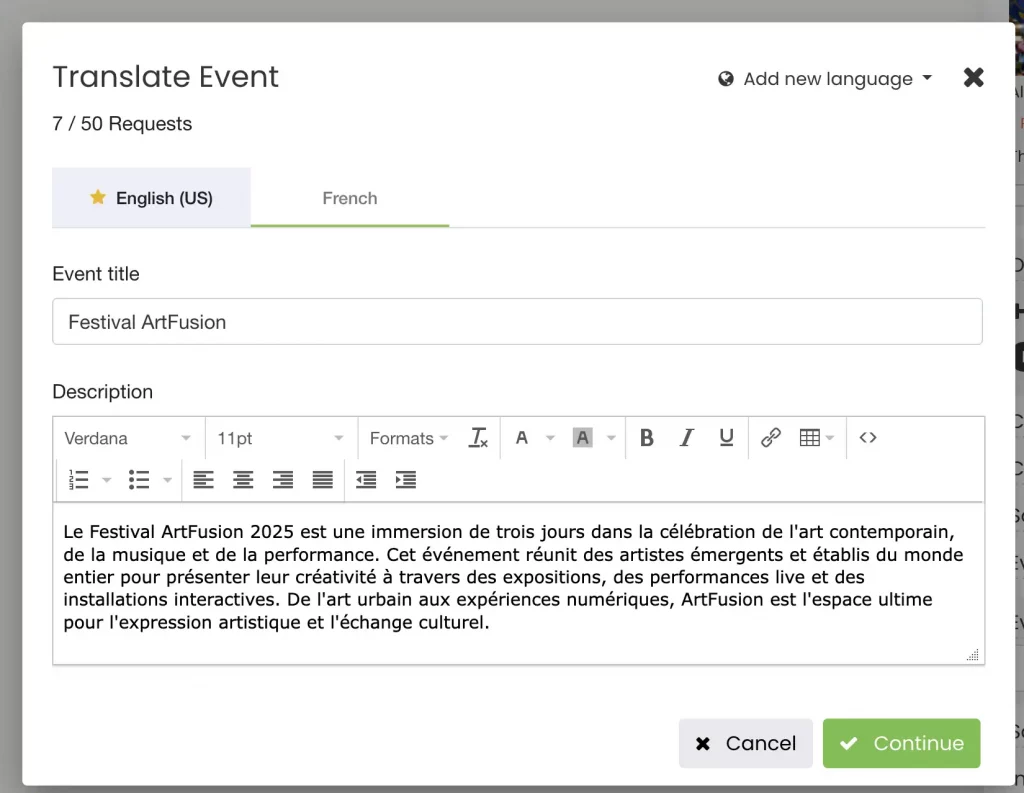
3.2 Manually Add Other Languages to Your Events
Enhance your event’s accessibility by adding multiple languages to your event information. Follow these steps to get started:
- Log in to your Timely dashboard.
- On the main navigation menu go to Events.
- In the Add Event section, start creating your event. You can also select a previously created event to edit if desired. Make sure you have included a title and description to the event.
- Find the Other Languages section, click on Add new languages, and choose your preferred languages, one at a time.

3.3 Use AI Auto-Translation for Events
Leverage the power of AI to automatically translate your event content, ensuring a seamless experience for your attendees. Here’s how to use this feature:
- After selecting your preferred languages, the AI will automatically generate the translations for you. You can make changes to the translated title and description if you’d like.
- Click Continue to save. Then, Publish the event or save it as draft, to keep your changes.
4. How your Audience will see the Translated Event Content
Once you’ve enabled multiple languages, your audience can easily switch between them to view event details in their preferred language. Here’s how it works from their perspective:
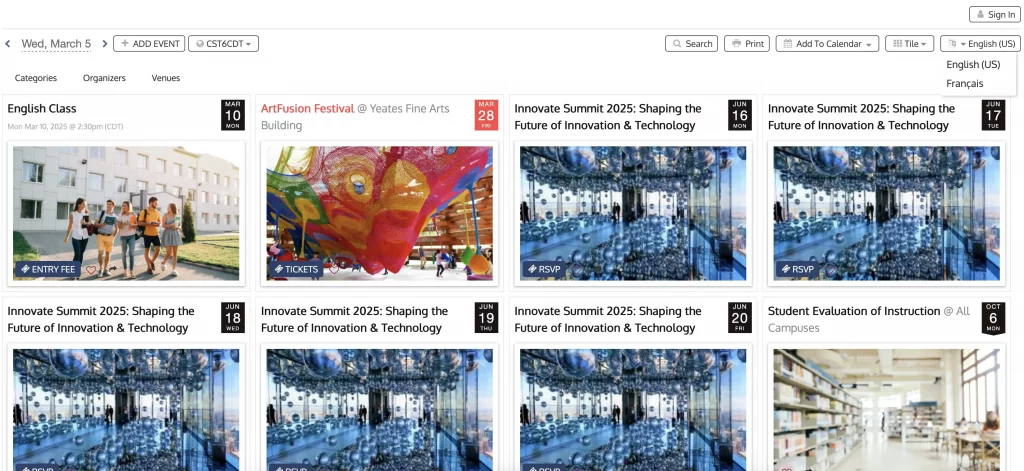
4.1 Using the Language Filter
- On your event calendar, visitors will see a language selector in the toolbar.
- They can click the dropdown menu and choose their preferred language.
- The calendar will automatically update, displaying all calendar and event content in the selected language.
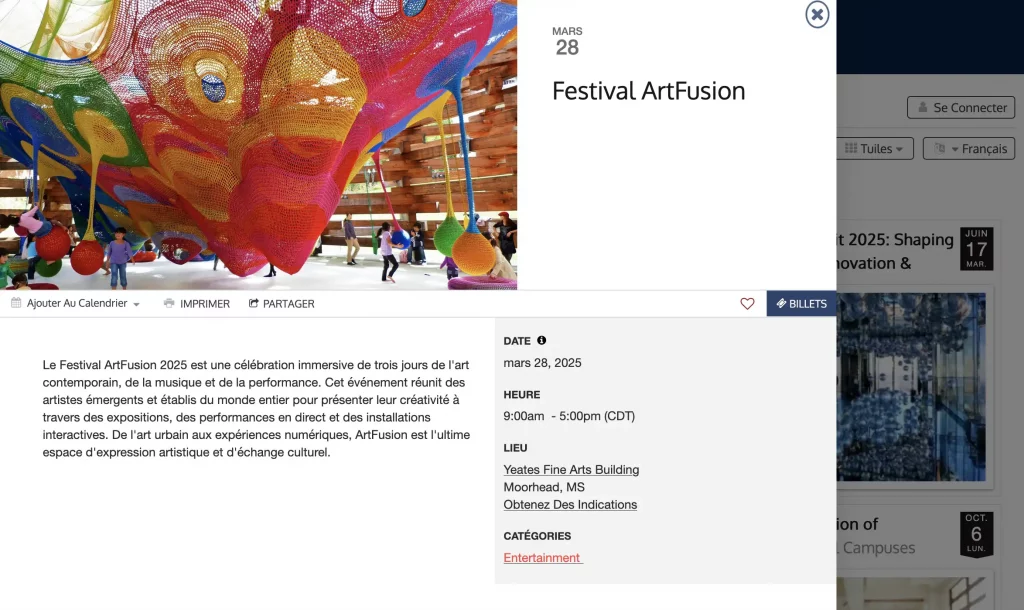
4.2 Viewing Translations in Event Details
- When clicking on an event, the event details page will display content in the language selected.
- If multiple translations are available, users can switch languages using the language selector on the calendar toolbar.
- The event title, description, and other details will appear in the chosen language, ensuring a seamless experience for multilingual audiences.
5. Using Timely’s Multi-Language Feature with a Multi-Language Website
If your website supports multiple languages and you want each translated page to display a calendar in the corresponding language, Timely’s multi-language feature allows you to achieve this seamlessly. Instead of relying on automatic language detection, you can embed a separate calendar code for each language version of your site.
To set this up, simply generate an embed code for each language within your Timely account and place the appropriate code on the corresponding language-specific page of your website.
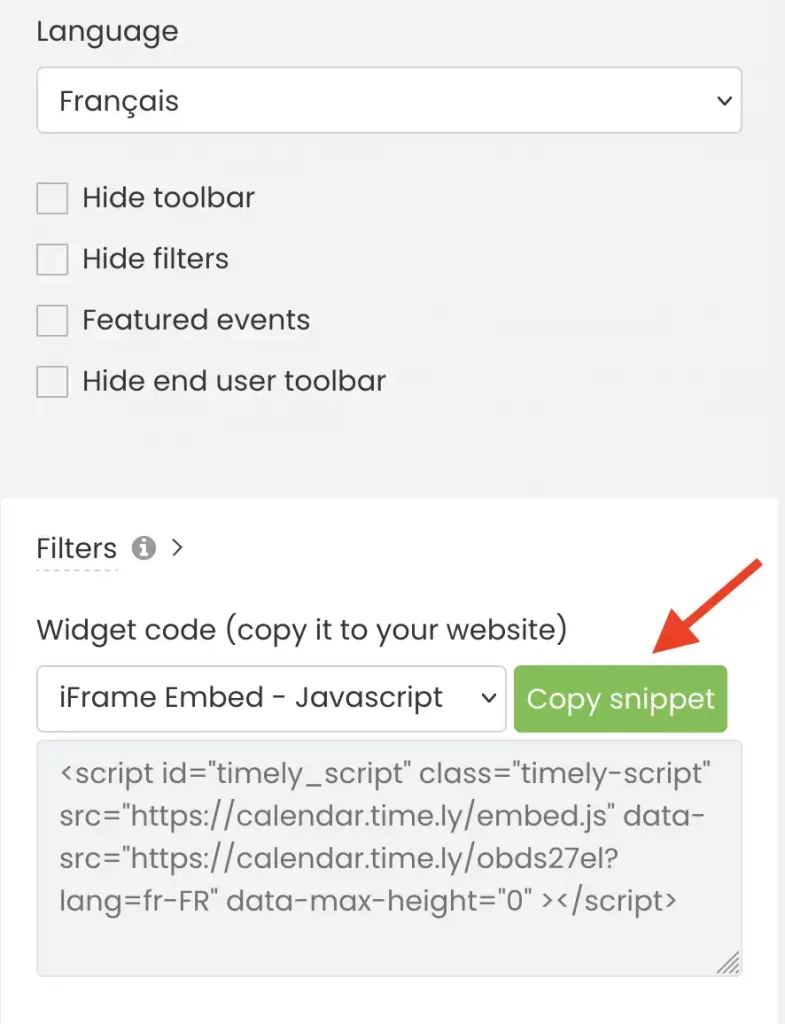
5.1 How to create embed codes with different languages
To create embed codes with specific languages follow these steps:
- Log in to your Timely dashboard.
- On the main navigation menu click on Settings and select the Embed Code tab.
- Under the Language section, select a language from the dropdown menu.
- Lastly, copy the customized embed code.
This ensures that visitors automatically see the calendar in the correct language without needing to switch manually. This approach provides a consistent and localized experience, improving accessibility and engagement for your diverse audience.
5.2 How to install the calendar embed code on your multi-language website
After copying the snippet into your embed code, paste it into your website’s backend. For step-by-step instructions tailored to different website hosting platforms, refer to our Embed Code Guides.
6. Conclusion
Using Timely’s multi-language support and AI auto-translation features can significantly enhance the accessibility and reach of your events. By following the simple steps outlined above, you can ensure that your event information is inclusive and engaging for a diverse audience.
These features not only improve the user experience but also save you time and effort, allowing you to focus on creating memorable events. Explore these powerful tools today and take your event planning to the next level with Timely.
Need Additional Help?
For further guidance and support, please visit our Help Center. If you have any inquiries or need assistance, don’t hesitate to contact our customer success team by opening a support ticket from your Timely account’s dashboard.
In case you require additional assistance in implementing and using Timely event management system, we are pleased to assist. Explore all the professional and managed event services we can offer you, and get in touch with us today!