With a Timely account and Timely event ticketing plan or ticketing add-on, you can customize your RSVP PDF and the Ticket PDF templates. Moreover, you can add or remove dynamic information to the templates and make it more adapted to your needs. This functionality is useful for creating a more personalized ticket experience for your customers. Learn all the steps here.
1. Timely Standard Event RSVP & Ticket PDF Templates
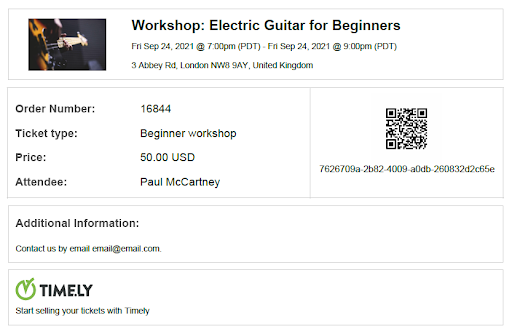
Timely’s standard PDF template, for both tickets and RSVPs / Registrations, has a clean and modern design. The image below shows an example of the Ticket PDF a customer will receive by email after buying an event ticket.

2. Customizable Event RSVP & Ticket PDF Templates
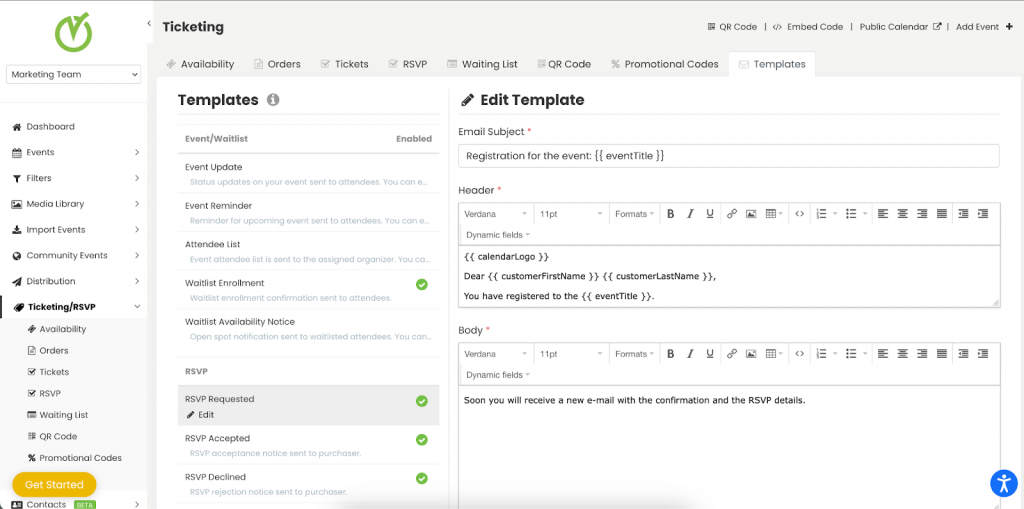
To customize your event RSVP or Ticket PDF template, go to your Timely account dashboard, and then click on Ticketing / RSVP > Templates. There are many types of templates you can edit, including emails and PDF templates. They are separated by type.
This user guide post talks about PDF templates. For notifications and email templates, please check this other helpful guide How to Customize Event RSVP and Ticket Email Templates.
3. How to Edit RSVP / Ticket PDF Templates?
To edit RSVP or Ticket PDF templates, hover the mouse over the template you want to customize. Then, click on the “Edit” button. A box will open on the right panel and you will be able to edit your PDF Template.

4. Customize your Title Subject Line
The templates will vary depending on whether they are Ticket or RSVP, but the changes are minor in the default templates, and you can customize the template for each of them separately. By doing so, you can create customized templates that are unique both for tickets and RSVP.

Remember that you can always go back to the original template by clicking the Restore Default Button at the end of the page.
5. Customize your PDF Content
Timely allows you to customize your PDF template content in a variety of ways, from changing the default fields to adding your own custom text.
You can change the following sections of the PDF template:
- Header;
- Body; and
- Footer.
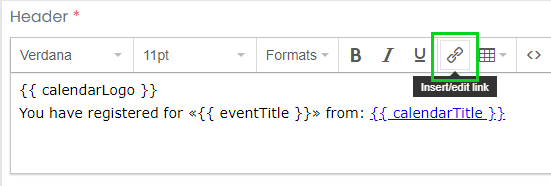
You can also insert or edit a hyperlink using the Insert/edit link button, next to the underline button in the editing toolbar.

When you click the button, a box will appear, and you can add the following properties:
- URL;
- Text to display;
- Title and
- Target.

For example, to add a link to Timely’s Event Management Software web page in a new window, you can set the properties to:
- URL: https://time.ly/
- Text to display: Timely | Event Management Software
- Title: Timely | Event Management Software
- Target: new window

6. RSVP and Ticket PDF Templates Dynamic Fields
Dynamic fields are a feature that pulls information directly from your event database, and populates your email template automatically, instead of typing them out every time.
You may want to use dynamic fields to quickly pull in your clients’ contact details, such as name and email address, or your event details, like event title, date and location. Usually, dynamic fields are used to personalize standard messages.
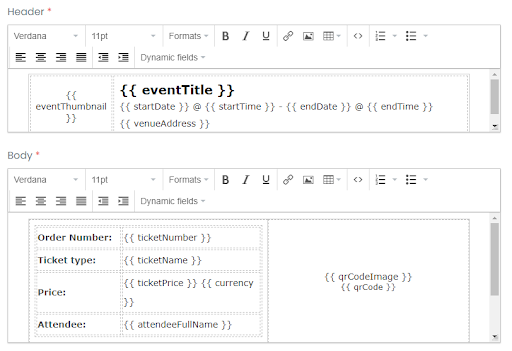
The example below shows the Content Header and Body dynamic fields options:

7. Dynamic Fields Description
7.1 General information
| Field Code | Field Name | Description |
addToCalendar | Add to Calendar | When this hyperlink is clicked by a user, the event is added to their own calendar |
| attendeeFullName | Attendee Full Name | The full name of the attendee |
| calendarIcon | Calendar Icon | The image icon for the calendar where the tickets were purchased or RSVP’d. |
| calendarLogo | Calendar Logo | The image logo for the calendar where the tickets were purchased or RSVP’d. |
| calendarTitle | Calendar Title | The title of the calendar where the tickets were purchased or RSVP’d. |
| calendarURL | Calendar URL | The website address of the calendar where the tickets were purchased or RSVP’d. |
| customerEmail | Customer Email | The email of the customer who purchased or RSVP’d. |
| customerFirstName | Customer First Name | The first name of the customer who purchased or RSVP’d. |
| customerLastName | Customer Last Name | The last name of the customer who purchased or RSVP’d. |
| endDate | End Date | The end date of the event |
| endTime | End Time | The end time of the event |
| eventDate | Event Date | The date of the event where the tickets were purchased or RSVP’d. |
| eventThumbnail | Event Image | |
| eventTitle | Event Title | The title of the event where the tickets were purchased or RSVP’d. |
| eventURL | Event URL | The event URL or link where individuals can RSVP or purchase tickets to the event. |
| extraInformation | Additional Information | This field lets the user add additional information to an event that can be added in the Event Details page for each specific event. |
| qrCode | QR Code | This dynamic field will print the QR Code in the PDF template. |
| qrCodeImage | QR Code Image | This dynamic field will print the QR Code image in the PDF template. |
| quantity | Quantity | The total number of tickets purchased or RSVP’d. |
| startDate | Start Date | The start date of the event. |
| startTime | Start Time | The start time of the event. |
| ticketInformation | Ticket Information | Any extra field added to the Ticket or RSVP template will be listed in the email in the following format: Ticket: John Doe E-mail: johndoe@fakemail.local First question Answer for first question Second question Checked Ticket: Jane Doe E-mail: janedoe@fakemail.local First question Answer for first question Second question Not checked |
| ticketInformation WithCancellation | Ticket Information with link to cancel tickets | Any extra field added to the Ticket or RSVP template will be listed in the email in the following format with the cancellation link: Ticket: John Doe E-mail: johndoe@fakemail.local First question Answer for first question Second question Checked If you want to cancel click here. Ticket: Jane Doe E-mail: janedoe@fakemail.local First question Answer for first question Second question Not checked If you want to cancel click here. |
| venueTitle | Venue | The name of the Venue where the event will take place. |
| venueAddress | Venue Address | The address of the Venue where the event will take place. |
| venueCity | Venue City | The City of the Venue where the event will take place. |
| venueWebsite | Venue Website | The URL of the Venue where the event will take place if it is an online event, or the URL where you can find information online about an event. |
7.2 RSVP / Registration only
| Field Code | Field Name | Description |
| rsvpNumber | RSVP # | The order number of the RSVP / Registration ticket. |
| rsvpName | RSVP Name | The ticket type name you gave in the Event Details page. The type/name of the RSVP. |
7.3 Ticket only
| Field Code | Field Name | Description |
| currency | Currency | The currency of the ticket of the event. |
| ticketNumber | Ticket # | The order number of the ticket. |
| ticketName | Ticket Name | The ticket type name you gave in the Event Details page. The type/name of the ticket. |
| ticketPrice | Ticket Price | The price of the ticket. |
8. Preview PDF
After editing your template, you can preview the PDF simply by clicking the Preview PDF button. Then, a new tab will open, and you can visualize the changes you made to your custom PDF template.

9. Saving, Cancelling or Restoring your PDF Template
After you’ve made the appropriate changes to your rsvp or ticket pdf template, click the Save button to save your work.

If you decide to discard the changes made, just click on the cancel button and none of the changes will be recorded.
While you are editing a PDF template, you can click the Restore Default button. This command will erase all the changes made and return the PDF to the original template provided by Timely. Caution: this option will erase all the content previously modified.
Need Additional Help?
For further guidance and support, please visit our Help Center. If you have any inquiries or need assistance, don’t hesitate to contact our customer success team by opening a support ticket from your Timely account’s dashboard.
In case you require additional assistance in implementing and using Timely event management system, we are happy to assist. Explore all the professional services we can offer you, and get in touch with us today!