With a Timely account, managing waiting lists and subscribers for your events is a seamless process. Timely provides powerful tools and features that allow you to efficiently handle waiting lists and keep track of subscribers, enabling you to maximize event participation and keep your audience engaged. In this guide, we will walk you through the steps to effectively manage a waiting list and its subscribers. Let’s dive in and explore the robust capabilities of Timely for managing waiting lists and subscribers.
1. Managing Events with Waiting Lists
Once you’ve created a waiting list for your event, you will be able to manage it from your Timely dashboard. Here is a step-by-step guide on how to manage waiting lists:
- Login into your Timely account using your credentials.
- Once logged in, navigate to the Ticketing / RSVP menu.
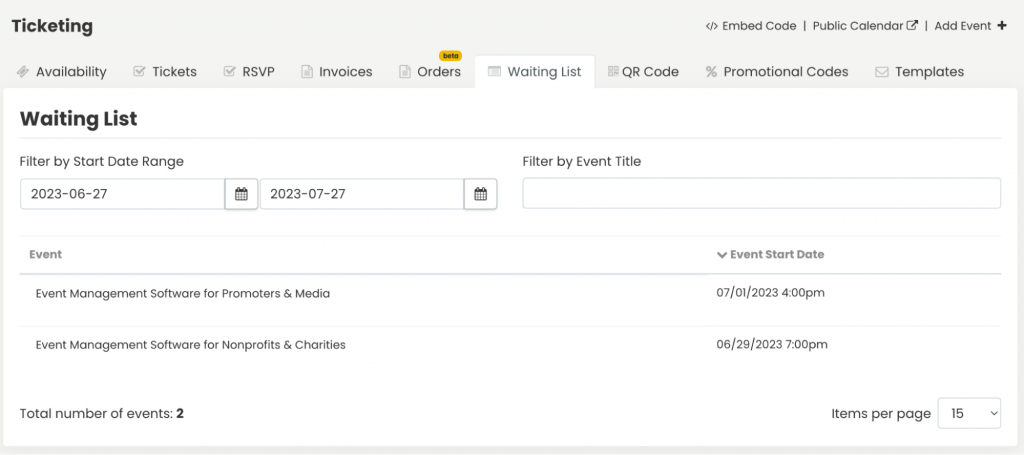
- Next, click on the Waiting List option. This will take you to the waiting list management page, which will show all the events with waiting list subscriptions.

- From the list of events, choose the one you want to manage the waiting list by clicking on the event title. If you have multiple events with waiting lists, you can use the filters to find specific events. You can filter events based on the start date range or event title.
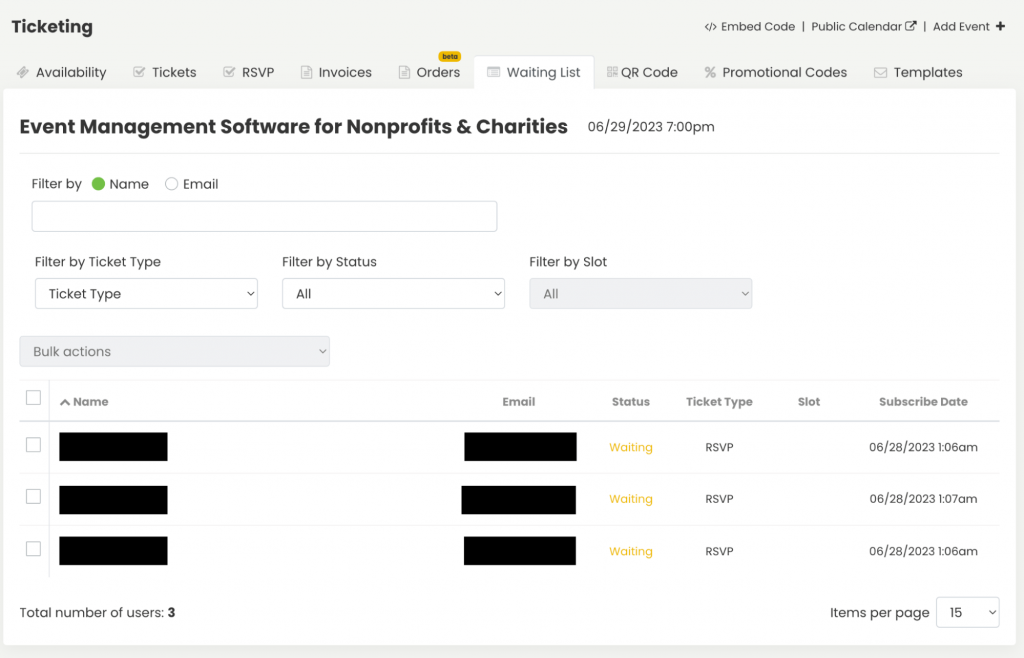
- After selecting the waiting list, you will see a list of individuals who have subscribed to that list. This list contains the names of customers who are waiting for tickets to become available.

People who have registered for your events’ waiting lists will be assigned a waiting list status. Currently, there are 2 statuses available:
- Waiting: when a person subscribes to your waiting list, their status will be “waiting” since they are waiting for new tickets to be available.
- Unsubscribed: if a person chooses to unsubscribe from your waiting list, their name will be removed from the list, and their status will change to “unsubscribed”.

Timely software provides you with the necessary tools to manage waiting lists’ subscribers, perform actions individually or in bulk, and export data. See detailed instructions below.
3. Using Filters to Search for Specific Waitlist Subscribers
To enhance waiting list management, you can use the built-in filters to easily find people in your lists. The filters available are: subscriber’s name or email address, as well as ticket type, status, and slot.

4. Manually Delete or Unsubscribe Registrants
Timely software users have the option to either delete or unsubscribe a subscriber from the waiting list. Please note that choosing to delete a user will permanently remove their name from the list. If you wish to maintain records of your waiting lists, we recommend unsubscribing registrants instead of deleting them.

Concerning the difference between the Delete and Unsubscribe options in the Waiting List report for a specific event, here’s the distinction:
- Unsubscribe: Choosing this option allows the person to remain on the waiting list, but it stops any further emails or notifications from being sent to them. Essentially, they remain on the list but no longer receive emails.
- Delete: On the other hand, the Delete option not only ceases notifications but also permanently removes the person from the waiting list. This particular action, which can only be executed by administrators, effectively erases the individual’s presence from the waiting list for good.
5. Manage Waiting List Registrants in Bulk
For efficient waitlist management, you have the option to perform several bulk actions in relation to your waiting list registrants.
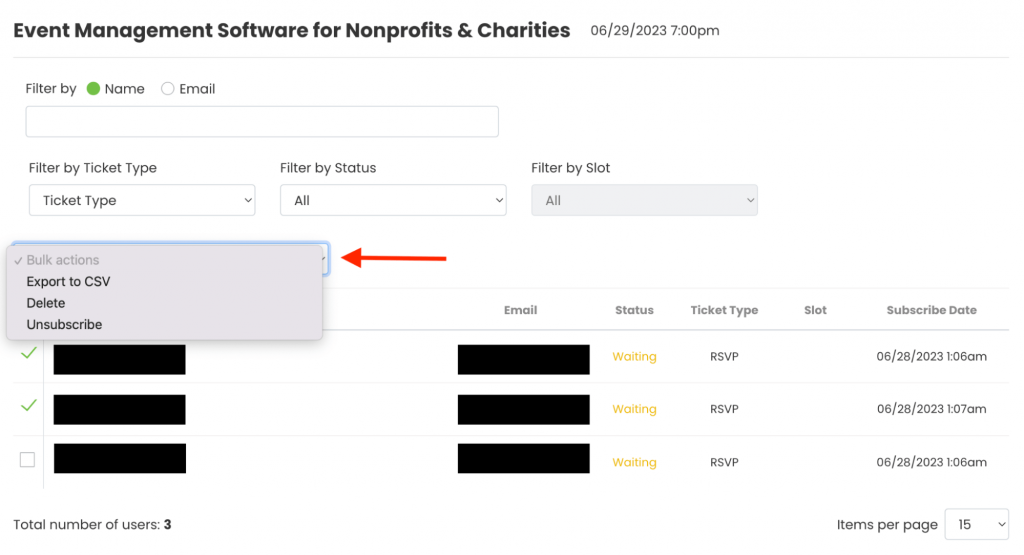
Simply select the subscribers from your waitlist and choose the desired action from the dropdown menu:
- Export to CSV: A list with all selected subscribers will be downloaded in a CSV file.
- Delete: Delete subscribers in bulk.
- Unsubscribe: Unsubscribe individual subscribers in bulk.

6. Waitlist Workflow with Automated Email Notification
If you have enabled the automated email notifications for waitlist subscribers, when someone cancels their ticket, all individuals on the waitlist receive a notification about the available spot. The first person that visits the event and registers will secure the ticket.
Please note that the system does not automatically remove people from the waitlist. If someone from the waitlist gets a ticket, they need to be manually unsubscribed from the waitlist.
Need Additional Help?
For further guidance and support, please visit our Help Center. If you have any inquiries, contact our customer success team by opening a support ticket from your Timely dashboard.
In case you require additional assistance in implementing and using Timely event management system, we are pleased to assist. Explore all the professional services we can offer you, and get in touch with us today!