Importing events into your calendar can be a time-consuming task, especially when dealing with large volumes of data. With Timely’s event management platform, you can easily import events from CSV files, streamlining your event scheduling and ensuring that all details are accurately captured. This guide will walk you through the process of creating a CSV file and importing your events into your Timely calendar.
1. Benefits of Using CSV Files for Importing Event Data
When managing a large number of events, CSV files provide a quick and efficient way to upload and organize event data. By using CSV files, you can:
- Save Time: Importing multiple events at once reduces the time spent on manual data entry.
- Ensure Accuracy: With predefined fields, you minimize the risk of errors in event details.
- Streamline Event Management: Easily manage and update your events in bulk, keeping your calendar organized and up-to-date.
2. What Is a CSV File?
A CSV (Comma Separated Values) file is a simple text format used for storing tabular data, such as a list of events. Each line in a CSV file corresponds to a row in a table, and each value is separated by a comma. This format is widely supported by various software applications, making it a versatile option for importing and exporting data.
3. How to Import Events from CSV Files into your Timely Calendar
Timely’s intuitive interface makes it easy to navigate through the event import process. Please note that CSV import is geared towards users who are technically savvy and understand how CSV files work. If this is not you, we recommend you import events using an ICS feed instead.
Follow these steps to successfully import your events from CSV files into your Timely calendar:
3.1 Preparing Your CSV File
To ensure a successful import, your CSV file must be correctly formatted according to Timely’s system standards. At a minimum, your first row should include the following fields:
1. UID (this field is mandatory):
- Description: A unique ID for the event. This ID is crucial for event management as it ensures that if the CSV is uploaded multiple times, the event is updated rather than duplicated.
- Format Suggestion: Use a sequential number combined with your domain, e.g., 001@yourdomain.com.
- Important: This is a required field. It also provides the event with its primary identifier in the calendar.
2. Title:
- Description: The name or title of the event.
- Important: If this field is left blank, the title of the event will be set as “Untitled.”
3. Start Date/Time (this field is mandatory):
- Description: The start date and time of the event.
- Format: Use the format YYYY-MM-DD HH:MM:SS for events with specific times (e.g., 2025-03-21 07:00:00).
- All-day Events: For all-day events, use YYYY-MM-DD (e.g., 2025-03-21).
- Important: This is a required field. If this column does not exist or is blank, the event will not be imported.
4. End Date/Time:
- Description: The end date and time of the event.
- Format: Similar to the start date/time, use YYYY-MM-DD HH:MM:SS for specific times or YYYY-MM-DD for all-day events.
5. Recurrence Rule:
- The recurrence rule defines how a calendar event repeats. It works with other properties like the start date (“Start Date/Time”), and exclusions (“Exception Dates””) to create the full set of event occurrences.
- Start Date/Time marks the first instance of the event.
- Recurrence Rule sets the pattern for recurring events (e.g., daily, weekly). Examples of the most common: FREQ=MONTHLY, FREQ=DAILY, FREQ=WEEKLY
- Exception Dates removes certain dates from the set. The expected format is: YYYYMMDDT000000.
The final schedule includes all dates from “Recurrence Rule” or “Recurrence Dates” minus any dates excluded by “Exception Dates” If dates overlap, only one event is counted.
5.1. Display Only One Recurrence:
If you want recurring events to be displayed only once on the calendar (only the next upcoming recurrence), add the following field to your CSV:
- Description: This field controls whether the recurrence of the event should be displayed only once on the calendar.
- Format: Use “yes” to display the recurrence only once or “no” to show each occurrence on the calendar.
3.2 Sample CSV File for Event Calendar and for Space View
To help you format your own CSV file for event data import, please download this sample CSV file. For more details on Timely’s system standards, please refer to this guide.
3.3 Adding Other Fields To The CSV File
Timely software allows you to include additional fields in your CSV file for more detailed event imports. Some of these fields include:
- Allday: Indicate whether the event is an all-day event with “yes” or “no.” If set to “yes,” the Start Date/Time will only use the YYYY-MM-DD format, and the End Date/Time will match the Start Date/Time.
- Recurrence Dates : Adds specific additional dates. If you are using the Recurrence Rule, do not use the Recurrence Date. Format expected: YYYYMMDDT000000. Examples: 20240310T000000, which means the event will repeat on March 10th, 2024. The time is the same as the start date/time. When informing more than one date, separate the dates with coma (20240310T000000,20240410T000000). Specify recurrence dates using the iCalendar Specification (RFC 5545 – RDATE), e.g., 20240310T000000, 20250309T000000.
- Exception Rule: Define exceptions to recurrence rules following the iCalendar Specification (RFC 5545 -EXRULE), e.g., FREQ=MONTHLY. If you are using exception dates, do not use this field.
- Internal Notes: This is an optional field for any additional notes that are internal and not visible to the public.
- Status: Indicate the event’s status using one of the following values: canceled, new, tentative, confirmed, postponed, updated, sold_out, to_be_confirmed. If not provided, the default status will be “Confirmed.”
- Featured: Mark the event as featured with “yes” or “no.” If left blank, it defaults to “no.”
- Source URL: Use this field to refer to the event’s source URL on an external website.
- Ticket[Cost]: Include the cost of the event, complete with the currency symbol, e.g., $ 10.00 CAD.
- Venue Fields:
- Venue[Title]: The title of the venue.
- Venue[Type]: Specify whether the venue is Online, Physical, or Both.
- Venue[Website]: The venue’s website URL.
- Venue[Address]: The street address of the venue.
- Venue[Address2]: Additional address information, if needed.
- Venue[City]: The city where the venue is located.
- Venue[State/Province]: The state or province of the venue.
- Venue[Zip Code/Postal Code]: The venue’s postal code.
- Venue[Country]: The country of the venue.
- Venue[GEO]: Specify the latitude and longitude of the venue in the format “0.000000, 0.000000”, ensuring the values are enclosed in double quotes.
- Spaces[Title]: The title of the space within the venue. This item is only applicable to clients using Timely venue management system to handle space bookings or rentals.
- Organizer Fields:
- Organizer[Title]: The name of the organizer.
- Organizer[Email]: The organizer’s email address.
- Organizer[Website]: The organizer’s website URL.
- Organizer[Phone]: The organizer’s phone number.
- Categories[Title]: A comma-separated list of categories for the event, e.g., Sports, Hobbies, Art Painting.
- Tags[Title]: A comma-separated list of tags, e.g., Soccer, Tennis.
- Description: Provide a description of the event.
- Custom Fields: The new template supports custom fields using the format Custom Field [<Custom Field Name>]. Replace <Custom Field Name> with your specific field name to include additional information that is not covered by the standard fields.
- Custom Filter: Replace the <Custom Filter Name> with the name of the existent custom filter. The custom filter must be created before importing the CSV.
3.4 Avoiding Common Pitfalls
Many users encounter issues with CSV imports due to improper formatting. To avoid these pitfalls:
- Use double quotes to enclose textual data, especially when it contains commas. If you don’t use double quotes, the import might fail or result in an incorrect import.
- Use HTML special characters for certain symbols, such as colons, to ensure proper import. For example, use the HTML special character for a colon (:) to avoid errors.
- Check for errors by reviewing the use of double quotes and HTML characters.
3.5 Using Outlook CSV export
Currently, we are unable to import CSV file exports from Outlook. To overcome this, you can convert your Outlook exported CSV into *.ics (iCalendar file format used by Google and Apple) using this online converter tool. It will generate an *.ics file for you to download. Upload this newly converted *.ics using our upload tool, instead of the original Outlook exported CSV file.
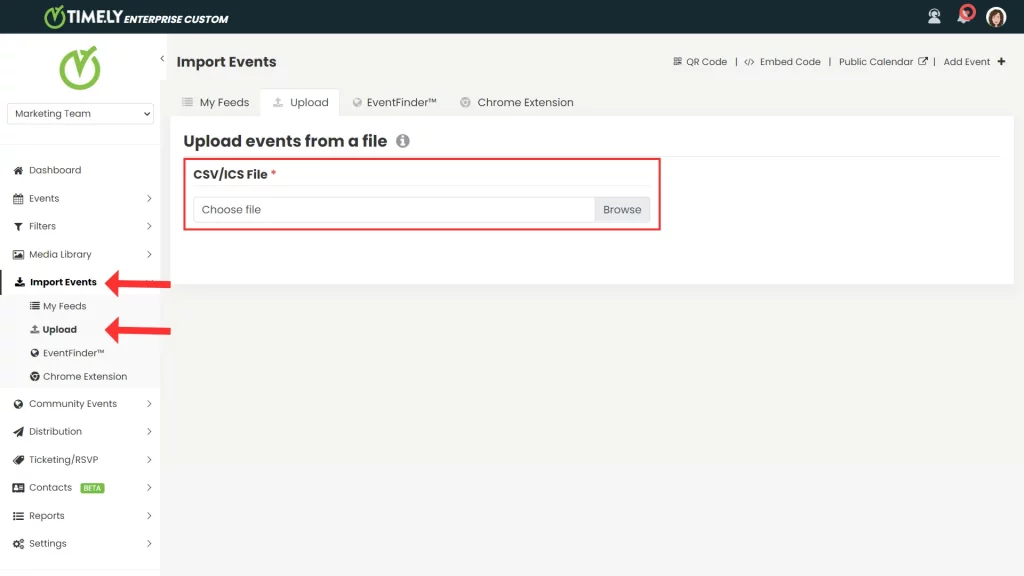
3.6 Uploading The CSV File into your Timely Calendar
To upload the CSV file, first log in to your Timely dashboard. In the left menu, select Import Events. Then, navigate to the Upload tab.
There, you will see a space where you can choose and upload your CSV file. Click on the upload area, browse your computer for the CSV file, and select it.
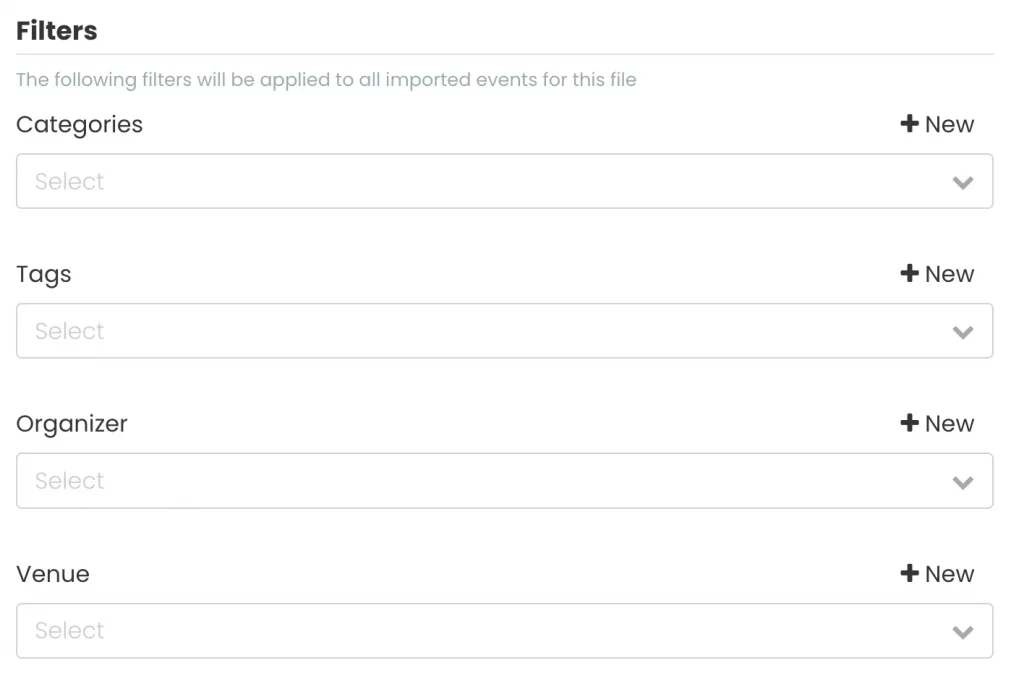
- Before completing the upload, you have the option to select your import preferences. These include:
- Import upcoming events only
- Import events categories
- Import events tags
- Import events venue
- Import events organizer
- Import events as draft

- In the dropdown menu, select the appropriate time zone for your imported events to ensure they are displayed correctly in your Timely Calendar.

- You can also add your own categories, tags, organizers, venues, and any other custom filters you may have created in Timely. This allows for better organization and searchability of your events within the calendar.
- To finalize the import, click on the Import button. If you do not wish to proceed with the import, you can click Cancel.

- Once the file is uploaded, you are going to see a message informing you that the file has been successfully imported.

4. Handling Errors
If you upload a file that contains errors, you will receive an error notification. To view this message, navigate to the notifications panel located in the upper right corner of the Timely dashboard. You will also receive an email detailing how many events were successfully imported or not. When importing events, certain conditions may prevent successful import. These reasons include:
- Start Date/Time field is empty or invalid: This occurs when the event lacks a start date, which is necessary for importing.
- UID field is empty: The Unique Identifier (UID) field is required for each event, and if it’s empty, the event cannot be imported.
- Event limit is exceeded: This happens when the total number of events to be imported surpasses the limit allowed by your plan.
- Event imported by another feed: If an event with the same UID has already been imported by another feed, it will not be re-imported.
- Event uploaded by CSV/ICS file: If an event with the same UID has already been uploaded via a CSV or ICS file, it will not be imported again.
- Not upcoming event: If the “Import upcoming events only” preference is checked, events that are not upcoming will not be imported.
- Unexpected error saving event: An unexpected error may occur during the import process, preventing the event from being saved. When this happens, the “First expect error saving event” will appear, providing more details about the issue.
Once you have successfully imported and organized your events, you can start selling tickets the right way using Timely’s advanced features, ensuring a smooth and efficient event management process.
Need Additional Help?
For further guidance and support, please visit our Help Center. If you have any inquiries or need assistance, don’t hesitate to contact our customer success team by opening a support ticket from your Timely account’s dashboard.
In case you require additional assistance in implementing and using Timely event management system, we are pleased to assist. Explore all the professional services we can offer you, and get in touch with us today!