With a Timely account, you can easily add images to your event pages and attract your audience’s attention or provide additional details about your events. You can add a feature image to appear your events calendar and on the top of your event landing page, as well as images inside your event’s description. In this post, you will learn how to add images to your event posts.
1. Why you Should Add Images to your Event Posts?
Getting someone’s attention isn’t always easy, but keeping it? Well that’s a whole other story. On average people have an 8 second attention span. So, you want to make sure they stay entertained for as long as possible while scrolling through your events website.
One of the best ways to do this is with good quality images. The majority of website visitors nowadays are scanning online content instead of reading them word-by-word. This means relevant photos will massively increase the chances that your events gets noticed. Indeed, displaying good images can make your event stand out from others and set it off to increase its buzz on social media.
Moreover, since a picture is worth a thousand words, using images can help your audience digest your event content in a more simplified way. Depending on the images you pick, they can give a clearer idea of what your events are about.
Lastly, by following Event SEO Best Practices, images can help you rank higher on Google searches.
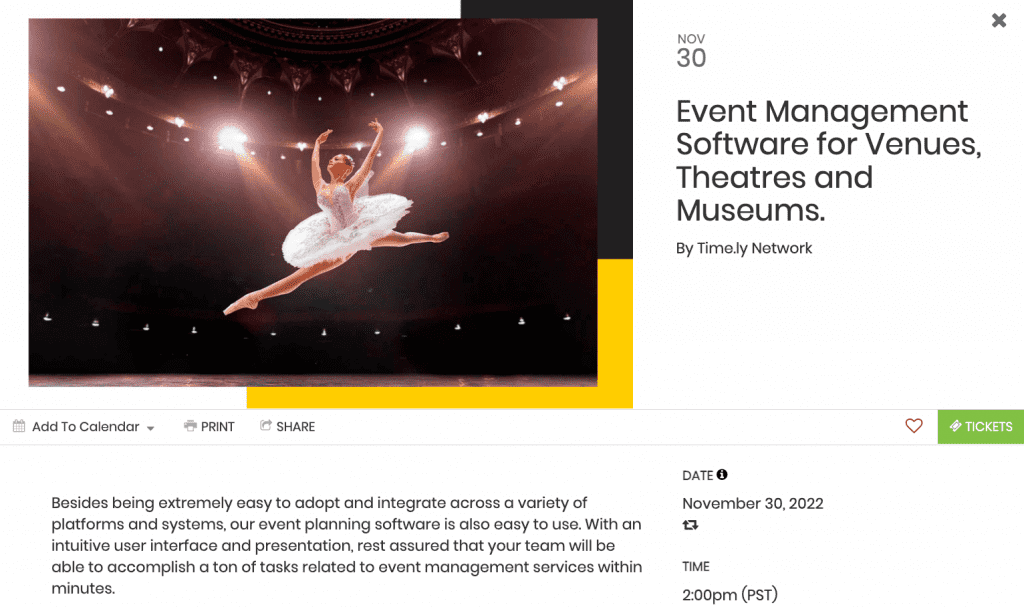
2. Adding a Featured Image to your Event Page
The featured image is the main image of your event. It will appear on the top of your event post, as well as in your calendar together with all the other events. While some Timely’s calendar views don’t require a featured image, they are a great way to make your calendar prettier and more organized.
To add a featured image to your event post follow the simple steps below:
- Log in into your Timely account.
- On the welcome page, click on the Add Event button shortcut on the top of the page. Alternatively, you can use the main navigation menu, and then click on Events.
- On the Add Event section, you can start creating your event. You can also pick a previously created event to edit, if you wish.
- Find the Featured image item. There, you will see two buttons: Media Library and Upload.

- To add a previously used image, click on Media Library. Your image gallery will pop-up on the screen. You can search for your image there, and then select the correct file.

- If you want to add a new image, click on the Upload button. A pop-up box will appear, allowing you to select an image from your computer. Give it an appropriate alternative text, and then click on the Save button. Your image will be automatically stored into your Timely Media Library.
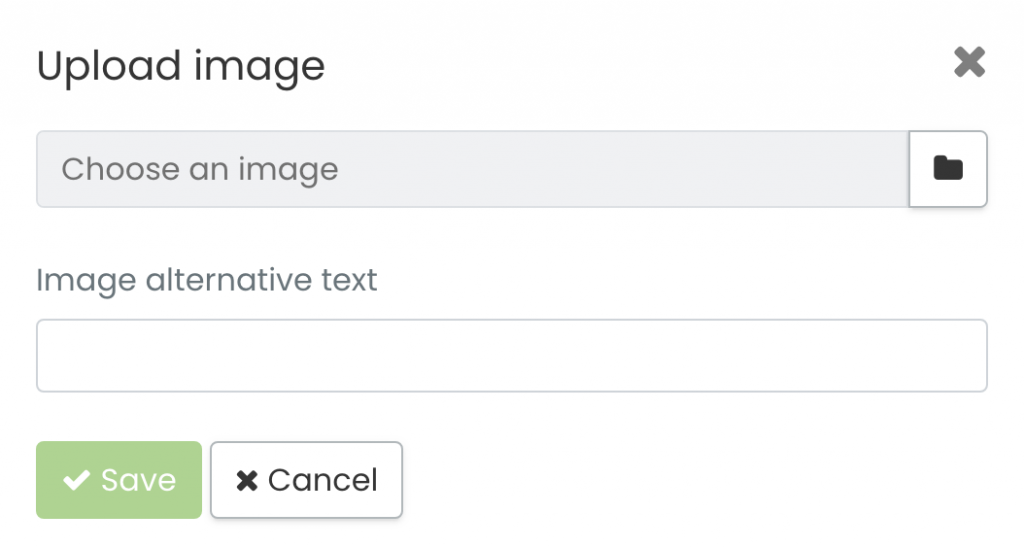
IMPORTANT: When uploading images to your Timely account, we recommend following our Images Best Practices in terms of file format, size, quality and image alternative text.
If you don’t have an image for your event and need to post an event right away, no worries. You can add all the relevant information and publish your event without any image. In this situation, your calendar image will be used as your default featured image. You can always add an image later by editing your event.
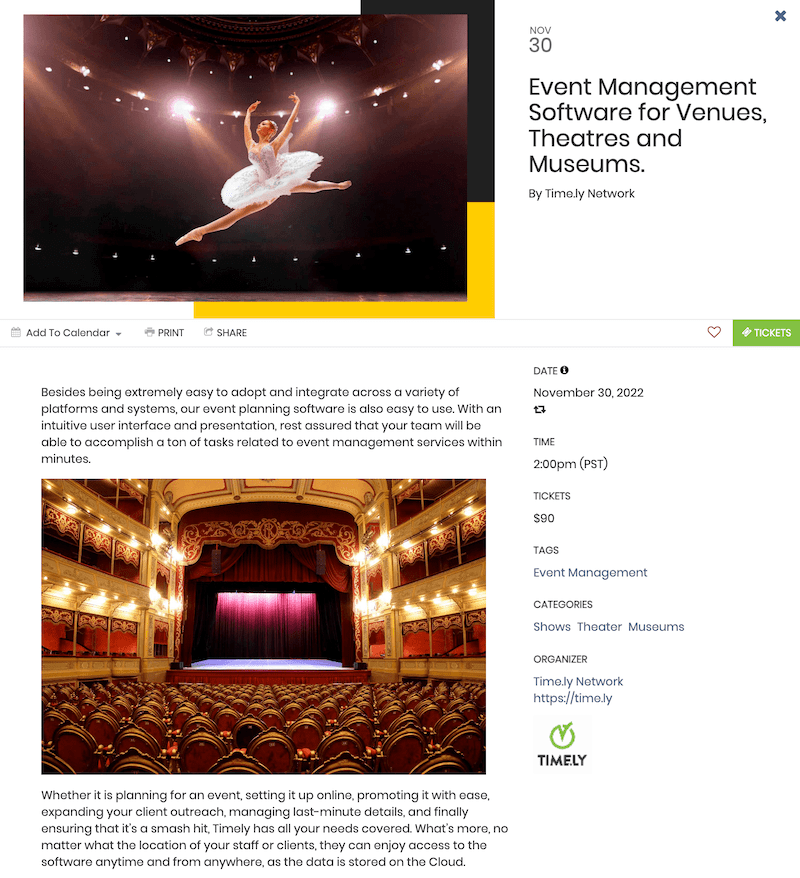
2. How to Add an Image to the Body of the Event Post?
By adding images inside the description, you can create the “blog post effect” in your event pages because you will be adding images between paragraphs of text. As a result, your audience will have more time to digest the text and be more likely to keep reading your event description.
To add additional images to your event posts simply follow the steps below:
- Log in into your Timely account.
- On the welcome page, click on the Add Event button shortcut on the top of the page. Alternatively, you can use the main navigation menu, and then click on Events.
- On the Add Event section, start creating a new event. You can also pick a previously created event to edit, if you wish.
- Go to the event Description section, and then click on the Insert / edit image icon.

- A pop-up box will appear allowing you to choose an image from your computer. Next, add an image description and then click on OK. The uploaded image will be immediately stored in your Timely Media Library.
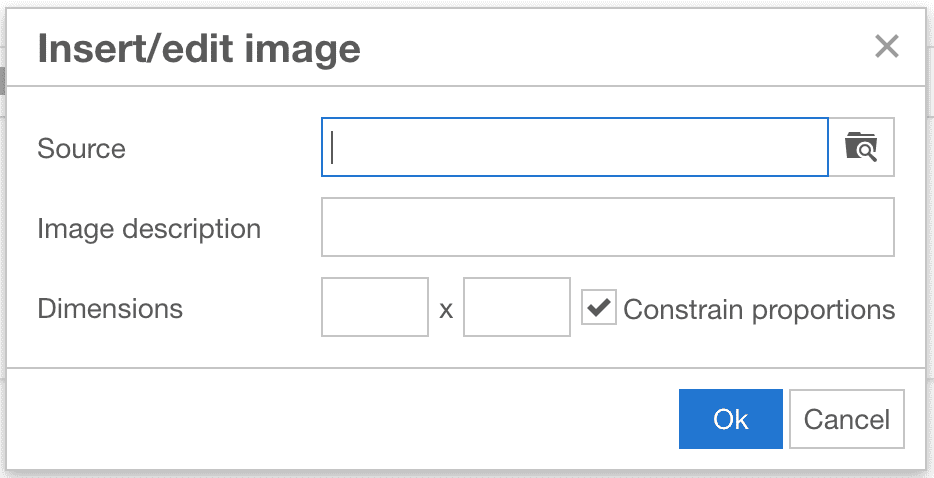
IMPORTANT: When uploading images to your Timely account, we recommend following our Images Best Practices in terms of file format, size, quality and image alternative text.
- Finish setting up your event page with all the remaining event information. When you are done, click on the Publish button.
Once the event is published, your website visitors will be able to see all your additional images when they click on your event post from your online calendar.
In addition to learning how to add images to your event posts, you can also explore how to incorporate SlideShare presentations into your event posts by following this guide: How to Add SlideShare Presentations to your Event Posts. You can also add audio descriptions to enhance your event details. Enhance the visual appeal and engagement of your event listings with these powerful features.
Note that Timely event software also allows you to add brand logos to your calendar and images to filters, making your calendar unique and beautiful.
Need Additional Help?
For further guidance and support, please visit our Help Center. If you have any inquiries or need assistance, don’t hesitate to contact our customer success team by opening a support ticket from your Timely account’s dashboard.
In case you require additional assistance in implementing and using Timely event management system, we are pleased to assist. Explore all the professional and managed event services we can offer you, and get in touch with us today!