With a Timely account, you have the ability to create customized ticket and RSVP email templates and manually send them to specific recipients, as needed. This feature gives you greater control and freedom when communicating with your customers about your events. In this post, you will learn how to create and manually send custom email notification templates to purchasers and attendees from your Timely account.
1. Automated vs Manual Emails
Clients who use Timely Event Registration, Event Ticketing and Event Booking Software are familiar with our automated email workflows. Every time someone performs a specific action, the system will send the respective custom email template, automatically. For example, attendees will receive an automated email when they purchase an event ticket from your online calendar, or when you update the event status.
What is different about the Custom Notification Templates is that there is no automated workflow associated with them. You create custom notification templates based on your specific business needs, and then manually send them to specific customers through your Timely system.
Moreover, you can choose in which step of the communication process you want to send the custom notification templates. For instance, you can provide attendees additional event information, or ask them to complete a pre-event screening form. You can notify event registrants and ticket purchasers from your Timely RSVP, Ticketing and Orders pages.
2. How to Create Custom Ticket / RSVP Notification Templates
This is how you create custom notification templates:
- Log into your Timely account.
- On the main menu on the left, go to Ticketing/RSVP.
- Then, click on the Templates tab.
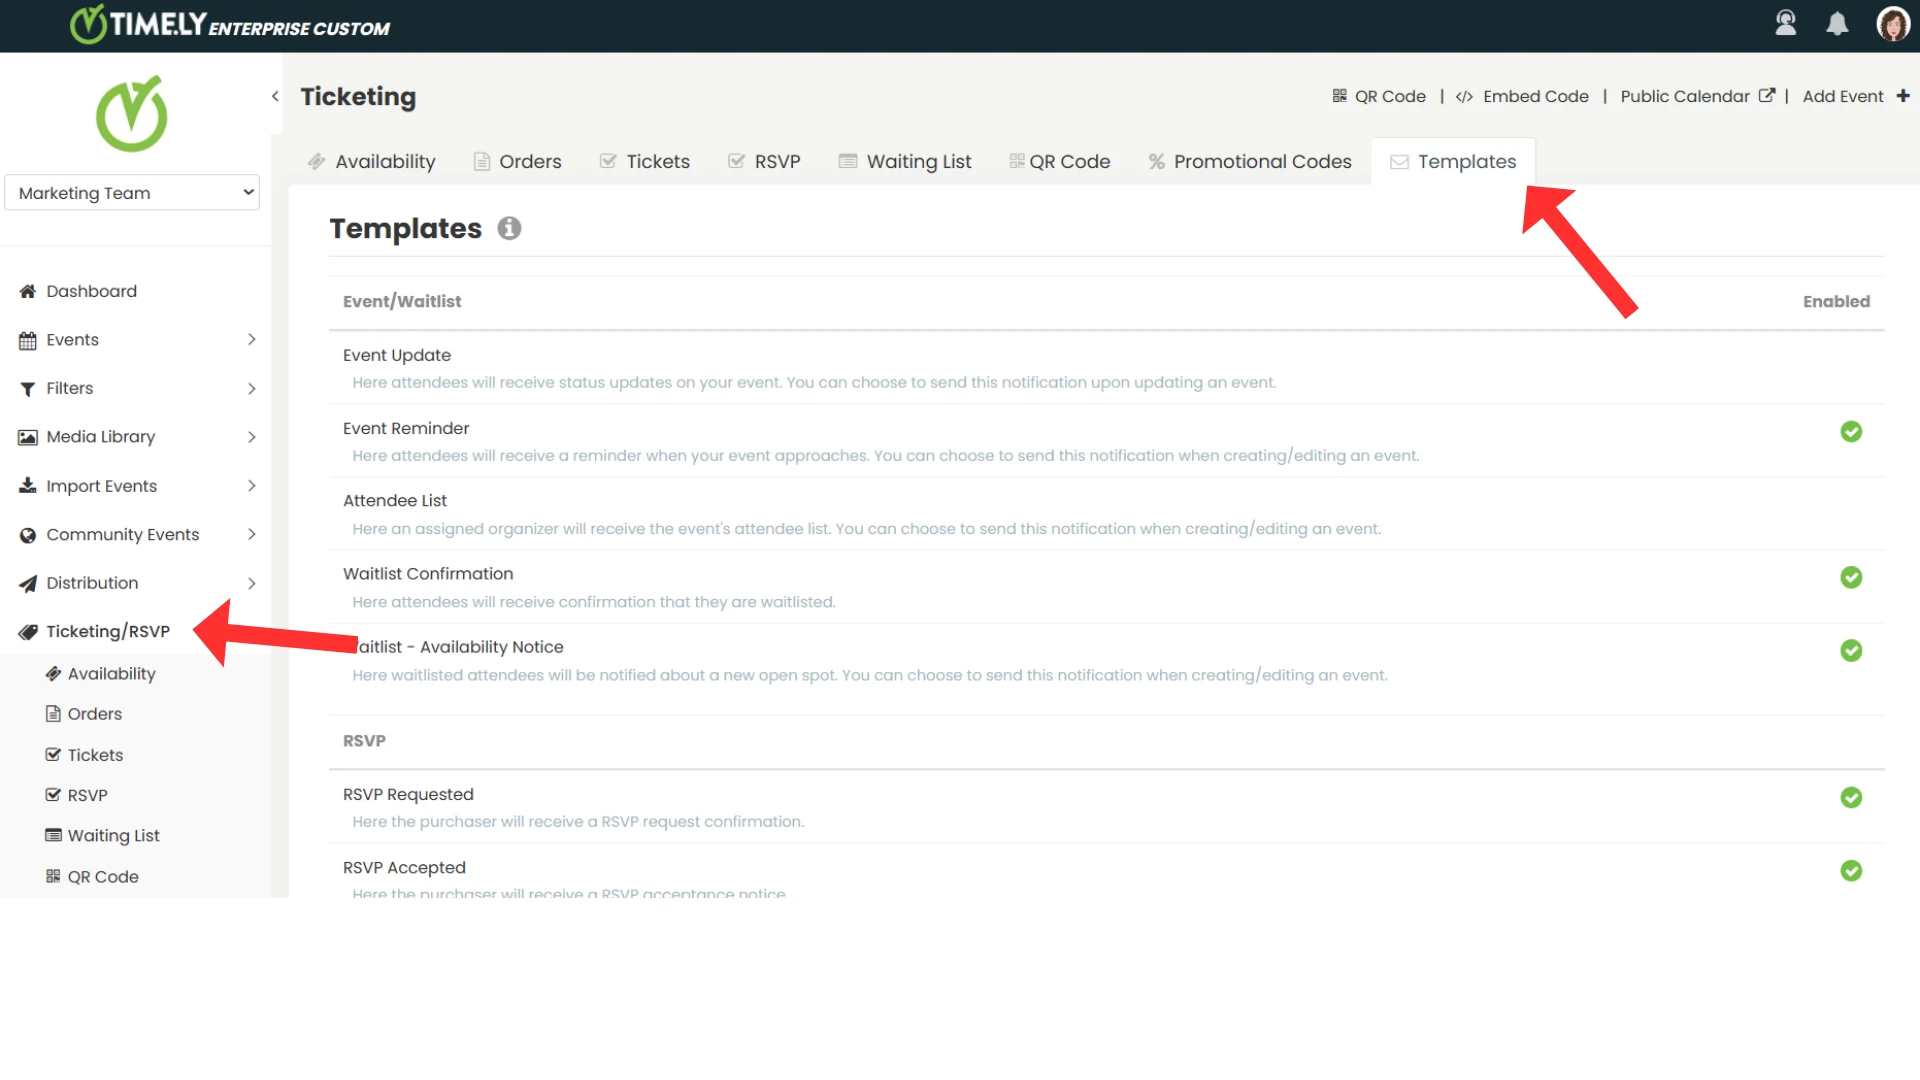
- Scroll down the page, and you will see the Custom Ticket / RSVP Notification Template section. You will also see the maximum number of templates that are available under your plan, and how many templates you have already created.

- Click the +Add item button to create a new custom notification template. The tab Edit Template will open on the screen, where you will be able to customize your template.

When editing a custom notification template, there are several items you can change, including:
- Name: Choose a name for your template
- Email Subject: Write the email subject
- Header: Customize the header of your template
- Body: Write your email message
- Footer: Edit the footer with your logo and signature
Moreover, you can use dynamic fields to personalize the email templates. For example, you can add your customers’ contact information and event details. Learn more about customizing email templates in the post How to Customize Event RSVP and Ticket Email Templates.
- Once you are done, you can send a preview of the email notification to yourself. If everything is ok, save the template, and start using it to notify attendees and ticket purchasers.
3. How to Manually Send Custom Notification Templates
As mentioned above, with a Timely account, you can manually send custom notification templates to event registrants or ticket purchasers. See below how to do it for each specific situation.
3.1 Sending Custom Notifications to Attendees Manually
Event attendees are people who hold an event ticket and can attend your event. If you use Timely Event Registration, Event Ticketing or Event Booking Software, you can easily manage your attendees from your Timely dashboard.
After creating your first custom notification template, you can manually send it to your attendees. To do so, simply follow the steps below:
- Log into your Timely account.
- On the main menu on the left, go to Ticketing/RSVP.
- Click on the RSVP tab if it is a free event, or the Tickets tab if it is a paid event.

- You will see all the issued event tickets. If you wish, you can filter by event or attendee using the filters on the top of the page.
- After choosing an attendee on the list, hover the mouse over the event’s name. Then, click on the button Notify attendee.

- A pop-up window will appear on the screen. Select a custom notification template from your predefined templates.
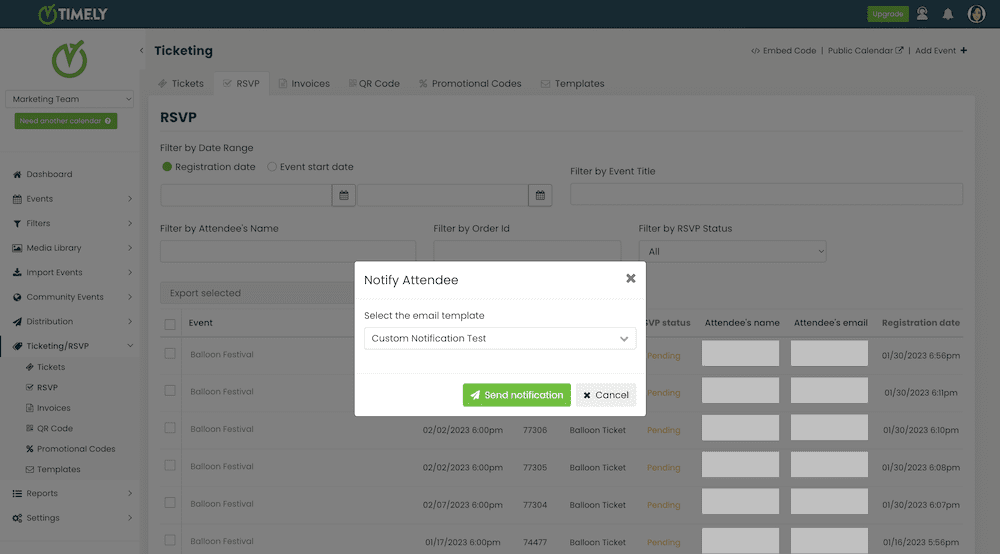
- Next, click on the Send notification button. Timely software will send the custom notification email to your attendee automatically.
3.2 Sending Custom Notifications to Purchasers Manually
If you use Timely Event Registration, Event Ticketing and Event Booking Software, you can allow your audience to purchase multiple tickets for the same event. They just need to choose the ticket quantity and fill the booking form with everyone’s names and emails. Therefore, a purchaser is the person who registers or purchases tickets for an event for at least one attendee. Purchasers may or may not be attendees.
Depending on your business needs, you may want to send custom notification templates to purchasers. For example, a standard message about all tickets included in an order. In this situation, just follow the steps below:
- Log into your Timely account.
- On the main menu on the left, go to Ticketing/RSVP.
- Then, click on the Orders tab.

- You will see all the orders. If you wish, you can use the filter at the top of the screen to help you find the purchaser.
- After choosing a purchaser on the list, hover the mouse over the event’s name. Then, click on the button Notify purchaser.

- A pop-up window will appear on the screen. Select a custom notification template from your predefined templates.

- Next, click on the Send notification button. Timely software will send the custom notification email to the purchaser automatically.
3.3 Sending Custom Notifications Manually in Bulk
Follow these simple steps to send custom notifications to multiple purchasers or attendees at once:
- Log into your Timely account.
- On the main menu on the left, go to Ticketing/RSVP.
- Then, click on the Orders tab for purchasers, or on the RSVP or Ticketing tab for attendees.
- There, you will see all the orders, tickets or RSVPs. If you wish, you can use the filter at the top of the screen to help you find the specific purchasers or attendees.
- Check the box next to at least one order, ticket or RSVP to activate bulk actions.

- Click on the action box and select “Notify Purchasers” or “Notify Attendees” from the available options.

- A pop-up will appear, presenting your Manual Email Templates created. Choose the template you wish to use.
- Once you’ve selected your template, hit the Send button.

- You’ll see a message asking, “Do you want to notify X purchasers?”, with X representing the total number of purchasers selected. Click “Yes” to proceed.

- After sending, you’ll receive a confirmation message stating, “Notification sent successfully.”
3.4 How to Avoid Sending Duplicate Notifications
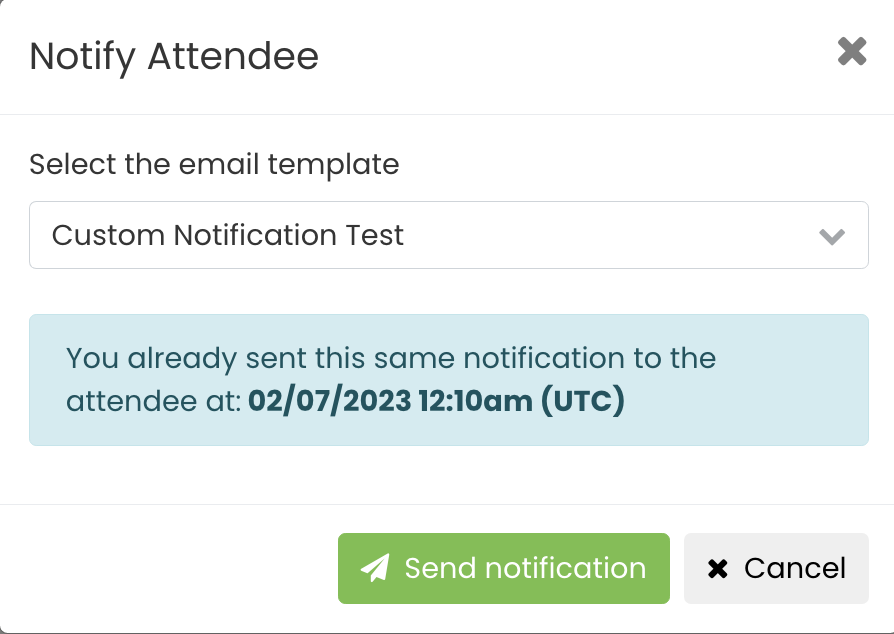
There might be situations where you have already sent a notification to an attendee or purchaser, and accidentally chooses to send the same message to the same person. No need to worry! Timely system will alert you.
In this situation, a popup window will appear on the screen letting you know the date and time the last message was sent. You can either press Send notification or Cancel, as appropriate.
Need Additional Help?
For further guidance and support, please visit our Help Center. Additionally, if you have any inquiries or need assistance, don’t hesitate to contact our customer success team by opening a support ticket from your Timely account’s dashboard.
Moreover, in case you require additional assistance in implementing and using Timely event management system, we are happy to assist. Explore all the professional services we offer, and get in touch with us today!