Timely event management platform can be used on any public or private website or mobile application. By default, when you publish events using our software, they become available online to everyone. However, if you want to limit who sees your events and calendar, you can easily hide them from the public or search engines. In this article, you will learn all the options available to make your events and calendar private.
Watch the instructions on video format, for a quick and easy walkthrough of the content:
1. Benefits of Controlling Event and Calendar Visibility
Adjusting who can see your events can help you:
- Protect sensitive information: Keep internal meetings, member-only events, or private gatherings from being publicly accessible.
- Increase attendee exclusivity: Offer limited access to VIP events, training sessions, or premium content.
Support compliance needs: Ensure visibility settings match data protection policies or organizational guidelines.
2. Exclude Your Calendar from Search Engines
To prevent your Timely calendar and events from being indexed by Google or other search engines. To access the SEO settings:
- Log in to your Timely dashboard.
- Go to Settings from the left-side menu.
- Choose the option General.
- Then, click on SEO Options.
You’ll see two checkbox options. Check one or both boxes depending on your needs:
- Exclude calendar from search engine indexing – Excluding the calendar from search engine indexing will prevent the calendar and events from showing in search results.

- Exclude past events from search engine indexing – Excluding past events from search engine indexing will prevent them from appearing in search results.

- Click Save to apply your settings.

Search engines may take several days or weeks to reindex your content. To avoid accidental exposure, make this change before publishing events.
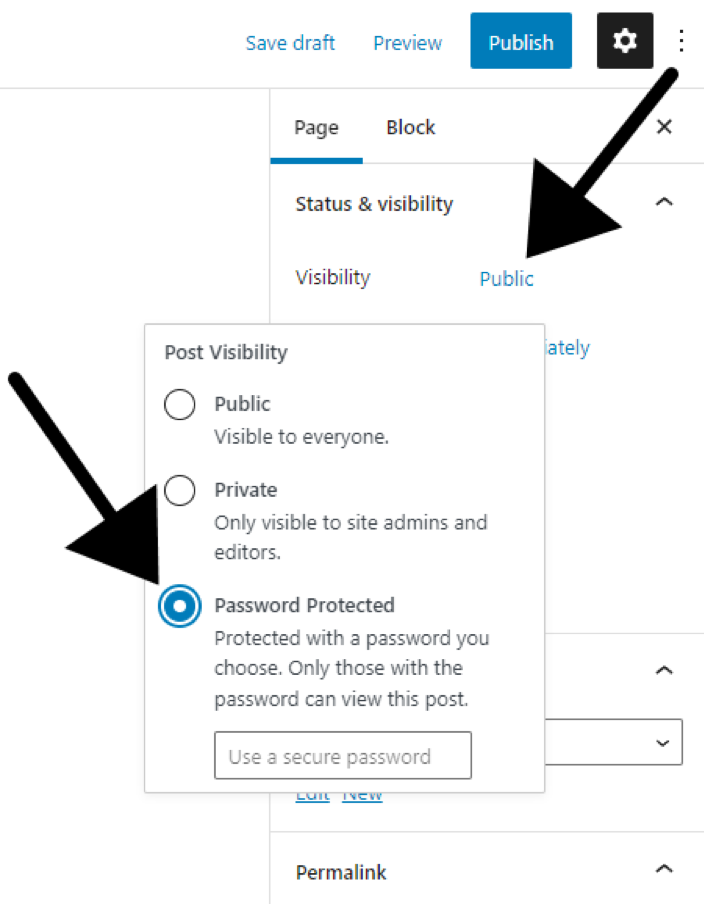
3. Hide your Calendar with a Password-Protected Page
Most CMS platforms, such as WordPress, Wix and Squarespace, have the ability to create password-protected pages, where you can embed your Timely calendar and make it private. Here’s how to do this in WordPress:
- Log in to WordPress as the administrator.
- Under Dashboard, click Pages, and then click Add New.
- Add your Timely embedding code to the new page.
- In the right column under “Status & visibility”, click “Public” and then change the visibility to “Password Protected”.
- Set a password and publish the page
4. Embed your Calendar on a Private Website
Organizations use private websites in many ways. Intranets are often used as online private communications networks with access restricted to internal employees or members. On the other hand, extranets provide a closed, internal communications network for a specially selected group of external partners, such as clients, customers or suppliers.
Regardless of the purpose of your private website, making your Timely calendar private is quite simple. You just need to create your calendar embedding code and add it to the backend of your private website, the same way you would do it if it were a public website. For additional instructions, please check the article How to Set Up the Embed Code for your Calendar.
5. Change Event Visibility to Private
In some situations, you may want to limit the online visibility of some but not all of your events. Timely event management software offers you the flexibility to adjust the visibility of each event, allowing you to choose between Public and Private settings.
By default, all events are marked as Public. By making an event Private, only logged users will be able to see the published event on the calendar and access its details. This is particularly useful for exclusive gatherings, internal meetings, or events not open to the public.
To make an event private, simply follow the steps below:
- Login into your Timely account.
- On the main menu on the left, go to Events.
- Next, click on the Add Event to create a new event. Alternatively, you can select a previously created event from the Published list to edit.

- On the event creation screen, find the Event Visibility section. There, you’ll have the option to choose between Public or Private. Select the Private option, then, save your changes.

Now that you know how to adjust the visibility of your event to private, you can confidently manage your events with precision and tailor your audience engagement to your specific needs.
6. Save Events as Draft
If you’re not ready to publish an event or want it visible only to logged system users:
- Log in to your Timely dashboard
- Click Events, then select Add Event or open an existing event
- Enter the event details and choose Save as Draft instead of publishing

To allow users to access these private events and see details, you can create an Editor account for them. For more information about user accounts, please refer to the article How to Add Users to Your Timely Account.
Whether you’re running a public-facing event calendar or managing internal communications, Timely makes it easy to control who sees what and when. From SEO settings to private events and password protection, you have the flexibility to adapt your calendar to your organization’s unique needs. Use these tools to deliver a better experience for your team and your audience, all while keeping your events secure and well-organized.
Need Additional Help?
For further guidance and support, please visit our Help Center. Additionally, if you have any inquiries or need assistance, don’t hesitate to contact our customer success team by opening a support ticket from your Timely account’s dashboard.
Moreover, in case you require additional assistance in implementing and using Timely event management system, we are happy to assist. Explore all the professional services we offer, and feel free to get in touch with us today!