Event promotional codes are a great way to engage your audience and convince them to purchase tickets to your events. When using a Timely event software, you can create any kind of promo code you want, grant discounts by percentage or dollar amount, and set start and end dates. In this post, you will learn how to create promotional codes for events and benefit from this ticket sales strategy.
1. How to Create an Event Promotional Code
With a Timely account and Timely Ticketing Add-on you can easily create promotional codes for events. You just need to follow these steps:
- Login into your Timely account.
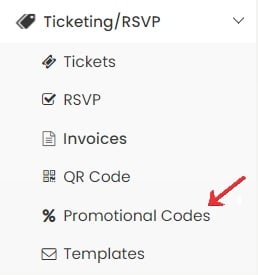
- Go to Ticketing on the main menu bar on the left side of your screen.
- Click on Promotional codes on the drop-down menu.
- A new page will open on your screen. Click on the + add item green button, so you can create your event promo code.
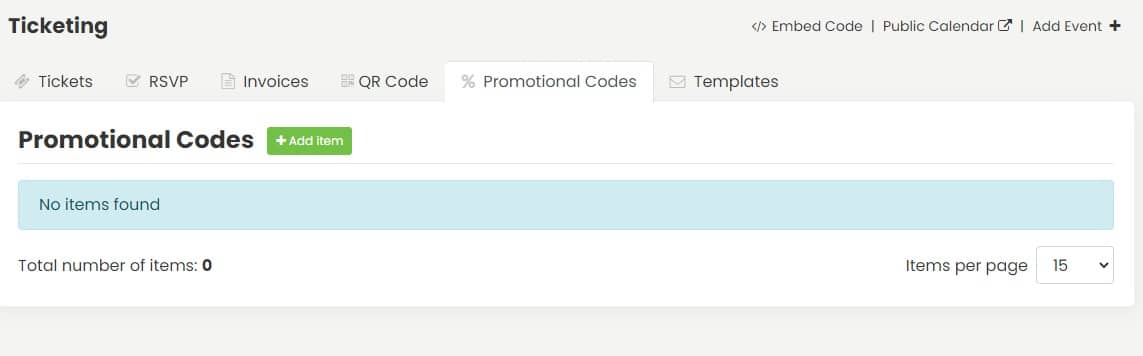
- Once you click on this button, you’ll see a new box to add the discount code information.
- When you finish adding all your event promo code information, click Save to save your discount code. Your new discount code will display in the list.
Now, you just need to associate each code to their respective ticketed events. Please note that a promotional code can be used for several events, if desired.
2. Discount Code Information
If this is the first time you are creating a promotional code on your Timely event software account, you might need more guidance regarding the specific information required. See the table below:
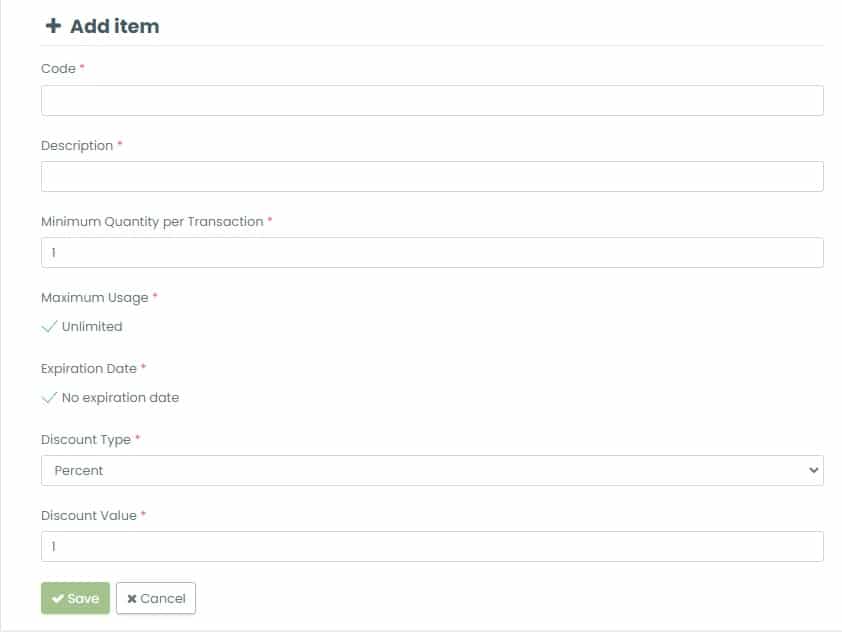
| Promo code | This is the code your registrants will enter at the checkout before paying for their tickets. For example, if your code gives a 10% discount, you can name it SAVE10. |
| Description | This is a short explanation about the discount code. It helps you managing all your promo codes. Only you and your team will be able to see it. |
| Minimum quantity per transaction | This is the minimum number of tickets a registrant needs to purchase to be able to apply the code and get the discount. If there is no minimum quantity order, just leave the default setting (# 1). |
| Maximum usage | This is the maximum number of times the promo code can be used by all registrants combined before it becomes unavailable. If there is no limitation, just check the box Unlimited. |
| Expiration date | This is the date the discount code will expire. If you don’t want to set any date, just check the box No expiration date. |
| Discount type | This is the type of promo code. It can be a percentage (i.e. 25%, 50%, etc.) or a fixed amount (i.e. $10, $50, etc.). |
| Discount value | This is the value of the discount you want to grant with the promo code. For the percentage option, specify the percentage that will be deducted from the invoice’s total. For the fixed amount option, specify the exact dollar amount to serve as a discount. |
3. How to Add Promo Codes to your Event Tickets
After creating a promotional code, it is ready to be added to your event ticket. Here are the steps to complete this action:
- While creating or editing your event, go to the Costs and Tickets section.
- Choose between the two Timely paid ticket options – Event ticket or Time slot ticket.
- On the ticket box, you’ll see the option to add a promotional code to your event. Select the desired code on the drop-down menu. If you wan to accept multiple promo codes, you can select more than code.

- Click Save or Publish to save your settings. Now your event promo code is ready to be used by your audience!
4. Updating or Deleting an Existing Code
If, for any reason, you need to update or delete an existing discount code, you can do by following these steps:
- Under the Ticketing>Promotional Codes, and you will see a list of all promo codes created.
- Hover the mouse over the promo code you want to edit or remove.
- Click edit to change the code name, limits and any other setting. Then, press Save.
- Alternatively, click delete to remove this code. The system will ask you to confirm this action before deleting the code.
For more user guidance, please go to our Help Center. If you have any questions or need additional assistance, do not hesitate to contact us. Alternatively, you can open a support ticket from your Timely account’s dashboard.