With the Design Setting on your Timely dashboard, you can set up different design customizations for your event calendaring software, strengthening your brand and business. In this post, you will learn how to set up your account design settings.
Watch the instructions on video format, for a quick and easy walkthrough of the content:
1. Why You May Want to Customize the Design of your Calendar?
There are many reasons you might want to customize the look and feel of your Timely online events calendar, including:
- To attract new website visitors and engage with your audience: A cool “What’s Happening” page is one of the best ways to build a following, drive traffic with repeat and longer website visits.
- Bring new content and events to your website: People are busy, and they’re only going to take 5 minutes to post events to one site, at best – make it yours.
- Attract money and monetize your events: Advertisers and sponsors spend their limited marketing budget on where they perceive the most value to be.
2. Customizations to the Account Design Settings
To start personalizing your website events calendar, on the main menu on the left, click on Settings. Then, click on the Design tab, where you can edit the following settings:
- Theme
- Event Page Layout
- Event Display Preference
- Share Button
- Font Settings
- Views
- Custom Colors
- Toolbar Settings
- Advanced Customizations

3. Calendar Themes
Check out our video for an effortless walkthrough of the content:
Currently, you can choose among 13 different preset calendar themes:
- Amsterdam
- Antique
- Corporate
- Custom
- Default
- Echeveria
- Twilight
- Minimal
- Night
- Peacock
- Timely
- Classic
- Legacy
By choosing any of these themes, colour and fonts of each theme will be automatically applied to your calendar views and widgets. If you wish, you can use them as a starting point to customize your calendar. Any customizations you add to a preset theme will become your Custom theme.
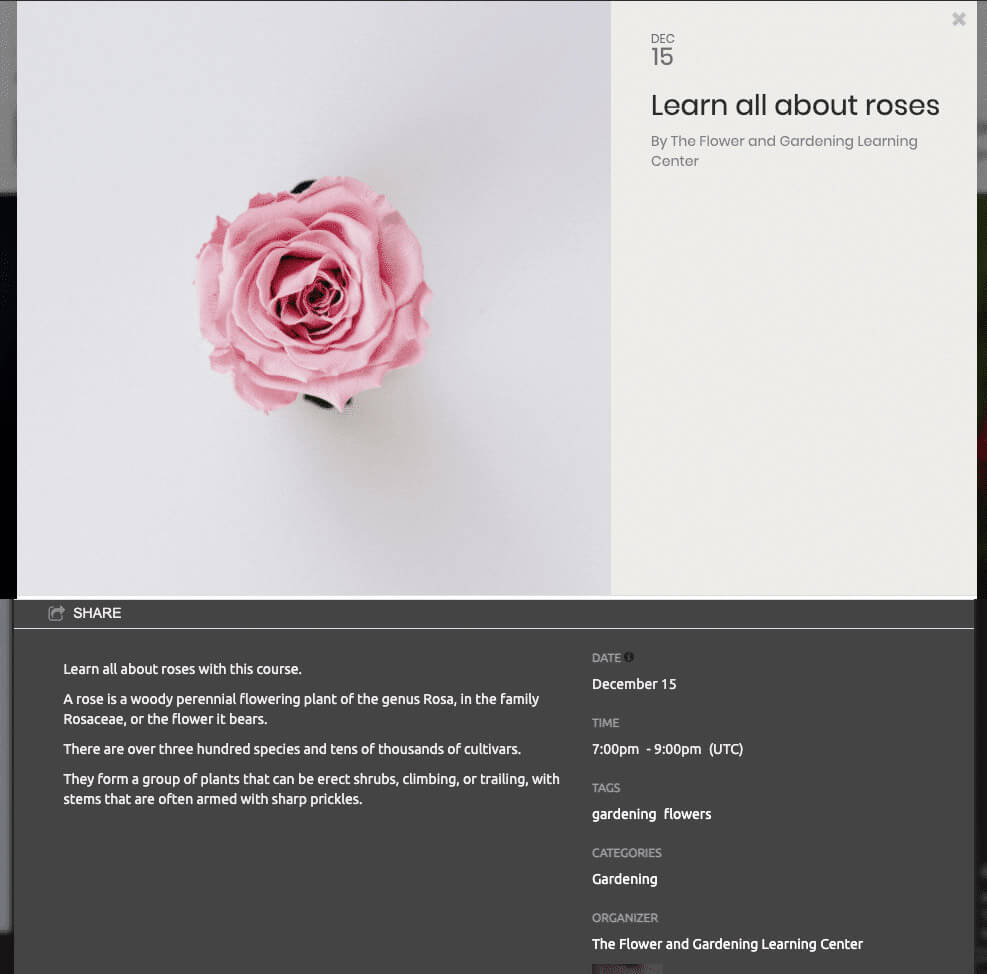
4. Event Page Layout and Display Preference
Check out the video for a quick and easy rundown of this section:
You can use the Event Page Layout settings to determine the appearance of your event pages. You can choose among 4 different event page layouts:
- Default
- Bold (Naos)
- Compact
- Wide
Moreover, you can choose how the event page displays online once your website visitors click on the event post for more information. The options are: pop-up window or new tab.
5. Share Button
The Share Button is a feature that allows your website visitors to easily share your calendar and events with their connections. You can control where the share button will be shown – in your online calendar and/or event landing pages -, as well as its appearance – colourful or neutral. You can also determine which social channels you will allow your audience to share your event content.
Learn in this post how to set up social share buttons for your calendar and event pages.
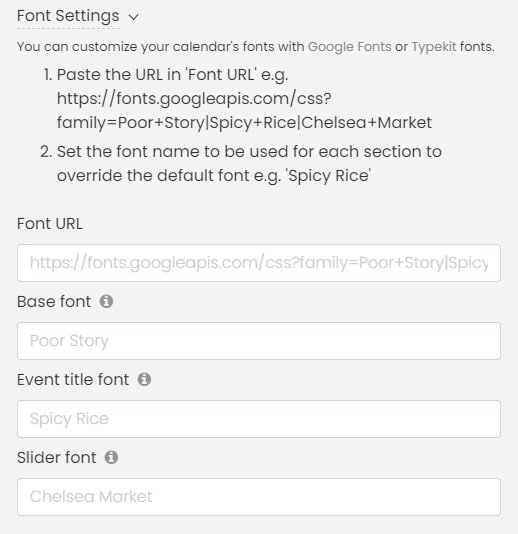
6. Font Settings
If you want to add a font that is not available by default, you can add a custom font with Google Fonts or Typekit fonts. You can do that for your calendar, events’ title and for the slider.
Follow the instructions on your dashboard. First, choose the font you want to use as the calendar’s default font. Second, paste the URL in the “Font URL” box. Third, set the font name to be used for each section to override the default font.
7. Calendar Views
The Views settings determine how your events calendar will be seen by your audience on your website. You can choose among more than 13 different calendar views, including:
- Posterboard view
- Tile view
- Stream view
- Modern List view
- Modern Row view
- Clean List view
- Clean Row view
- Agenda view
- Compact Agenda view
- Year view
- Month view
- Week view
- Map view
In addition, you can personalize each view to improve calendar and events visualization and user engagement. Learn in this post how to set up your calendar views settings, and customize a calendar layout for your website.
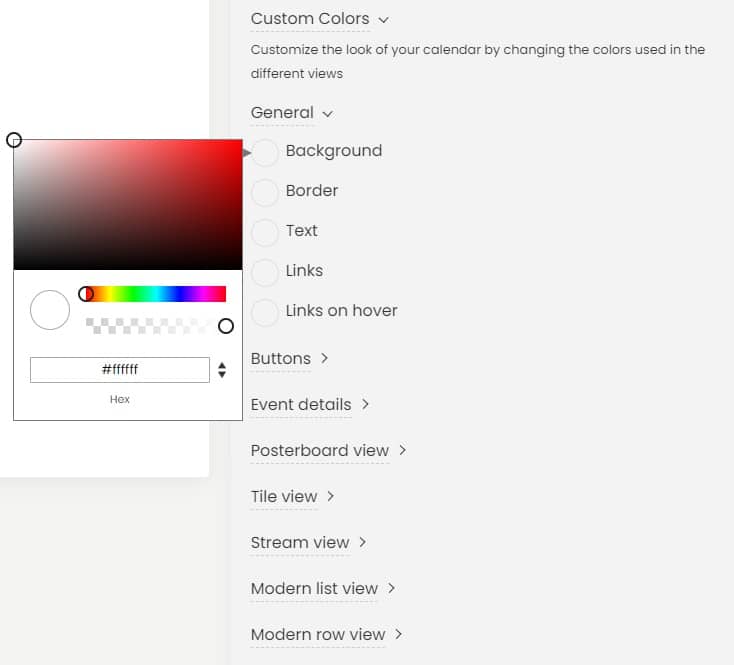
8. Custom Colors
If you want to personalize your events calendar even more, you can customize its look and feel by changing the colors used in different parts, such as the background, border, text, and buttons.
You can choose the colors by clicking on the desired option. A color picker box will appear allowing you to pick your color. You can either drag the colour selector or type the hex code of the desired color on the appropriate box. Moreover, you can click on the “Restore Default” button to restore the color from the original template.
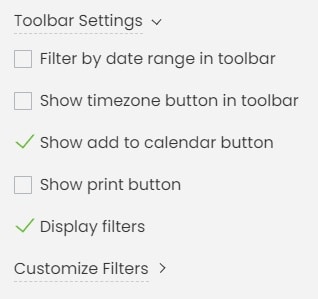
9. Toolbar Settings
Aside from personalizing your online event calendar and event pages, you can also customize your toolbar. By changing the toolbar settings you can change how the toolbar on top of your calendar will be seen by your website visitors.
You can check the options and choose to hide or display them, as listed below:
Furthermore, you can choose the filter that will appear on your public calendar to facilitate event search. For example, categories, tags, venues, organizers and any other custom filter created by you.

Lastly, filters are displayed in the toolbar, based on the top-to-bottom sequence in which they are selected within your settings. To modify the filter order in the public toolbar view, simply uncheck all the filters, then recheck them in the desired order. The system will display the filters in the order you select them, ensuring they appear exactly as intended for users.
10. Advanced Design Customization
The Advanced Customization menu allows you to customize the design of your calendaring software even more. The options are: custom metadata, custom sections and custom style sheet (CSS).
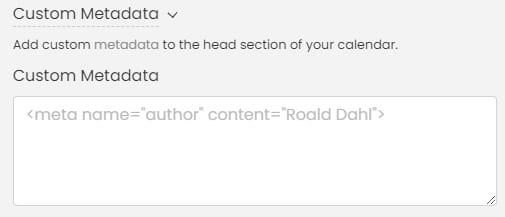
Custom Metadata
If you wish to have the same metadata for both standalone and embedded calendars, you only need to fill the first box and leave the “Embed Customization” checkbox unchecked.
If you check the Embed Customization, a second box will appear and you will need to add custom metadata. By doing that, the embed calendar will have different metadata than the standalone calendar.
Then, click the Save button to record your new personalized calendar design settings.
Custom Sections
Custom header and footer sections allow you to place text, image, or ads at the top or bottom of your calendar. You can do this for your standalone calendar (hosted on time.ly) and your embedded calendars (iFrame embed).
If you wish to have the same customizations for both standalone and embedded calendars, you only need to fill the first two boxes and leave the Embed Customization checkbox unchecked.
If you check the Embed Customization, two more boxes will show and you will need to add custom code to each one. By doing that, you will be able to customize the embed calendar differently than the standalone calendar.

Custom Style Sheet (CSS)
Custom style sheets give you more control for styling your calendar. You can change only some small parts of your calendar’s look and feel or change it completely with the help of CSS. You can do this for your standalone calendar (hosted on time.ly) and your embedded calendars (iFrame embed).
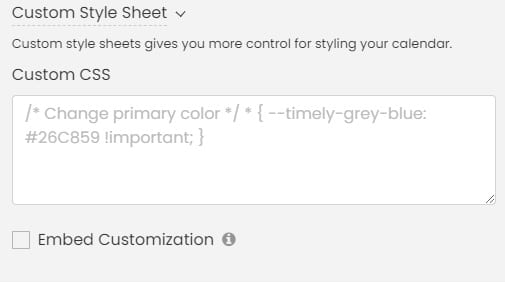
If you wish to have the same custom style sheets for both standalone and embedded calendars, you only need to fill the first box and leave the Embed Customization checkbox unchecked.
If you check the Embed Customization, a second box will appear and you will need to add a custom style sheet. By doing that, the embed calendar will have a different custom style sheet from the standalone calendar.
Please remember to add custom styles to classes that start with a “timely-” prefix, those classes are more likely to remain the same with every new release.
11. Save
Always remember to click on the Save button to record your new personalized calendar design settings. If you do not wish to save the changes you’ve made then click the Reset button.
12. What’s Next?
Once you’ve finished the design customization of your calendar, you can go ahead and create a new event or import events to populate your calendar. Then, set up the embed code for your calendar so you can install it into your website.
For more user guidance, please go to our Help Center. If you have any questions or need additional assistance, do not hesitate to contact us. Alternatively, you can open a support ticket from your Timely account’s dashboard.