With a Timely account, you can easily create events to populate your online events calendar. In this post, you will learn how to create events, save them as draft, schedule publication and publish them to your calendar.
Watch the instructions on video format, for a quick and easy walkthrough of the content:
1. Several Ways to Create Events on Timely Dashboard
After signing in into your Timely account, the first item on the left sidebar is the menu Events. Click on +Add Event to create an event. You can also find an +Add Event shortcut in the top right corner of your dashboard.


2. The Right Content to Create an Event
When creating an event, there is lots of content you can add to your event post to enrich your users’ experience. From your Timely event management software dashboard, you can add the following content:
- Event title;
- Date and time;
- Timezone;
- Recurrence;
- Venue details;
- Event description;
- Featured image;
- Featured event;
- Categories, tags, and filters;
- Cost and tickets;
- Social media automations;
- Event visibility;
- Event status; and
- Internal notes
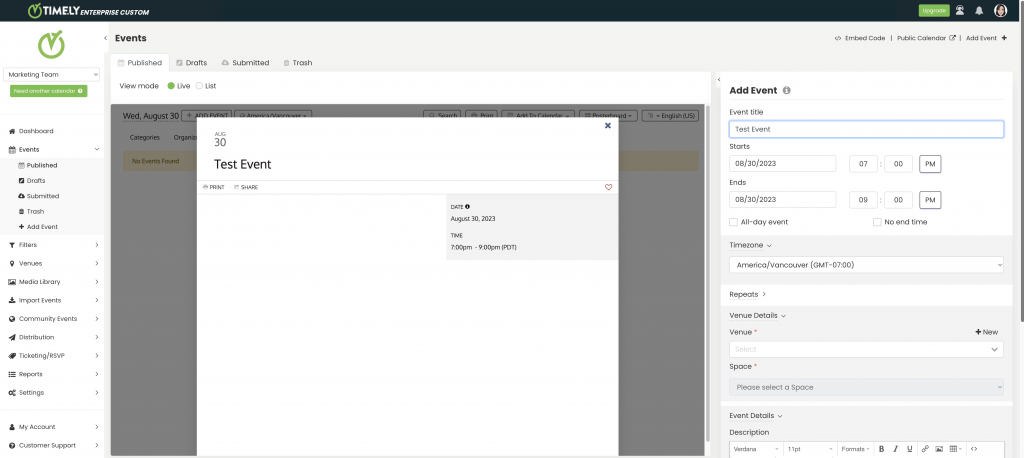
You can create and edit your new event, while seeing how it will look like with our preview visual display.

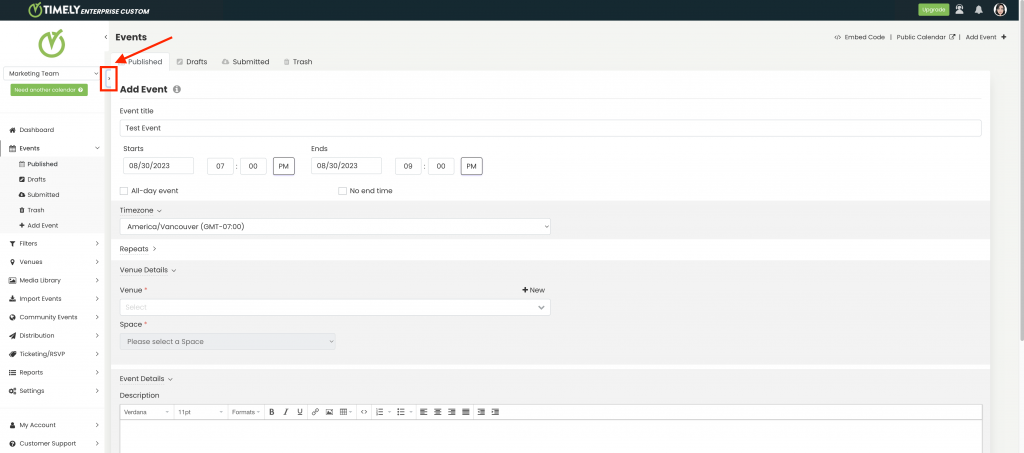
If you wish, you can expand the event form so it occupies the full screen, giving you more working space to create your event. Just click the expand or collapse button on the top left corner of the form to toggle between showing and hiding the event preview.

Continue reading to learn how to create an event on your Timely event management software.
2.1 Event Title
You can enter any text to be the title of your event. The title may not be greater than 1,000 characters. However, we recommend a shorter title in order to improve your event SEO.
2.2 Date and Time
Events can have a fixed date, thus happening on a single day. Events can also have a range date, therefore occurring during several days. In this case, events will have different start and end dates.
If the event is a multi-day event, on certain calendar views, the event will appear on every day during that multi-day event, with a note saying “Day X of Y”.
You can choose “All-day event” just by clicking on the appropriate checkbox. No time will be needed in this case, and a note will appear on the calendar view that the event is an all day event.
In addition, you can choose the “No end date” for your event. In this option, you will not be able to select the end date or end time for your event.
If you are interested, learn more about how to create one day and multi day events.
2.3 Timezone
You can choose a different timezone for a specific event just by clicking on the dropdown menu and selecting the appropriate time zone for the event.
If no timezone is selected, the event timezone, by default, will be the calendar timezone. The default timezone can be changed in the Settings Tab, in General, Calendar Date & Time options.
For more information about this option, please refer to the how to set up your account general settings and how to set up multiple time zones for your calendar and events help pages.
2.4 Repetition Settings for Recurring Events
Use the “Repeats” setting to make your event recurrent. You can choose from “Daily”, “Weekly”, “Monthly”, “Yearly”, and “Custom” recurrence. The “Custom” recurrence allows you to choose individual dates for that event.
If you choose one of the recurrence types, you will also have the option to “Exclude” certain dates. “Exclude” has the exact same recurrence types as “Repeats” but the opposite action.
For example, you can choose to “Repeat” a “Weekly” event on Monday, but to “Exclude” “Monthly” the first Monday of the month and the Christmas Monday, using “Custom”.
If you would like to learn more, check the how to create recurring events help guide.

2.5 Venue Details
With a Timely account, you can create any type of event, including in-person, virtual and hybrid events. Indeed, you can choose a venue for your event, and it can be either online or have a physical address.
If you have already created a venue, you can choose it by clicking on the dropdown menu and selecting the appropriate venue. You can also create a new venue by clicking on the “+ New” button and add the appropriate information for the venue.
For more information, please go to how to create in-person, virtual and hybrid events help page.
2.6 Event Description
You can enter a description of your event in the text editor. There are several formatting tools, including bold, italic, align, link, insert image, insert code, numbering, bullets, and headings.
Check out our dedicated guides on How to Add Images to your Event Posts and How to Add SlideShare Presentations to Your Event Posts for step-by-step instructions on incorporating engaging multimedia content into your event descriptions. Stay ahead with our up-to-date resources and make your event listings more interactive and visually appealing.
Additionally, our AI Content Assistant feature enhances the efficiency of course creation by providing suggestions and generating dynamic content for course descriptions, saving time and effort for educators and course creators.

2.7 Featured Image
Make your event stand out in your events calendar by adding a featured image to your event post. You can upload a new image or use a previously uploaded image from your Media Library. We suggest following our image guidelines to improve the event discovery experience for your audience.
If you do not pick a featured image for your event, your public calendar will display the Timely logo. However, if you create and select an event category, and the category has an image, this will be used as the event featured image.

2.8 Featured Event
Depending on your subscription plan, you might be able to highlight certain events as featured events on the public interface of your calendar of events. If you are interested, learn how to create featured events in your Timely events calendar.

You can also choose to “Display featured event at the top of the calendar.” Enabling this option will change the behavior. The featured event will be showcased at the top of the calendar, while other events will follow the chronological order. If the option is disabled, the event will still have the “Featured” tag and its border highlighted, but the view will maintain the chronological order.

All filters, such as date range, search, organizer, tags, and venues, will be considered. If a highlighted event doesn’t meet the filter criteria, it won’t be displayed. If there are multiple featured events, they’ll be listed at the top of the calendar in chronological order.
For recurring events, all instances will be shown at the top of the calendar. Alternatively, if the “Display recurring event only once” setting is enabled, only the next recurrence will be displayed at the top.
2.9 Categories, Tags, and Filters
To organize your new event within your events calendar, you can connect it to the available filter groups (or taxonomies). According to your plan, your event may have some or all of the following filter groups available:
- Categories;
- Tags;
- Organizer; and
- Custom filter groups or taxonomies created by you (i.e. Band, Artist, Hashtag, etc).
You can choose for your event a previously created value for each of them, choose “New” to create a new value, or “Edit” to update or delete a selected value filter group.
If you are interested, we recommend checking our how to organize your calendar with filters page.
2.10 Cost and Tickets
If you want to collect registrations or sell tickets to your events using Timely event platform, feel free to add the ticketing add-on to your account by yourself or contact us if you need help.
By adding this add-on, you will be able to collect event registrations for your free events, as well as sell event tickets to your paid events. See below some of our RSVP and ticketing features:
- Tickets can be sequentially numbered and have their own price, stock, and SKU;
- Custom and unlimited price categories, including general admission and VIP tickets, time-sensitive and early bird tickets, as well as discount codes;
- Ticket availability and inventory updated automatically and in real time;
- Accept online payments with PayPal, Stripe and Square. All PCI DSS certified;
- Automatic purchase confirmation e-mails, event reminders and event change notifications;
- Absorb ticketing fees or pass them on to your patrons;
- Manage attendees, ticket sales, invoices, refunds, and cancellations;
- Allow at-home ticket printing option to your customers;
- Scan QR code from printed ticket or mobile phone in real-time to control fast check in at the door.
To learn more, check all the available event software features.
2.11 Social Media Automations
Depending on your subscription plan, you might be able to post your events automatically on social media. Currently, we support event post automations with Facebook, and LinkedIn.
2.12 Event Visibility
Enhance your event’s reach with Timely’s versatile visibility options. Tailor your event’s exposure by selecting between Public and Private settings, ensuring it reaches the right audience while maintaining your desired level of exclusivity.
By default, all events are marked as Public. By making an event Private, only logged users will be able to see the published event on the calendar and access its details. This is particularly useful for exclusive gatherings, internal meetings, or events not open to the public.
2.13 Event Status
Depending on your plan, you can set up and change the status of your event by choosing the appropriate option in the Event status dropdown menu. You can also automate this task by enabling dynamic event status.
If you are interested, we recommend you check the how to set up and change the event status of your events help page.
2.14 Internal Notes
Depending on your subscription plan, you might be able to add internal notes to your events. The purpose of this feature is for you to have relevant internal event information at hand within our system, but keep it confidential. You can add any kind of note. It will be visible only to you and your team.
3. Schedule, Publish, Save as Draft, or Reset your Event Post
At the bottom of the edit event area, you have the option to schedule the event post publication. If that is the case, simply click on Schedule Event Publication, and select the date and time for publication.

Then, just click on Save as Draft. The new event post will be saved to your Draft folder and will be published as scheduled.
Alternatively, you can immediately publish your event post to your online event calendar, save it as draft, or reset it to remove all the changes you have made.

Need Additional Help?
For further guidance and support, please visit our Help Center. If you have any inquiries or need assistance, don’t hesitate to contact our customer success team by opening a support ticket from your Timely account’s dashboard.
In case you require additional assistance in implementing and using Timely event management system, we are pleased to assist. Explore all the professional services we can offer you, and get in touch with us today!