
With Timely, you can restrict ticket purchases and RSVPs to a specific list of invitees. When invite-only registration is enabled, only your guest list will be able to register for the event. This is ideal for private conferences, VIP experiences, and any event where access control matters.
This guide explains how to set up invite-only registration for your events.
1. What is invite-only registration?
Invite-only registration is a ticketing setting that limits registration or checkout to people included in an uploaded invitee list. When the setting is active, Timely checks the attendee email address against the uploaded list before allowing checkout to continue.
This feature applies per ticket or RSVP type. That means you can restrict one ticket type while keeping other ticket types on the same event open to the public.
2. Benefits of invite-only registration
Invite-only registration helps you manage private or limited-access events without manually reviewing every registration. The main benefits include:
- Restrict access to a curated list of attendees, ensuring only intended guests can register or purchase tickets.
- Reduce manual review by automatically blocking checkout for email addresses that are not on your invitee list.
- Reach your invitees directly by triggering automatic invitation emails at the moment you publish the event.
- Control access at the ticket type level without affecting other ticket types or events.
- Use the setting for paid and free events, including event ticket and RSVP ticket types.
3. How to set up invite-only registration in Timely
You can enable invite-only registration while creating a new event or editing an existing one. The setting appears inside the Cost and Tickets section after you select a ticket type.
3.1 Enable invite-only registration
- Log in to your Timely account.
- Navigate to the desired event, or create a new one.
- Scroll down to the Cost and Tickets section.
- Select your desired ticket type. Invite-only registration is available for both free and paid events.
- Once a ticket type is selected, locate the Invite-only registration checkbox.

- Enable the checkbox to activate invite-only mode for that ticket type.
- Download the Invitee list CSV template, add the invitee emails and upload the list back.
- Select the option “Send invitation when publishing the event” to enable an automated email notification to be sent to the provided attendee list. Or leave it unchecked.
- Save the event.
Note: Invite-only registration is configured per ticket type, not per event. If your event has multiple ticket types, you can choose to restrict only specific ones.
3.2 How to upload your invitee list
Once invite-only registration is enabled, you need to upload a CSV file containing the email addresses of all allowed attendees. Timely provides a template to ensure the file is formatted correctly.
- With invite-only registration enabled, click Download Template file.
- Open the downloaded CSV file in a spreadsheet editor (such as Microsoft Excel or Google Sheets).
- Enter the email addresses of your invitees, one per row, in the designated column. Do not modify the column headers.
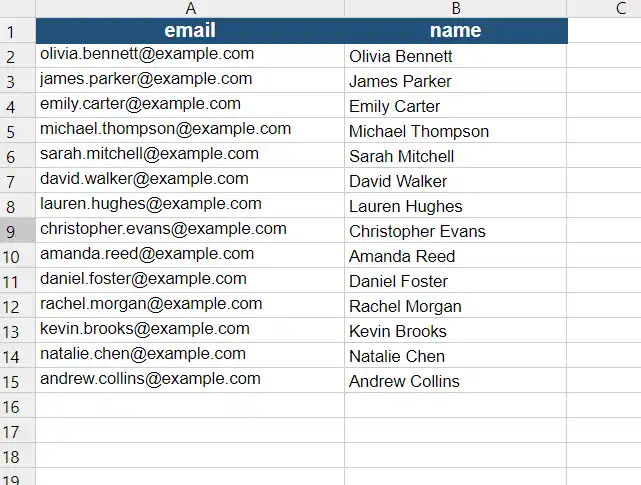
- Save the file in CSV format.
- Then, return to the event editor and click Upload Invitee List.

- Select your saved CSV file and confirm the upload.
Tip: To add or replace invitees later, simply upload a new CSV file. The new list will replace the previous one entirely. Make sure your updated file includes all intended invitees, not just the new additions.
Warning: If you upload a CSV that is missing required columns or contains formatting errors, the upload will fail. Always use the provided template to avoid issues.
3.3 Send invitation emails automatically
Timely can send an automatic invitation email to everyone on your invitee list at the moment you publish the event. This option appears alongside the invite-only registration settings.
- With invite-only registration enabled and your invitee list uploaded, locate the Send invitation when publishing the event checkbox.
- Enable the checkbox to activate automatic email sending.

- Complete any remaining event details and click Publish. Timely will send an invitation email to each address on your uploaded list, notifying them that the event is live and they have been invited.
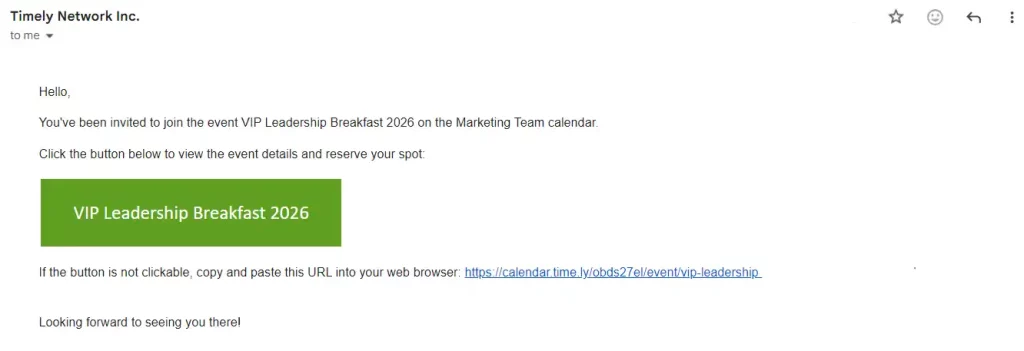
Note: Invitation emails are sent once, at the time of publishing. If you add new invitees after publishing, you will need to resend invitations manually. This checkbox does not trigger re-sends for subsequent CSV uploads.
4. How the Public View behaves for non-invitees
When invite-only registration is active for a ticket type, your public events calendar enforces access control automatically. Attendees who are not on the invitee list will not be able to complete their registration or ticket purchase.
When a visitor attempts to check out using an email address that is not on the invitee list, they will be prevented from proceeding. Only email addresses included in the uploaded CSV will be allowed to complete the checkout flow for that ticket type.

Note: Other ticket types on the same event that do not have invite-only registration enabled remain fully accessible to the public. Access control only applies to the specific ticket type where it is configured.
For more information on managing your event tickets and registration options, see our guides on How to Set Up Cost and Tickets for your Events and How to Register or Sell Tickets Onsite Using Point of Sales.
Need Additional Help?
For further guidance and support, please visit our Help Center. Additionally, if you have any inquiries or need assistance, don’t hesitate to contact our customer success team by opening a support ticket from your Timely account’s dashboard.
In case you require additional assistance implementing and using the Timely event management system, we are happy to assist. Explore all the professional services we offer, and feel free to get in touch with us today!