With a Timely account, you can easily set up event registration / RSVP for your free events. If you are running a free event, you can use “Event Registration / RSVP” setting for your event listing. This feature is particularly useful if you do not want your attendees to purchase a ticket, but still want to know in advance who is coming to your event. Learn all the steps here.
1. Event Registration / RSVP Basic Settings
Knowing in advance who is coming to your event can help a lot with event planning. With Timely event RSVP software, you can easily collect pre-registrations and RSVPs for your events. Moreover, since the system does not allow the same spot to be reserved by more than one person, it prevents overbooking. If you do not have this feature in your plan, contact us to upgrade your account.
After logging into your account, go to the Events menu. You can create a new event or select the event you want to add the pre-registration feature.
1.1 Create your RSVP Type
First, go to the Cost and Tickets section of your event, where you find all the RSVP and ticketing options. Then, select Event Registration / RSVP on the dropdown menu, just below “Free Events”. A panel will show up. You can click the plus button to add your first ticket block.

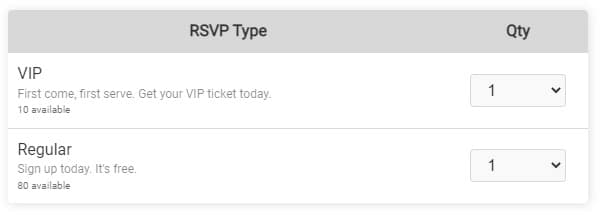
Give a name to your ticket block and add a short description. Please note that this information will be visible to your audience in the event page.

You can add as many ticket blocks as you see fit. For example, you can add an adult ticket, a children ticket and a senior ticket. You can also add VIP ticket with limited availability, and regular tickets with more spots available.
1.2 Add Additional Information
You can add additional information to each one of your ticket blocks. This information will not be visible to your audience in the event page. However, it will show up on the automated confirmation emails, and PDF ticket they receive after registering for your event. For more information, check how to add additional information to tickets, RSVPs, emails and PDF templates.
If you are hosting a free virtual or hybrid event, you can add an online meeting link as additional information. As a result, the link will appear in your confirmation emails and PDF tickets. If you want to learn more, read how to add an online meeting link to tickets and emails.

1.3 Limit Ticket Availability
Setting up ticket limits for your event is the best way to keep track of your events’ popularity and be prepared. If you are planning your event for a specific venue or are planning to serve food and drinks to your guests, you don’t want it to be overcrowded or uncomfortable. Knowing in advance how many people will attend your event helps you to plan your venue, catering, parking lot or any additional services you may offer.
On your Timely account, after naming your event registration ticket and adding additional information, set the ticket limits. Add the maximum number of tickets available and the maximum number of tickets a person can get per registration, on the respective fields. If you do not have a limit, simply click on the Unlimited checkbox.

When you set a number of tickets for your event, Timely event registration software will update your ticket inventory automatically, every time a spot is reserved. When the number of tickets you set up is over, the event will be considered “sold out”. Consequently, no one will be able to register for that particular event. However, if you check the Unlimited box, Timely event reservation system will accept reservations from guests indefinitely.
Note that you can change the number of tickets available at any time. You just need to edit your ticket settings on the Costs and Tickets section.
At checkout, your registrants can see how many spots are still available. As people register for your events, the quantity of spots available updates automatically there too.
1.4 Limit Number of Tickets Per Registration
While configuring your ticket preferences, prices and description, you can also set the maximum quantity of tickets available per registration. In other words, this functionality limits how many spots on your event a person can reserve with a single registration.

By default, our event RSVP software will always limit the number of tickets per registration to ten (10) tickets. If you want to change this setting, just type the right number in the appropriate box.
1.5 Create a Waiting List for Your Event
To accommodate potential attendees beyond your initial capacity, you can set up a Waiting List. A Waiting List enables interested individuals to register for your event even when it’s full. If a spot becomes available due to cancellations or changes, those on the Waiting List can have the opportunity to attend.
To learn how to create a Waiting List for your event, we have a comprehensive guide that walks you through the process step by step. Check out our post How to Create a Waiting List for Your Event. This guide will help you configure the Waiting List settings and seamlessly integrate it into your event registration process.

Once your Waiting List is set up, knowing how to effectively manage it is crucial. Learn valuable insights and strategies for handling Waiting List subscribers in our post How to Manage Waiting Lists and Subscribers. This guide provides practical tips, from prioritizing registrations to manually confirming attendance, to ensure a smooth and efficient management of your Waiting List.
1.6 Event Registration Start and End Date
By default, all events will be available for online registration once the event is published. However, you can set up a different event registration start and end date and time.
To do so, simply use the dropdown menus. For the beginning of event registrations, you can set up a custom date, in weeks, days, hours, and even minutes before the event begins. Similarly, you have the option to end registrations when the event starts, by the end of the event, or customize the date and time.

With this feature, you have more control over your RSVPs and their availability to the public.
1.7 Block RSVP Availability
Despite the level of preparation invested into any event, unanticipated situations will likely occur. Consequently, event planners need to have the proper tools and techniques to respond to such occurrences professionally.
If a free event with online registration requires last-minute changes, Timely has the perfect solution. Our software makes it easy to alter event registration availability, even after tickets have been made available to the public for booking.
For more information, check our user guide How to Block RSVPs and Ticket Availability for Your Events.
1.8 Event Registration Status
In addition, you can set the status of each of your event registration types to inform your audience. The options are:
- Open
- Canceled
- Ended
1.9 Deleting RSVP Ticket Blocks
You can use the delete button at the bottom of the section to remove a specific ticket block. This step has to be performed individually by ticket block. In other words, you have to delete them one by one.
2. Event Registration Custom Questions
Sometimes event organizers need to ask questions or confirm eligibility prior to accepting registration of an attendee. For example, if you are collecting RSVP to an event tailored to an adult audience where alcohol will be served, you can ask participants to confirm if they are over 21 years of age.
With Timely, you can request any information from customers before they sign up for your event. Just create a customized booking questionnaire using custom fields.
Currently, there are four custom field types:
- Yes/No answer: requires registrants to mark Yes or No to respond to the question.
- Text answer: requires registrants to answer the question with a sentence.
- Checkbox answer: requires registrants to check the box if the sentence is applicable or to confirm understanding.
- Dropdown answer: provides a user-friendly interface to help users select the desired item from a list of available options.
- When creating a dropdown custom field, you’ll see an ‘Add choices’ option, where you can enter up to 20 choices, each on a separate line.
- You can also enable the ‘Multiple Choice’ option, allowing users to select more than one answer. When configuring the number of choices available, you can specify ‘Unlimited,’ an ‘Exact Number,’ or a ‘Range’ of selections.

In addition, you can add links to any custom field, and make questions mandatory or optional.
If you want to use this feature for your event registrations, learn more on how to create and event booking form with custom fields.
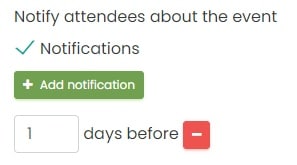
3. Event Registration Email Notifications
A great way to keep your attendees informed about the upcoming event is to add notifications to your event. You can add as many notifications as you see fit. By confirming this setting, the system will send automated emails to your event participants reminding them about the event.
If you want to customize the notification emails, you can change the respective template. For more information, read this helpful user guide: How to Customize Event RSVP and Ticket Email Templates.
4. Agree with the Terms and Save your Changes
After creating the registration / RSVP for your event, make sure you check the I agree to all Terms checkbox to proceed.

The final step is to scroll down the page and hit the Publish button. You can also click on the button Save as draft in case you want to review your event and publish it later.

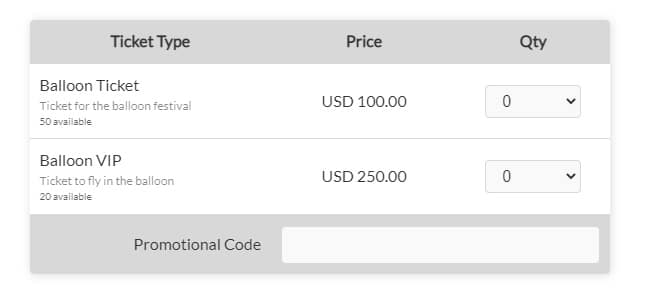
5. Event Registration Checkout in your Event Page
After setting up the event registration / RSVP for your free event, check how it looks in your public calendar. The registration / RSVP checkout box with your ticket types will show up exactly as you have configured them.
With Timely, you can not only collect online registrations for your free events, but also time slot-based registrations for free events, and sell event tickets, and time slot tickets for your paid events.
Need Additional Help?
For further guidance and support, please visit our Help Center. If you have any inquiries or need assistance, don’t hesitate to contact our customer success team by opening a support ticket from your Timely account’s dashboard.
In case you require additional assistance in implementing and using Timely event management system, we are pleased to assist. Explore all the professional services we can offer you, and get in touch with us today!