With a Timely account, you can easily create an event booking questionnaire and ask specific questions to attendees prior to event registration, booking request or ticket purchase. You can create a form with custom fields not only to get to know your audience better, but also to collect more information about their preferences and special requirements. In this post, you will learn how to create an event booking form with custom fields.
1. What are Event Booking Forms?
Event booking forms provide a dynamic and adaptable approach to engaging with your event registrants. By crafting a custom questionnaire, you can enhance the registration process, gather essential information, and ensure your events align with your attendees’ preferences and requirements.
Event booking questionnaires can be used for many purposes. For example:
- Collect additional information from your attendees for marketing purposes.
- Collect additional personal information to confirm attendees’ eligibility to the event.
- Ask attendees about their preferences or special requirements, such as food allergies.
- Collect registrants’ acknowledgement and consent about event rules and conditions.
- Collect registrants’ consent or acceptance of legal documents, for example, terms of service, privacy policy, insurance, or agreements.
- Offer additional services, such as special assistance for disabled persons.
With Timely event booking system, you can use custom fields to ask questions to your event registrants before they finalize their event registration, booking request, or ticket purchase. These fields were designed to collect additional information from your audience, as well as their acknowledgement or consent regarding registration conditions. Once you create custom questions for an event, they will appear on the check-out page of that particular event.
Let’s now explain how to create a customized event booking questionnaire.
2. How to Create a Custom Event Booking Questionnaire
As mentioned above, the Custom Fields feature is part of Timely event registration, booking request and ticketing products. This means that you need to create the RSVP, booking request or ticket for your event prior to creating an event booking form with customized questions.
2.1 Creating an Event RSVP, Booking Request or Ticket
Here are the step-by-step instructions to create an event RSVP, booking request or ticket:
- Log in to your Timely account.
- In the main menu on the left, click on Events and + Add Events. Alternatively, you can click on + Add Events shortcut on top of your Timely dashboard.
- Create your event by adding the relevant event information. For additional instructions, you can check the post How to Create an Event.
- Next, scroll down until you find the Costs and Tickets section. Select the appropriate ticketing option by following the post How to Set Up Cost and Tickets for your Events.

Note: The Custom Fields feature is only available for Event Registration/RSVP, Time Slot Registration/RSVP, and RSVP & Time Slot Booking Requests for free events, and Event Ticket and Time Slot Ticket for paid events.
2.2 Creating Custom Fields
After making a selection on the Cost and Tickets dropdown menu, as explained above, you will have the option to create custom fields at the ticket level or at the ticket block level.
Using custom fields at the ticket level will allow you to create one booking form per checkout, regardless of how many tickets are booked on the same transaction. In contrast, using custom fields at the ticket block level will create one event booking form for each ticket booked.
Let’s suppose one person wants to purchase 4 tickets for your event. Creating a booking form on the ticket level will make this purchaser answer your required questions only once. If you add custom fields at the ticket block level, the same purchaser will need to answer 4 different questionnaires for the same purchase.
Both options can be useful to you depending on your ticketing structure and the type of information you want to collect from your guests. You might want to ask certain questions to the ticket purchaser and other questions to the ticket holders. For instance, you may want to know where the purchaser heard about your event, and the ticket holders if they have any special needs or dietary restrictions.
2.3 Ticket Level Questionnaire
To create an event questionnaire at the ticket level, after making the selection on the Cost and Ticket dropdown menu, you will see the Booking form- ticket level section. You will also see a green + Add Field button. Click on that button to create your first custom question.

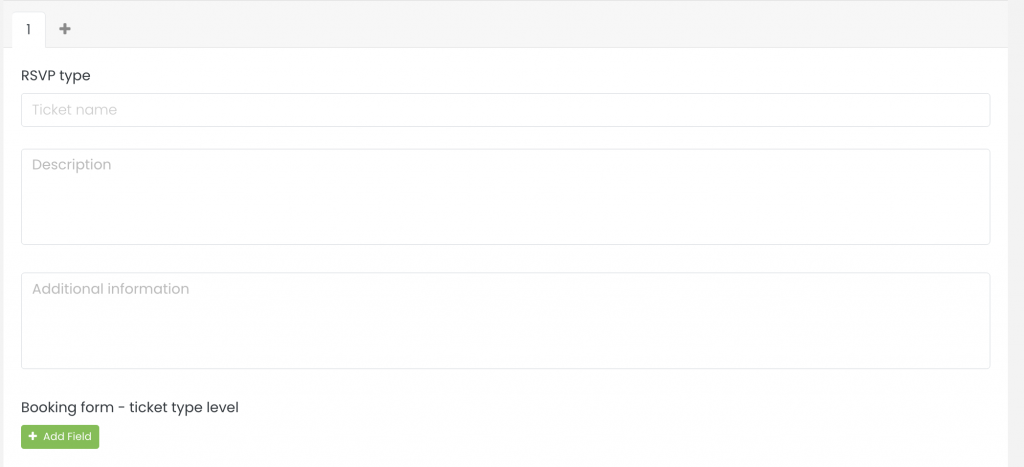
2.4 Ticket Type Level Questionnaire
If you want to create a booking form at the ticket type level, click on the + sign to create a ticket block. Give a name and description to your ticket type so your audience understands what is included. For example, you can create simple RSVP tickets, Early Bird and VIP tickets, or even offer time slot tickets.
After creating a Ticket Type for your ticket, you will see the +Add Field button to create the booking questionnaire with custom fields. Click on that button to create your first custom question.
2.5 Custom Field Types
Currently, there are three custom field types:
- Yes/No answer: requires registrants to mark Yes or No to respond to the question.
- Text answer: requires registrants to answer the question with a sentence.
- Checkbox answer: requires registrants to check the box if the sentence is applicable or to confirm understanding.
- Dropdown answer: provides a user-friendly way for users to select an item from a list of available options.
- When creating a Dropdown custom field, you will see an “Add choices” option, where you can enter up to 20 choices, each on a separate line.
- You can also enable the ‘Multiple Choice’ option, allowing users to select more than one answer. When configuring the number of choices available, you can specify ‘Unlimited,’ an ‘Exact Number,’ or a ‘Range’ of selections.

You can add as many questions as are available under your subscription plan. Just keep pressing the +Add field button to create new inquiries. The limit number of characters per question is 2000, and you can add any text you wish.
Once you finish creating your custom fields and setting up your event ticket, check the I agree with all terms box to continue. Next, publish the event, so your calendar visitors can see the event booking questionnaire on the checkout page.
Note: Some subscription plans may have a limitation on the number of custom fields available. If you reach your plan’s limit and would like to add more custom fields, please contact us.
2.6 Making Fields Optional or Mandatory
If you want to make sure that your registrants respond to the questions before finishing their registration, click the Required checkbox under each custom field created. This will make the answer mandatory. Otherwise, just leave the Required box unchecked.

2.7 Adding Links to Custom Fields
If you wish, you can also create an event booking form with a link on the custom field. You can use this feature to add any hyperlink you want. For instance, you can use the checkbox option with a link to your Terms and Conditions and ask registrants to confirm acknowledgement or acceptance to your terms.
To add a link to a custom field, follow the steps below:
- Click the +Add field button to create a new field
- Add the applicable intro text (i.e. “I agree to the”, “I consent with the”, etc.)
- Paste this code on the Custom Field area: <a href=”LINK”>TEXT</a>
- Replace the LINK text with the hyperlink for the applicable webpage. Make sure you add the new link between the quotation marks.
- Replace the TEXT text with the word or sentence you want to use as anchored text for the hyperlink.
We will use an example to clarify. Let’s say you want people who register for your event to review and acknowledge your Refund and Cancellation Policy prior to purchasing the ticket. You can do that by creating an event booking questionnaire with a custom field with the checkbox or the Yes/No answer options. Then, you add the following text and code to the custom field:
I agree to the <a href=”https://www.example.com/refund-cancellation-policy/”>Refund and Cancellation Policy</a>

By adding the link “https://www.example.com/refund-cancellation-policy/” and the text “Refund and Cancellation Policy” to the code that goes on the custom field, your audience will not see the URL “https://www.example.com/refund-cancellation-policy/”. Instead, they will only see the text “Refund and Cancellation Policy” that you added as the anchored text. Moreover, if they click on the anchored text, the applicable webpage will open on their browser as a new tab.
3. How Will Your Audience See the Event Booking Form?
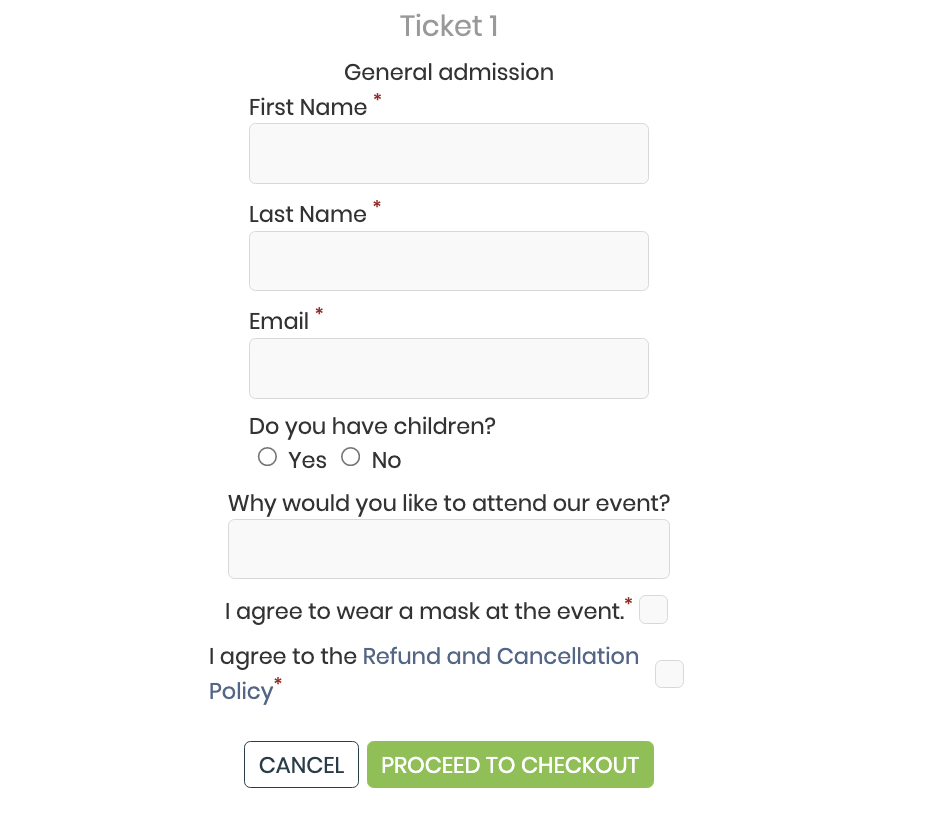
When people visit your online event calendar and click on your event post, they will see a CTA button to RSVP, request to book or purchase a ticket. Once they click on that button, a new page will open on the screen allowing them to select the ticket type and quantity they want to book or purchase.
After making the selection, they will be asked to inform their name and email address, as well as complete your customized event booking questionnaire. If any of the custom questions in the form is set up as mandatory, purchasers, and registrants will not be able to finalize their event registration without answering it.
4. Where to Find the Answers from your Event Booking Forms?
You’ve created an event booking form with custom questions, published your event, and gathered responses from attendees. Now, all you have to do is review them. There are several ways to find and manage event booking form submissions using Timely. For more information, refer to our dedicated post How to Find and Manage Event Booking Forms Responses.
Need Additional Help?
For further guidance and support, please visit our Help Center. If you have any inquiries or need assistance, don’t hesitate to contact our customer success team by opening a support ticket from your Timely account’s dashboard.
In case you require additional assistance in implementing and using Timely event management system, we are pleased to assist. Explore all the professional services we can offer you, and get in touch with us today!